
Hi! I'm Mayte CG, Rive Ambassador and designer. This new entry in the Data Binding series continues our learn-by-building approach.
Each mini-project breaks down a specific use case, with visual guides, explanations, and files to follow or compare.
If you're new to Data Binding, check out the core concepts first.
Missed earlier entries? Catch up on pt. I and pt. II.
Next time, we’ll wrap up the series with a dose of inspiration to fuel your future Data Binding adventures.
What you’ll build
You’ll build a 1-bit painting editor with two interactive parts:
A 16×16 grid of paintable cells.
A Light/Dark toggle that flips background and bit colors (white ↔ black)
Use cases:
A perfect excuse to explore what else Rive Lists can do. Spoiler: they’re not just for menus.
Key Data Binding features:
Lists (driven by a Number) | Booleans | Number-to-List Converter | Toggle Converter
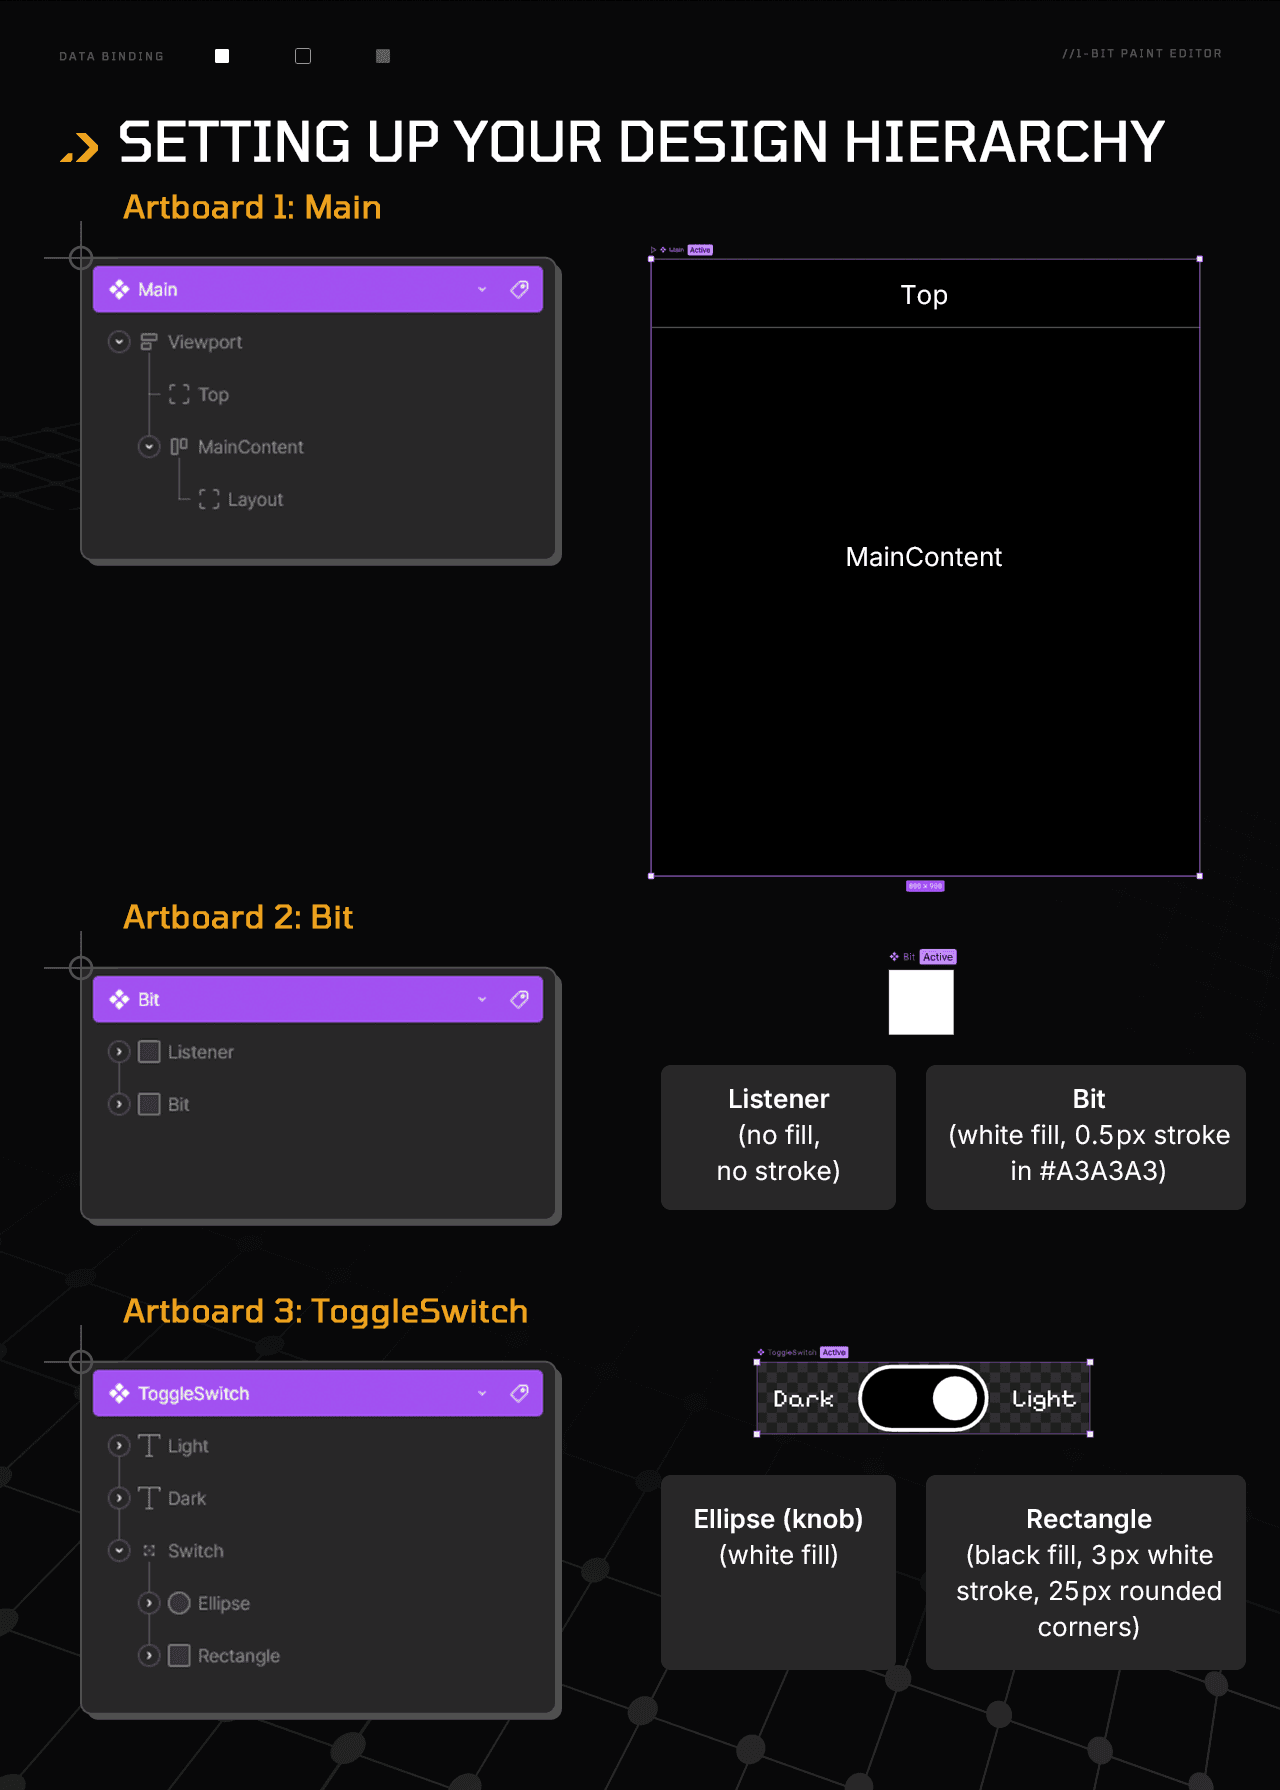
Set up the Artboard
Let’s start by setting up our canvas. We need three artboards: Main, Bit, and ToggleSwitch, configured as follows:
Main
Size: W: 800 H: 900
Background: #000000
Bit
Size: W: 800 H: 900
Background: No fill
ToggleSwitch
Size: W: 263 H: 57
Background: No fill
Follow this guide to organize your layer hierarchy:
Grab the base file
Use this file to follow along. It includes the basic design (no data or logic yet).
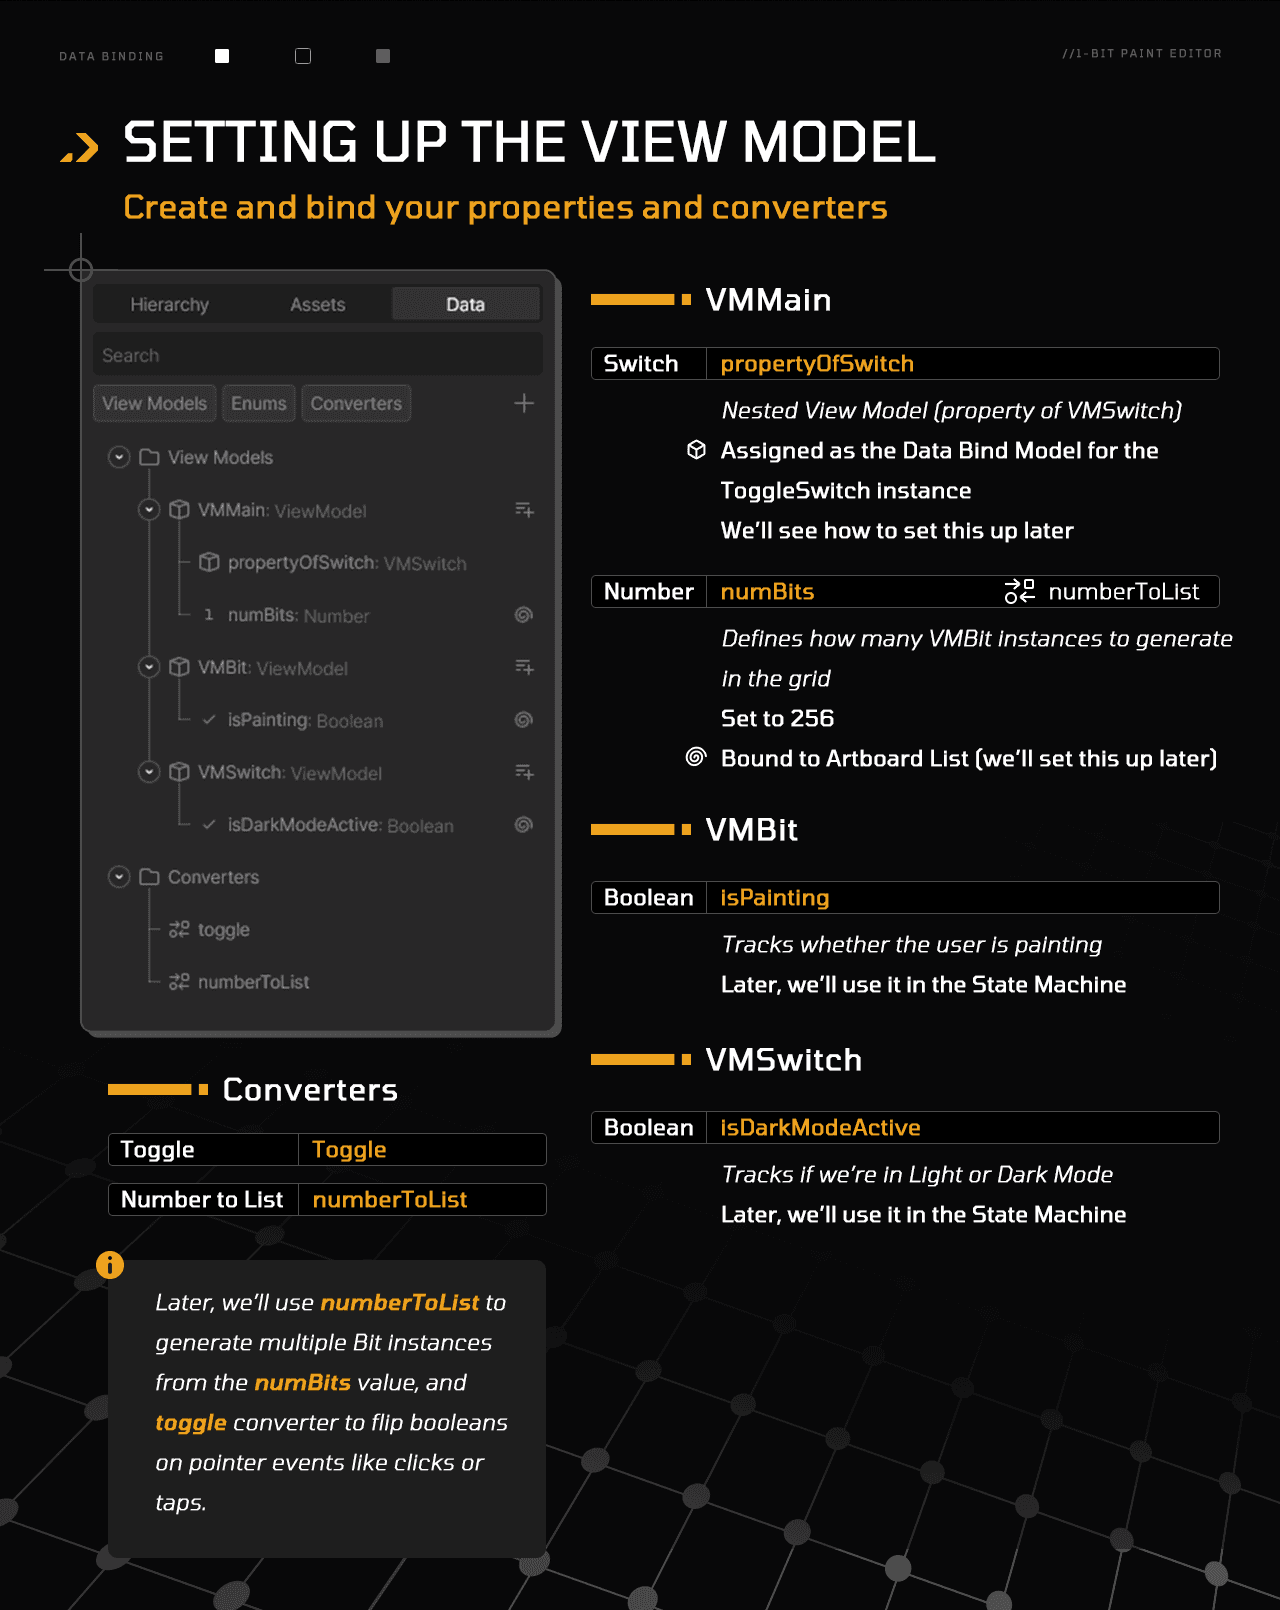
Create View Models & Converters
Next, create the data structure for the project. You'll need three View Models and two Converters set up as follows:
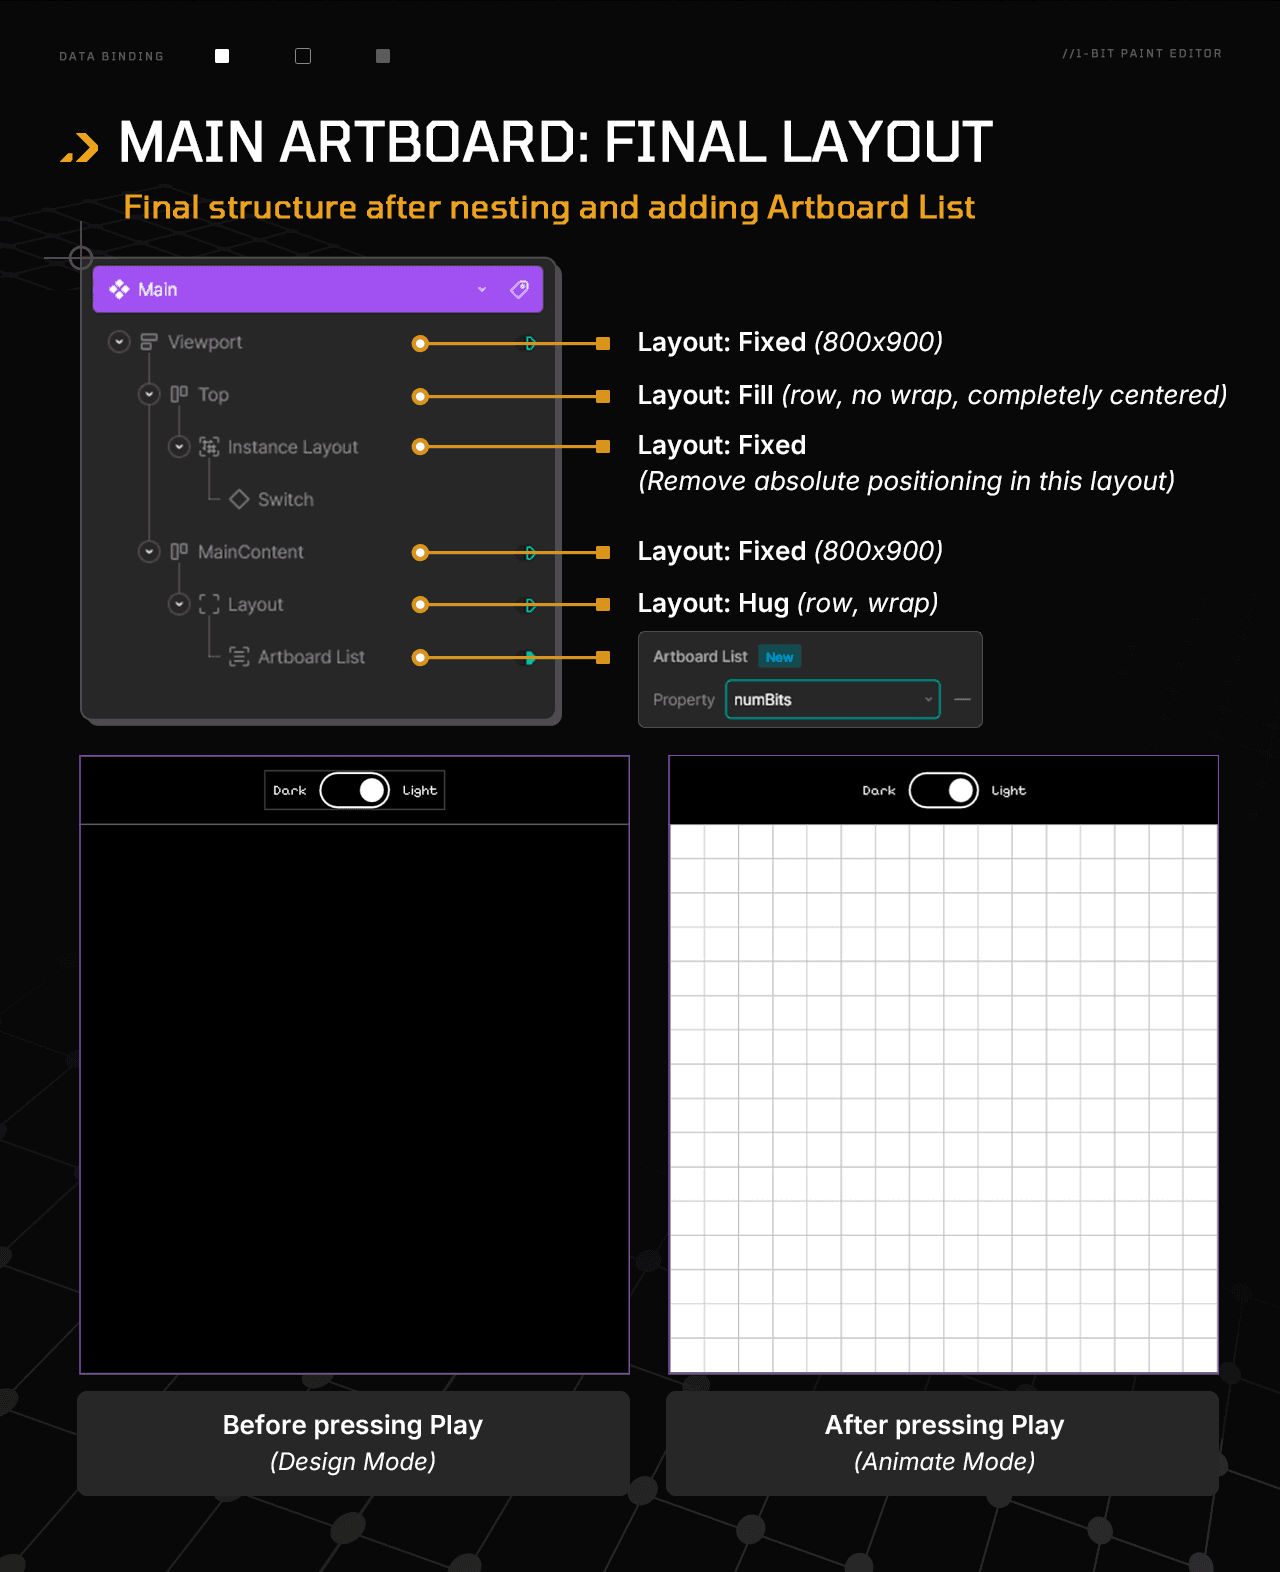
Lay out the Main Artboard:
Time to bring the pieces together:
Nest the ToggleSwitch component into the Main artboard (N → Toggle Switch).
Wrap the component in a layout so it becomes the child of an Instance Layout.
Drag the Instance Layout into the Top layout. Remove absolute positioning in the Instance Layout.
Since Top is set to fill and center, the ToggleSwitch appears perfectly centered.
Now jump to the MainContent area and select its child layout.
Click Add Artboard List in the right sidebar.
Bind the new Artboard List to NumBytes. The dropdown will turn yellow (error!). Fix it by right-clicking → Update Bind → select Number to List.
Make sure NumBits is set to 256 to generate a 16×16 grid (256 Bit instances).
Run the State Machine.
If the grid overflows in a single row, select the Artboard List’s parent layout and set it to Wrap.
Use the image below to confirm everything’s in place:
Add functionality with State Machines
With the visual structure ready, it's time to define behavior. We'll use State Machines to set up interaction logic across three artboards, each with its own timelines, listeners, and goals.
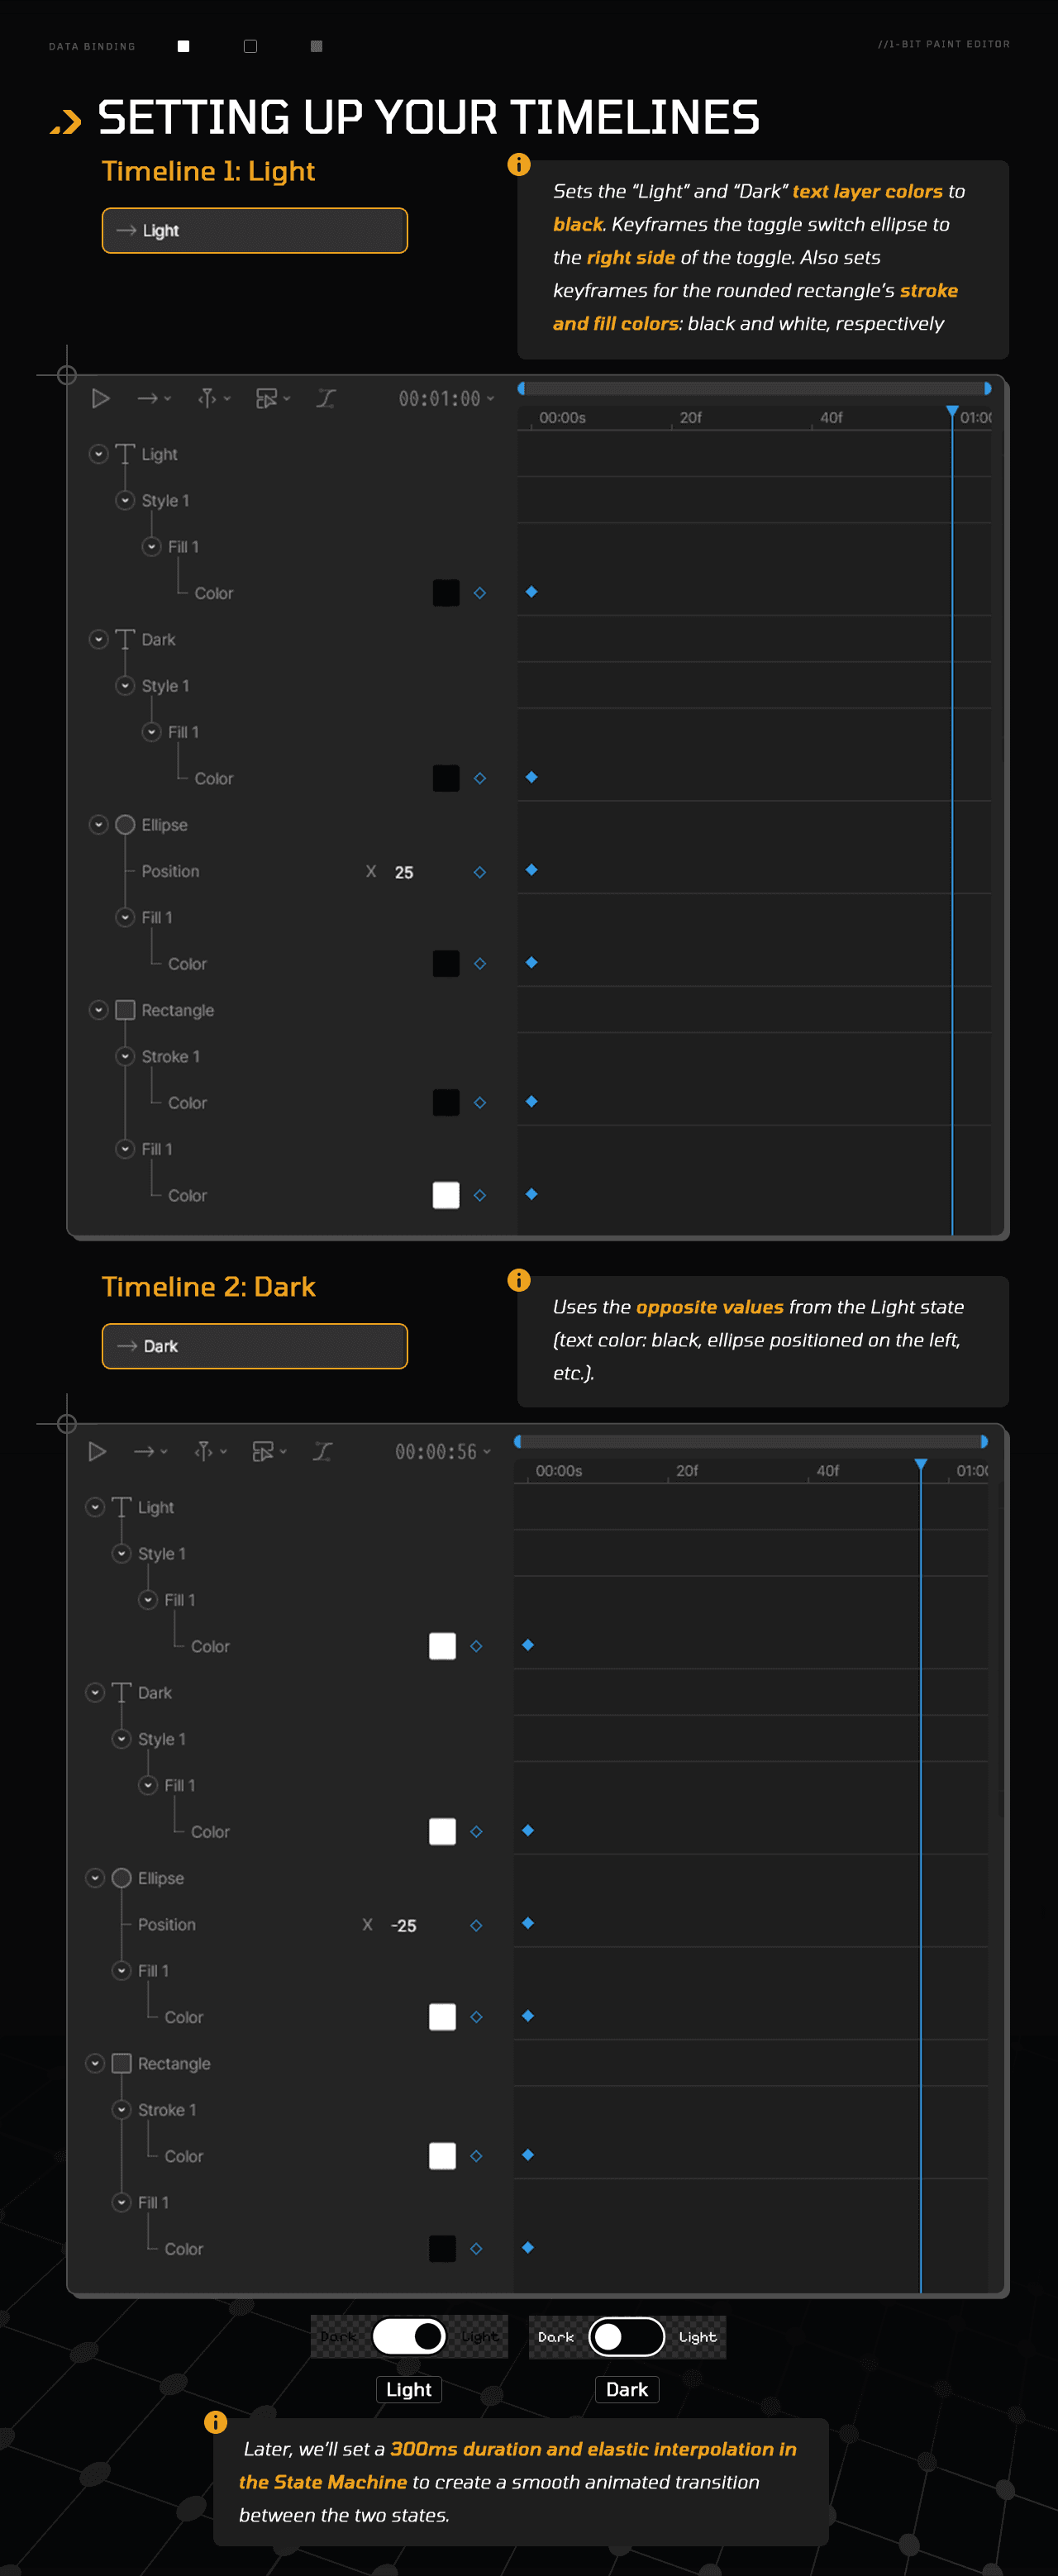
Toggle switch artboard
This toggle will switch between Light and Dark modes.
Timelines:
Two timelines control the toggle’s visual states:
Listeners:
One listener detects user interaction:
State Machine:
Follow along in the video to set it up:
Bit artboard
This sets up the “bit” item we’ll later instantiate in the Main artboard.
Timelines:
We’ll set up three timelines:
Listeners:
One listener manages interaction for this artboard:
State Machine:
Controls how the Bit reacts to clicks:
Main artboard
Our final step, where everything comes together.
Timelines:
Two timelines:
State Machine:
No listener is needed here, so we go straight to setting the State Machine:
Inspect & remix:
Download the final file to compare, explore, or remix.
Ready to take it further?
I designed these mini-projects as hackable templates. Poke around, remix, and make them yours! A few ideas:
Go from 1-bit to 8-bit: let users paint with a limited color palette.
Try different grid sizes or visual styles.
Add reference pixel art images for tracing using Data Binding Images
Check the docs or browse the 101 Data Binding tutorials to keep learning. Want company? Join the Community to ask questions or share your progress.
Hi! I'm Mayte CG, Rive Ambassador and designer. This new entry in the Data Binding series continues our learn-by-building approach.
Each mini-project breaks down a specific use case, with visual guides, explanations, and files to follow or compare.
If you're new to Data Binding, check out the core concepts first.
Missed earlier entries? Catch up on pt. I and pt. II.
Next time, we’ll wrap up the series with a dose of inspiration to fuel your future Data Binding adventures.
What you’ll build
You’ll build a 1-bit painting editor with two interactive parts:
A 16×16 grid of paintable cells.
A Light/Dark toggle that flips background and bit colors (white ↔ black)
Use cases:
A perfect excuse to explore what else Rive Lists can do. Spoiler: they’re not just for menus.
Key Data Binding features:
Lists (driven by a Number) | Booleans | Number-to-List Converter | Toggle Converter
Set up the Artboard
Let’s start by setting up our canvas. We need three artboards: Main, Bit, and ToggleSwitch, configured as follows:
Main
Size: W: 800 H: 900
Background: #000000
Bit
Size: W: 800 H: 900
Background: No fill
ToggleSwitch
Size: W: 263 H: 57
Background: No fill
Follow this guide to organize your layer hierarchy:
Grab the base file
Use this file to follow along. It includes the basic design (no data or logic yet).
Create View Models & Converters
Next, create the data structure for the project. You'll need three View Models and two Converters set up as follows:
Lay out the Main Artboard:
Time to bring the pieces together:
Nest the ToggleSwitch component into the Main artboard (N → Toggle Switch).
Wrap the component in a layout so it becomes the child of an Instance Layout.
Drag the Instance Layout into the Top layout. Remove absolute positioning in the Instance Layout.
Since Top is set to fill and center, the ToggleSwitch appears perfectly centered.
Now jump to the MainContent area and select its child layout.
Click Add Artboard List in the right sidebar.
Bind the new Artboard List to NumBytes. The dropdown will turn yellow (error!). Fix it by right-clicking → Update Bind → select Number to List.
Make sure NumBits is set to 256 to generate a 16×16 grid (256 Bit instances).
Run the State Machine.
If the grid overflows in a single row, select the Artboard List’s parent layout and set it to Wrap.
Use the image below to confirm everything’s in place:
Add functionality with State Machines
With the visual structure ready, it's time to define behavior. We'll use State Machines to set up interaction logic across three artboards, each with its own timelines, listeners, and goals.
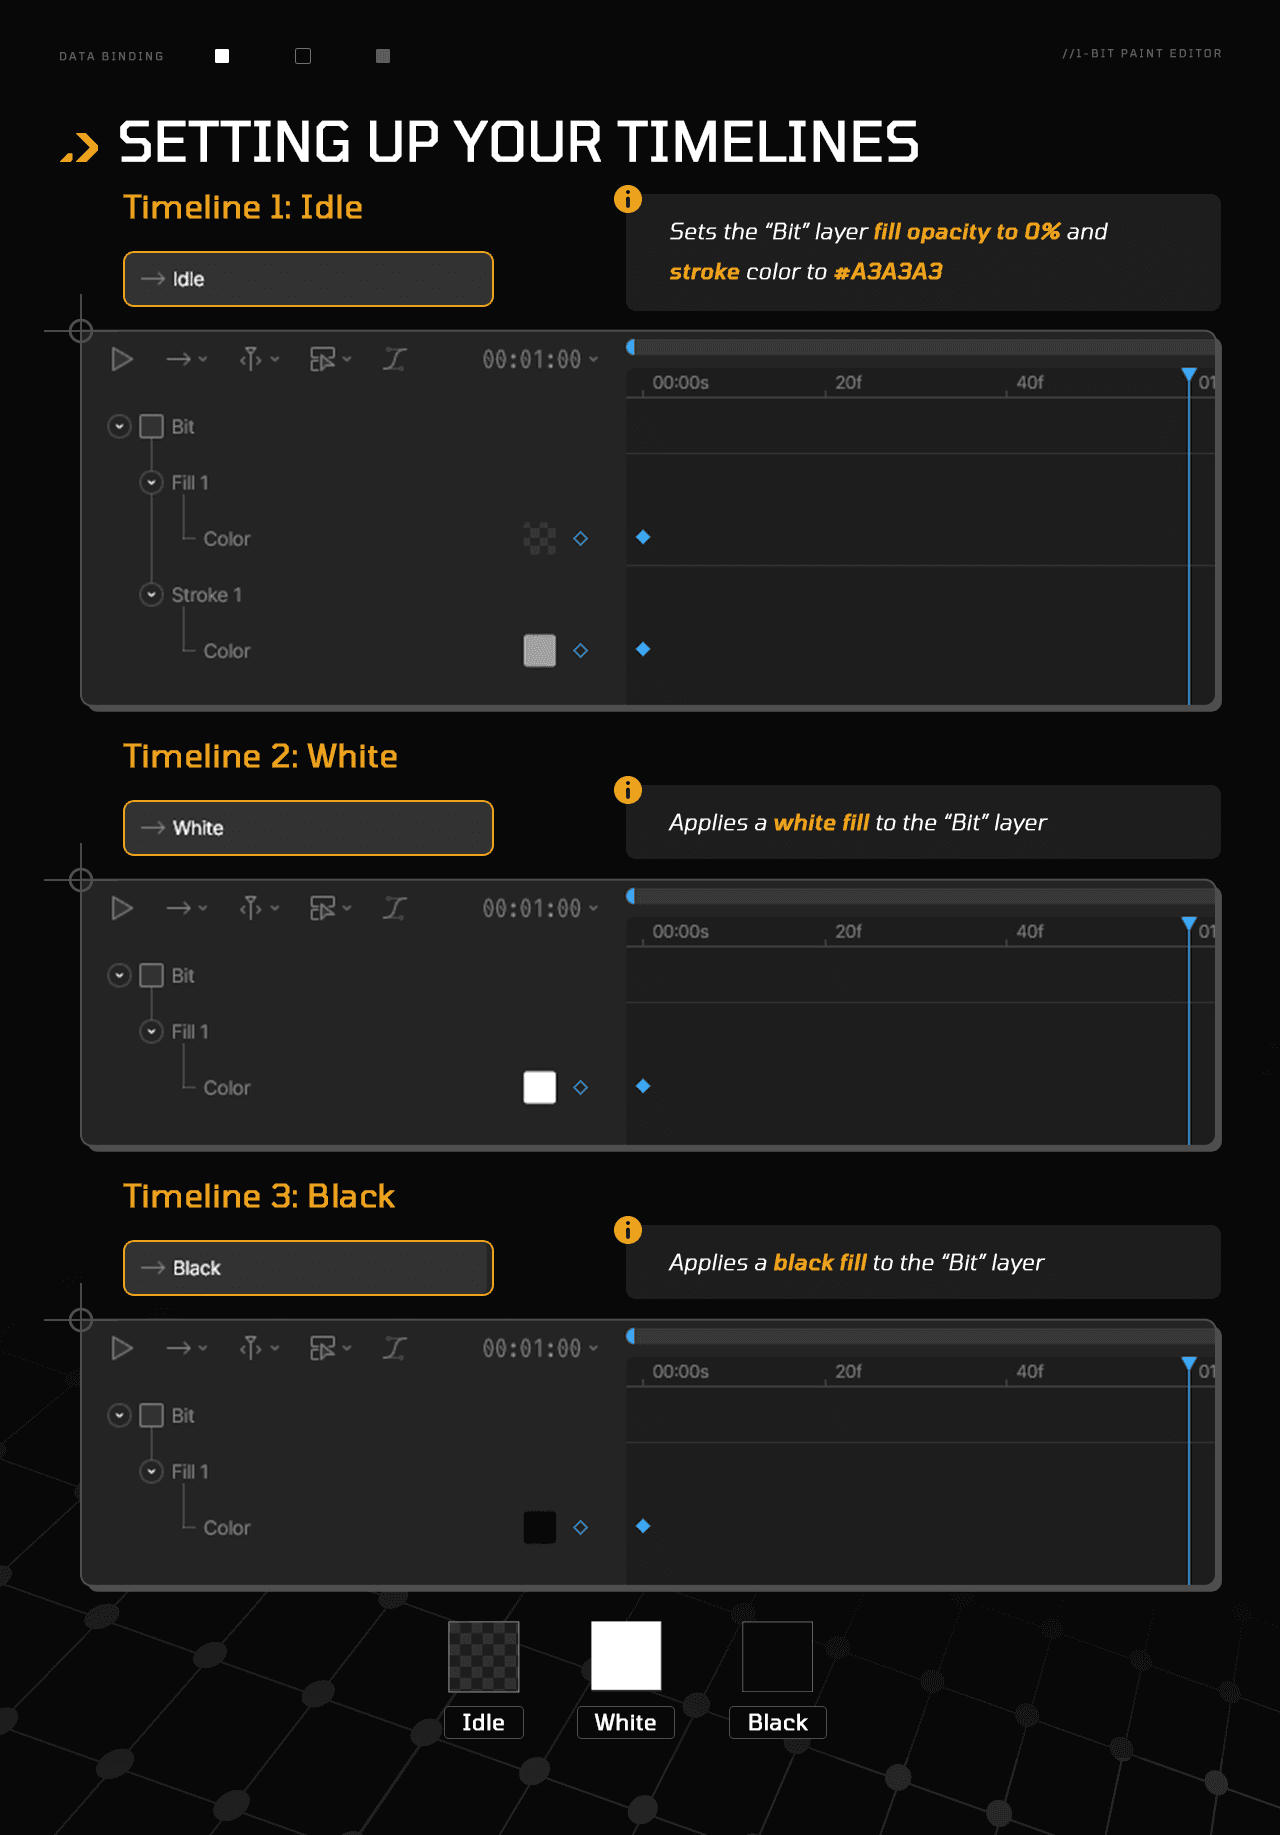
Toggle switch artboard
This toggle will switch between Light and Dark modes.
Timelines:
Two timelines control the toggle’s visual states:
Listeners:
One listener detects user interaction:
State Machine:
Follow along in the video to set it up:
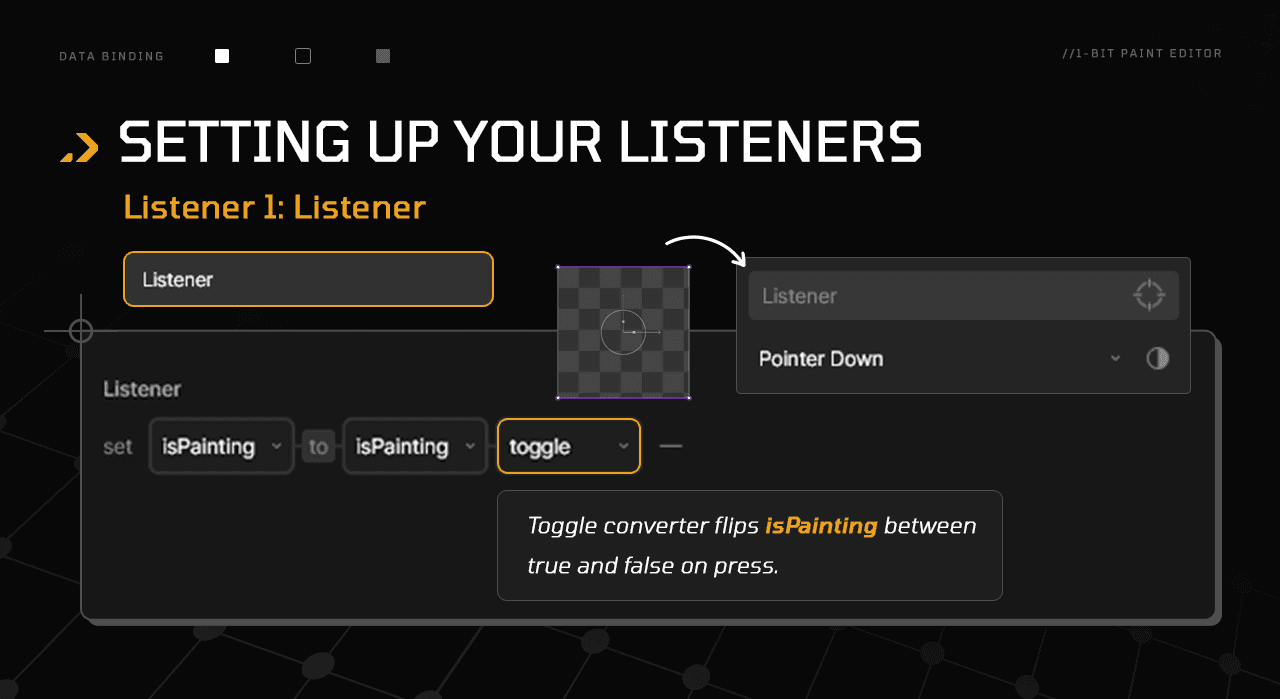
Bit artboard
This sets up the “bit” item we’ll later instantiate in the Main artboard.
Timelines:
We’ll set up three timelines:
Listeners:
One listener manages interaction for this artboard:
State Machine:
Controls how the Bit reacts to clicks:
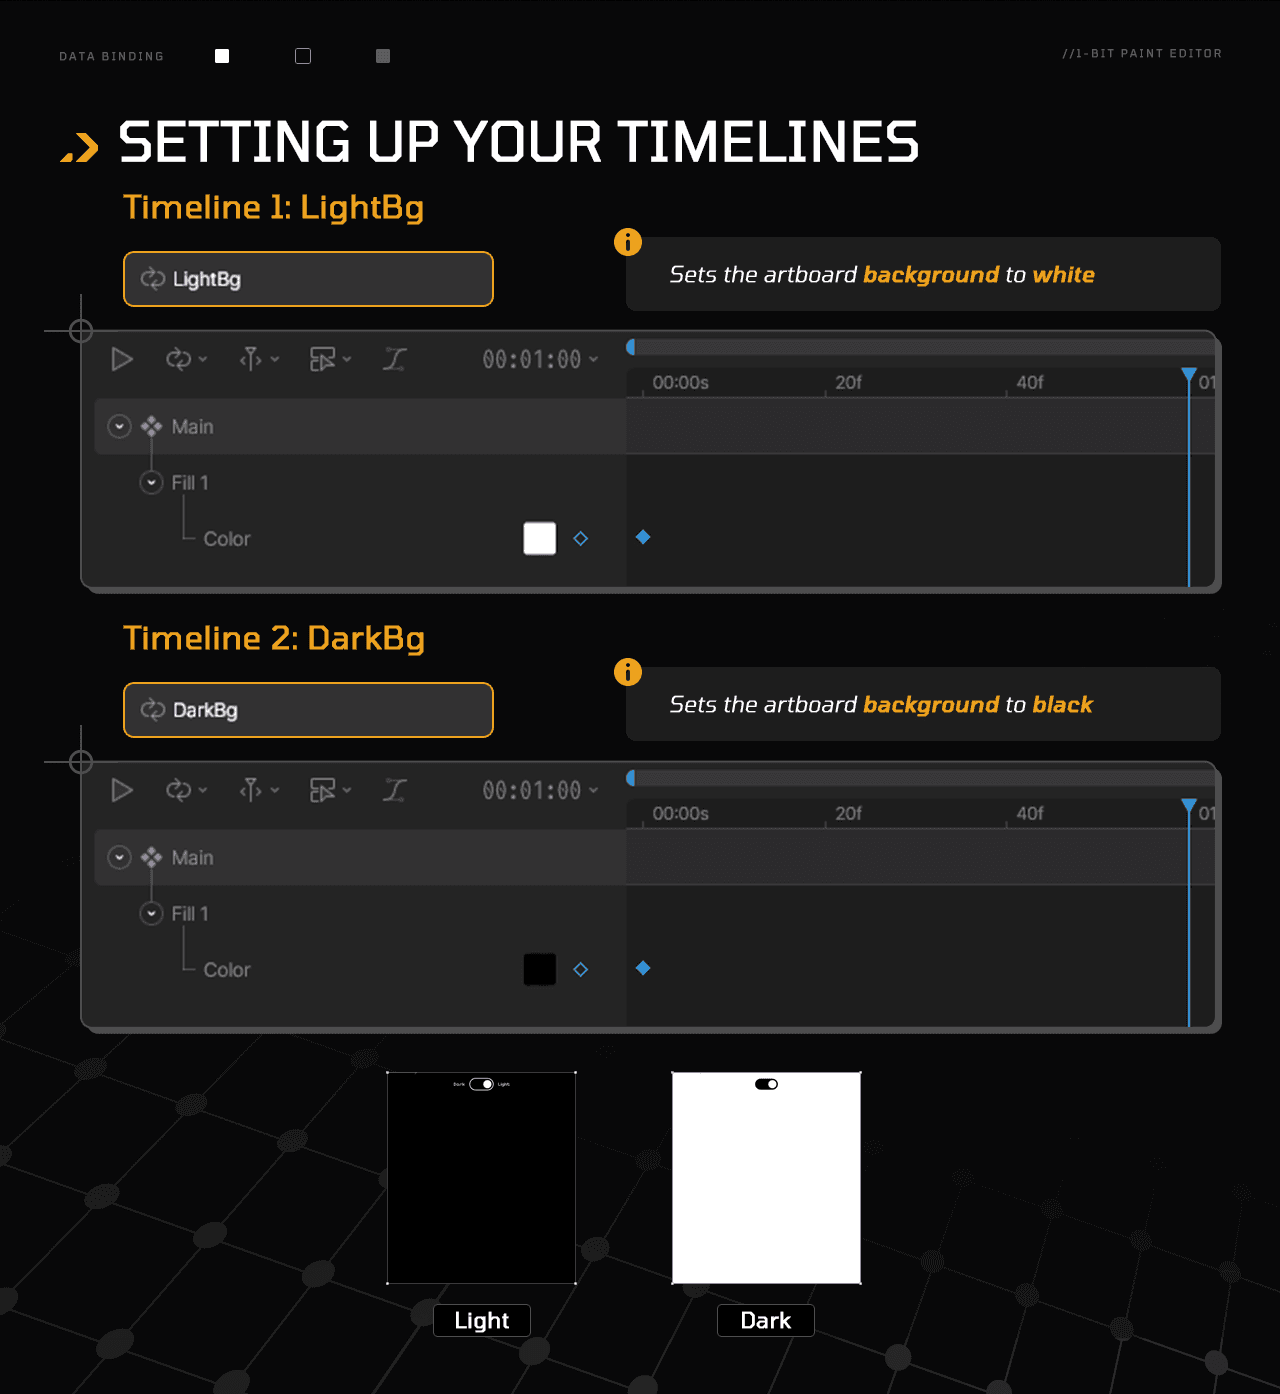
Main artboard
Our final step, where everything comes together.
Timelines:
Two timelines:
State Machine:
No listener is needed here, so we go straight to setting the State Machine:
Inspect & remix:
Download the final file to compare, explore, or remix.
Ready to take it further?
I designed these mini-projects as hackable templates. Poke around, remix, and make them yours! A few ideas:
Go from 1-bit to 8-bit: let users paint with a limited color palette.
Try different grid sizes or visual styles.
Add reference pixel art images for tracing using Data Binding Images
Check the docs or browse the 101 Data Binding tutorials to keep learning. Want company? Join the Community to ask questions or share your progress.
Hi! I'm Mayte CG, Rive Ambassador and designer. This new entry in the Data Binding series continues our learn-by-building approach.
Each mini-project breaks down a specific use case, with visual guides, explanations, and files to follow or compare.
If you're new to Data Binding, check out the core concepts first.
Missed earlier entries? Catch up on pt. I and pt. II.
Next time, we’ll wrap up the series with a dose of inspiration to fuel your future Data Binding adventures.
What you’ll build
You’ll build a 1-bit painting editor with two interactive parts:
A 16×16 grid of paintable cells.
A Light/Dark toggle that flips background and bit colors (white ↔ black)
Use cases:
A perfect excuse to explore what else Rive Lists can do. Spoiler: they’re not just for menus.
Key Data Binding features:
Lists (driven by a Number) | Booleans | Number-to-List Converter | Toggle Converter
Set up the Artboard
Let’s start by setting up our canvas. We need three artboards: Main, Bit, and ToggleSwitch, configured as follows:
Main
Size: W: 800 H: 900
Background: #000000
Bit
Size: W: 800 H: 900
Background: No fill
ToggleSwitch
Size: W: 263 H: 57
Background: No fill
Follow this guide to organize your layer hierarchy:
Grab the base file
Use this file to follow along. It includes the basic design (no data or logic yet).
Create View Models & Converters
Next, create the data structure for the project. You'll need three View Models and two Converters set up as follows:
Lay out the Main Artboard:
Time to bring the pieces together:
Nest the ToggleSwitch component into the Main artboard (N → Toggle Switch).
Wrap the component in a layout so it becomes the child of an Instance Layout.
Drag the Instance Layout into the Top layout. Remove absolute positioning in the Instance Layout.
Since Top is set to fill and center, the ToggleSwitch appears perfectly centered.
Now jump to the MainContent area and select its child layout.
Click Add Artboard List in the right sidebar.
Bind the new Artboard List to NumBytes. The dropdown will turn yellow (error!). Fix it by right-clicking → Update Bind → select Number to List.
Make sure NumBits is set to 256 to generate a 16×16 grid (256 Bit instances).
Run the State Machine.
If the grid overflows in a single row, select the Artboard List’s parent layout and set it to Wrap.
Use the image below to confirm everything’s in place:
Add functionality with State Machines
With the visual structure ready, it's time to define behavior. We'll use State Machines to set up interaction logic across three artboards, each with its own timelines, listeners, and goals.
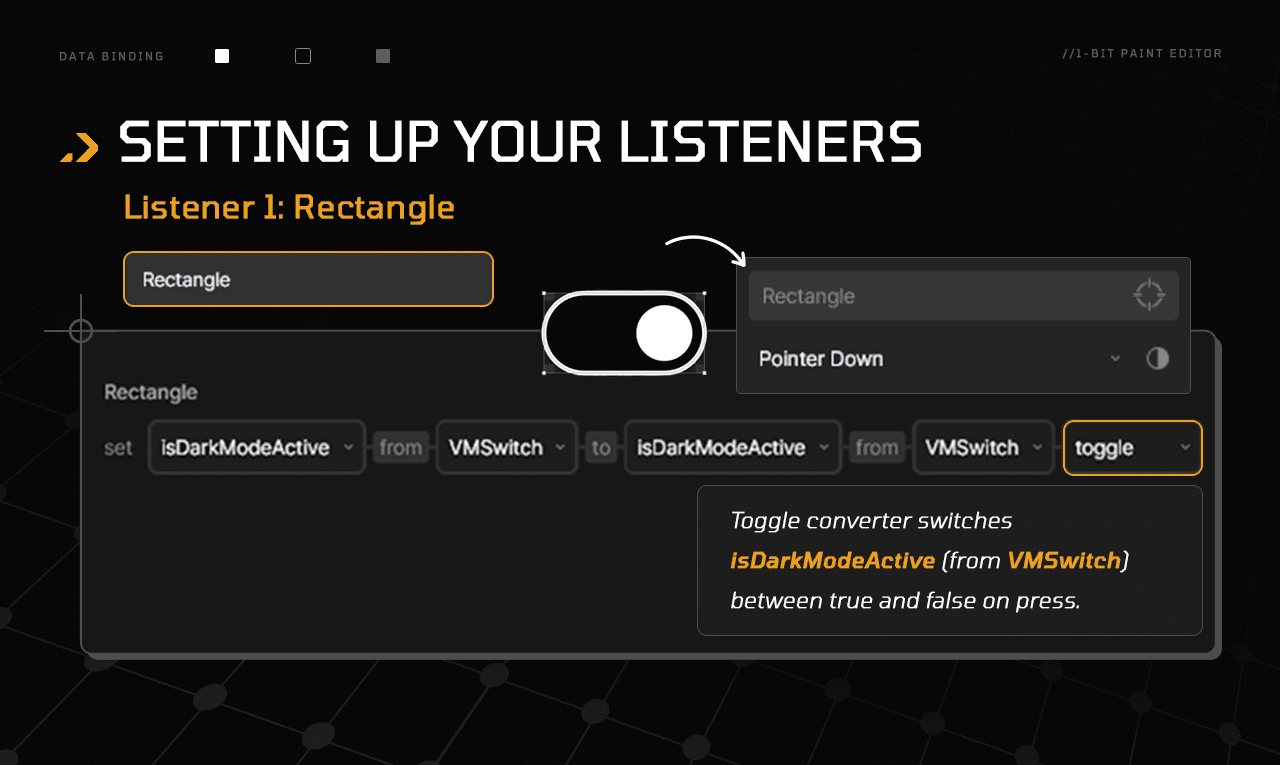
Toggle switch artboard
This toggle will switch between Light and Dark modes.
Timelines:
Two timelines control the toggle’s visual states:
Listeners:
One listener detects user interaction:
State Machine:
Follow along in the video to set it up:
Bit artboard
This sets up the “bit” item we’ll later instantiate in the Main artboard.
Timelines:
We’ll set up three timelines:
Listeners:
One listener manages interaction for this artboard:
State Machine:
Controls how the Bit reacts to clicks:
Main artboard
Our final step, where everything comes together.
Timelines:
Two timelines:
State Machine:
No listener is needed here, so we go straight to setting the State Machine:
Inspect & remix:
Download the final file to compare, explore, or remix.
Ready to take it further?
I designed these mini-projects as hackable templates. Poke around, remix, and make them yours! A few ideas:
Go from 1-bit to 8-bit: let users paint with a limited color palette.
Try different grid sizes or visual styles.
Add reference pixel art images for tracing using Data Binding Images
Check the docs or browse the 101 Data Binding tutorials to keep learning. Want company? Join the Community to ask questions or share your progress.
Join our newsletter
Get all the latest Rive news delivered to your inbox.