
Loading animations are a great way to add visual interest to an otherwise dull situation. In a previous post, we demonstrated how to generate idle loading animations quickly, but we didn't go into making these animations interactive. In this post, we'll look at a basic setup that will work for most loaders and then take things a bit further to include both on-hover and on-click interactions.
If you are curious about the animations used to create these loaders check out the other blog post, creating simple loaders.
Basic Setup
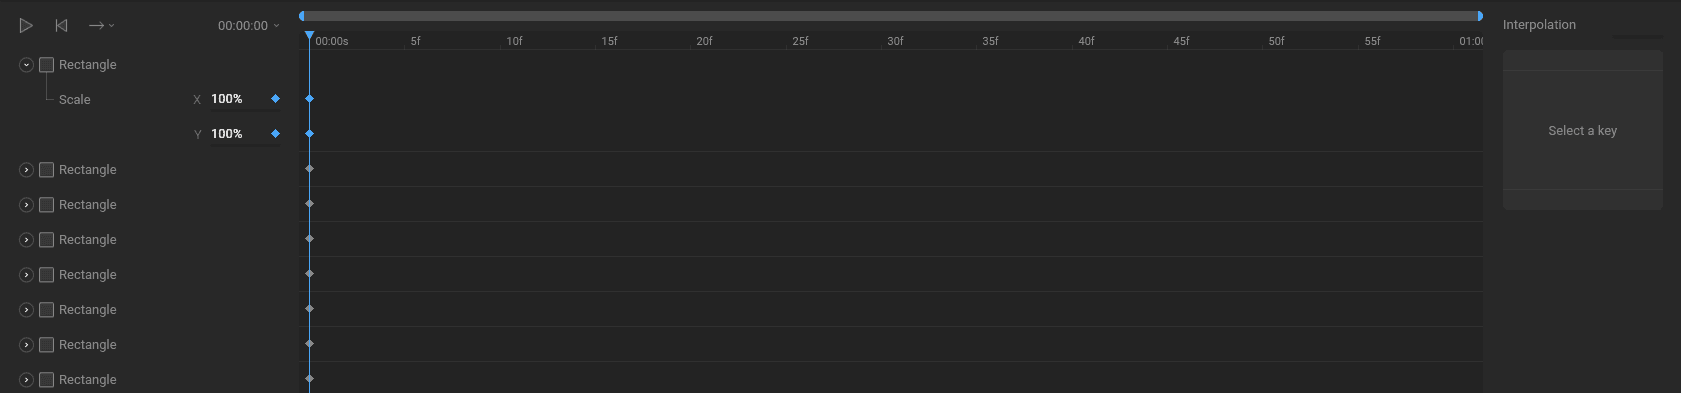
The most straightforward setup for an interactive loader requires 3 animations. First, you'll need an idle animation that keeps your loader in a static state. Remember, you'll want to key all of the properties that you want to change in the following animation. For example, if you plan on animating the rotation of an asset be sure that you key the initial rotation in the idle animation. In this case, I’ll be making the rectangles will change scale, so I’ve keyed the initial scale property in the idle animation.
The next animation you'll need is the loading animation. This animation sends the message that the asset or page is currently loading. You can make this animation as simple or extravagant as you'd like!

In some instances, you'll need to add a transition animation between the idle and loading animations. This added animation entirely depends on the two animations you are trying to mix. If, for example, your static ellipse turns into a bouncing box, you may want to add in an additional animation.

The final animation you'll likely want to add is a loading-done animation. This animation makes it clear that whatever is loading has finished and is ready to use.
Once you have all the necessary animations, we can create our state machine. Be sure to rename the state machine to something recognizable. Your coder will need the name to get your state machine running in code, so keep it as simple as possible. In this case, I've called it loader.
Start by creating a boolean input and renaming it isLoading. After that, create a number input and rename it loadingPercent. We'll use both of these inputs to control the transitions on our main state machine layer.
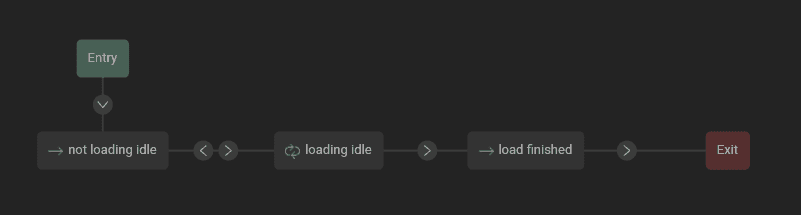
Now, drag all of your states onto the stage and begin creating transitions between them. We need a transition from entry to idle, a two-way transition between idle and loading, and a transition from loading to load finish.

Use the boolean input to allow the state machine to switch to loading when isLoading is true, and back to idle when isLoading is false.

After the first transition is ready, use the number input to allow the state machine to transition to load finish with its value is equal to 100.

Finally, test your state machine and ensure that everything transitions correctly. If you notice your animations aren't mixing correctly, go back and double-check your animation keys.
With that, you've successfully created an interactive loading asset. Keep in mind that this particular setup will work for a majority of use cases. Now that we've covered the basics, let's take it a step further and have our asset respond to a user interacting with it.
Adding hover and click actions
Before we can add more interactivity to the state machine, we need to create a few more animations. Let's tackle the on hover interaction first.
Start by creating a new animation called not hovered idle. This animation, much like our not loading idle animation, should consist of keys for all of the properties we plan on changing in the following animation. In this case, we'll be changing the scale, so create keys for the scale property of the asset.
Next create a new animation and rename it hovered. Now, create some keys that bring the asset from its initial scale to a much larger one around. You only need two sets of keys, but I like to add a bit of bounce to this type of animation, so I've added a few extra keys to make that happen.
Technically, these are the only two animations you need to make the on hover interaction work, but as you can see, I've added a third animation that plays when our state machine will transition back to the not hovered idle animation. Once again, this animation adds a bit of bounciness to the asset, which I enjoy.
Now that our animations are ready, it's time to add them to the state machine. First, add a new boolean input and rename it isHovered.
Next, add a new layer to the state machine. Layers allow us to play multiple animations simultaneously in the state machine. We'll need a new layer for each type of interaction we add. Be sure to name your layers accordingly. I typically name the first layer Main and each other layer are labeled by the interaction I create.

On the new layer, drag the on hover animations onto the graph and begin creating transitions between them. Next, use the isHovered boolean to control the transitions between each different state. If you've added in the not hovered animation that plays between hovered and hovered idle, be sure to set the exit time to 100% so that the entire animation plays before it exits.

Finally, test the state machine and ensure that your new layer is working properly. If so, you've successfully added some uniqueness to your asset! As a challenge, use the steps we just covered to create an on click interaction. In general, you'll need to add some new animations as well as a new layer to your state machine. If you do decide to participate in the challenge, be sure to share your creation on the community because we'd love to see the awesome animations you come up with!
Loading animations are a great way to add visual interest to an otherwise dull situation. In a previous post, we demonstrated how to generate idle loading animations quickly, but we didn't go into making these animations interactive. In this post, we'll look at a basic setup that will work for most loaders and then take things a bit further to include both on-hover and on-click interactions.
If you are curious about the animations used to create these loaders check out the other blog post, creating simple loaders.
Basic Setup
The most straightforward setup for an interactive loader requires 3 animations. First, you'll need an idle animation that keeps your loader in a static state. Remember, you'll want to key all of the properties that you want to change in the following animation. For example, if you plan on animating the rotation of an asset be sure that you key the initial rotation in the idle animation. In this case, I’ll be making the rectangles will change scale, so I’ve keyed the initial scale property in the idle animation.
The next animation you'll need is the loading animation. This animation sends the message that the asset or page is currently loading. You can make this animation as simple or extravagant as you'd like!
In some instances, you'll need to add a transition animation between the idle and loading animations. This added animation entirely depends on the two animations you are trying to mix. If, for example, your static ellipse turns into a bouncing box, you may want to add in an additional animation.
The final animation you'll likely want to add is a loading-done animation. This animation makes it clear that whatever is loading has finished and is ready to use.
Once you have all the necessary animations, we can create our state machine. Be sure to rename the state machine to something recognizable. Your coder will need the name to get your state machine running in code, so keep it as simple as possible. In this case, I've called it loader.
Start by creating a boolean input and renaming it isLoading. After that, create a number input and rename it loadingPercent. We'll use both of these inputs to control the transitions on our main state machine layer.
Now, drag all of your states onto the stage and begin creating transitions between them. We need a transition from entry to idle, a two-way transition between idle and loading, and a transition from loading to load finish.
Use the boolean input to allow the state machine to switch to loading when isLoading is true, and back to idle when isLoading is false.
After the first transition is ready, use the number input to allow the state machine to transition to load finish with its value is equal to 100.
Finally, test your state machine and ensure that everything transitions correctly. If you notice your animations aren't mixing correctly, go back and double-check your animation keys.
With that, you've successfully created an interactive loading asset. Keep in mind that this particular setup will work for a majority of use cases. Now that we've covered the basics, let's take it a step further and have our asset respond to a user interacting with it.
Adding hover and click actions
Before we can add more interactivity to the state machine, we need to create a few more animations. Let's tackle the on hover interaction first.
Start by creating a new animation called not hovered idle. This animation, much like our not loading idle animation, should consist of keys for all of the properties we plan on changing in the following animation. In this case, we'll be changing the scale, so create keys for the scale property of the asset.
Next create a new animation and rename it hovered. Now, create some keys that bring the asset from its initial scale to a much larger one around. You only need two sets of keys, but I like to add a bit of bounce to this type of animation, so I've added a few extra keys to make that happen.
Technically, these are the only two animations you need to make the on hover interaction work, but as you can see, I've added a third animation that plays when our state machine will transition back to the not hovered idle animation. Once again, this animation adds a bit of bounciness to the asset, which I enjoy.
Now that our animations are ready, it's time to add them to the state machine. First, add a new boolean input and rename it isHovered.
Next, add a new layer to the state machine. Layers allow us to play multiple animations simultaneously in the state machine. We'll need a new layer for each type of interaction we add. Be sure to name your layers accordingly. I typically name the first layer Main and each other layer are labeled by the interaction I create.
On the new layer, drag the on hover animations onto the graph and begin creating transitions between them. Next, use the isHovered boolean to control the transitions between each different state. If you've added in the not hovered animation that plays between hovered and hovered idle, be sure to set the exit time to 100% so that the entire animation plays before it exits.
Finally, test the state machine and ensure that your new layer is working properly. If so, you've successfully added some uniqueness to your asset! As a challenge, use the steps we just covered to create an on click interaction. In general, you'll need to add some new animations as well as a new layer to your state machine. If you do decide to participate in the challenge, be sure to share your creation on the community because we'd love to see the awesome animations you come up with!
Join our newsletter
Get all the latest Rive news delivered to your inbox.