Before engaging with the runtime data binding APIs, it is important to familiarize yourself with the core concepts presented in the Overview.
View Models
View models describe a set of properties, but cannot themselves be used to get or set values - that is the role of view model instances.
To begin, we need to get a reference to a particular view model. This can be done either by index, by name, or the default for a given artboard, and is done from the Rive file. The default option refers to the view model assigned to an artboard by the dropdown in the editor.
These APIs are only needed when the Data Binding Mode on the RiveWidget is set to Manual.Otherwise, you can configure view model binding directly in the Unity Inspector under the Data section.
private void OnEnable()
{
    riveWidget.OnWidgetStatusChanged += HandleWidgetStatusChanged;
}

private void OnDisable()
{
    riveWidget.OnWidgetStatusChanged -= HandleWidgetStatusChanged;
}

private void HandleWidgetStatusChanged()
{
    if (riveWidget.Status == WidgetStatus.Loaded)
    {
        File file = riveWidget.File;

        // Get reference by name
        ViewModel viewModel = file.GetViewModelByName("My View Model");

        // Get reference by index
        for (int i = 0; i < file.ViewModelCount; i++)
        {
            ViewModel indexedVM = file.GetViewModelAtIndex(i);
        }

        // Get reference to the default view model for an artboard
        ViewModel defaultVM = riveWidget.Artboard.DefaultViewModel;
    }
}
View Model Instances
Once we have a reference to a view model, it can be used to create an instance. When creating an instance, you have four options:
-
Create a blank instance - Fill the properties of the created instance with default values as follows:
| Type | Value |
|---|
| Number | 0 |
| String | Empty string |
| Boolean | False |
| Color | 0xFF000000 |
| Trigger | Untriggered |
| Enum | The first value |
| Image | No image |
| Artboard | No artboard |
| List | Empty list |
| Nested view model | Null |
-
Create the default instance - Use the instance labelled “Default” in the editor. Usually this is the one a designer intends as the primary one to be used at runtime.
-
Create by index - Using the order returned when iterating over all available instances. Useful when creating multiple instances by iteration.
-
Create by name - Use the editor’s instance name. Useful when creating a specific instance.
In some samples, due to the wordiness of “view model instance”, we use the abbreviation “VMI”, as well as “VM” for “view model”.
These APIs are only needed when the Data Binding Mode on the RiveWidget is set to Manual.Otherwise, you can configure view model binding directly in the Unity Inspector under the Data section.
private void OnEnable()
{
    riveWidget.OnWidgetStatusChanged += HandleWidgetStatusChanged;
}

private void OnDisable()
{
    riveWidget.OnWidgetStatusChanged -= HandleWidgetStatusChanged;
}

private void HandleWidgetStatusChanged()
{
    if (riveWidget.Status == WidgetStatus.Loaded)
    {
        // From a ViewModel reference
        ViewModel vm = riveWidget.File.GetViewModelByName("My View Model");

        // Create blank
        ViewModelInstance vmiBlank = vm.CreateInstance();

        // Create default
        ViewModelInstance vmiDefault = vm.CreateDefaultInstance();

        // Create by index
        for (int i = 0; i < vm.InstanceCount; i++)
        {
            ViewModelInstance vmiIndexed = vm.CreateInstanceAt(i);
        }

        // Create by name
        ViewModelInstance vmiNamed = vm.CreateInstanceByName("My Instance");
    }
}
Binding
The created instance can then be assigned to a state machine or artboard. This establishes the bindings set up at edit time.
It is preferred to assign to a state machine, as this will automatically apply the instance to the artboard as well. Only assign to an artboard if you are not using a state machine, i.e. your file is static or uses linear animations.
The initial values of the instance are not applied to their bound elements until the state machine or artboard advances.
// Access the RiveWidget component

// Using the Unity Inspector
// 1. Select your RiveWidget in the Inspector
// 2. In the "Data" section, set the Data Binding Mode:
//    - Auto Bind Default: Automatically binds the default view model instance
//    - Auto Bind Selected: Uses a specific instance you select in the dropdown
//    - Manual: Requires you to manually set up binding in code

// Or programmatically if set to Manual or if using the low-level API
private void OnEnable()
{
    riveWidget.OnWidgetStatusChanged += HandleWidgetStatusChanged;
}

private void OnDisable()
{
    riveWidget.OnWidgetStatusChanged -= HandleWidgetStatusChanged;
}

private void HandleWidgetStatusChanged()
{
    if (riveWidget.Status == WidgetStatus.Loaded)
    {
        ViewModel vm = riveWidget.Artboard.DefaultViewModel;
        ViewModelInstance vmi = vm.CreateDefaultInstance();

        // Applying to a state machine will automatically bind to its artboard
        riveWidget.StateMachine.BindViewModelInstance(vmi);
    }
}
Auto-Binding
Alternatively, you may prefer to use auto-binding. This will automatically bind the default view model of the artboard using the default instance to both the state machine and the artboard. The default view model is the one selected on the artboard in the editor dropdown. The default instance is the one marked “Default” in the editor.
Rive Widget* provides both visual and programmatic ways to configure auto-binding. In the Inspector, you can easily set up binding through the Data Binding Mode dropdown: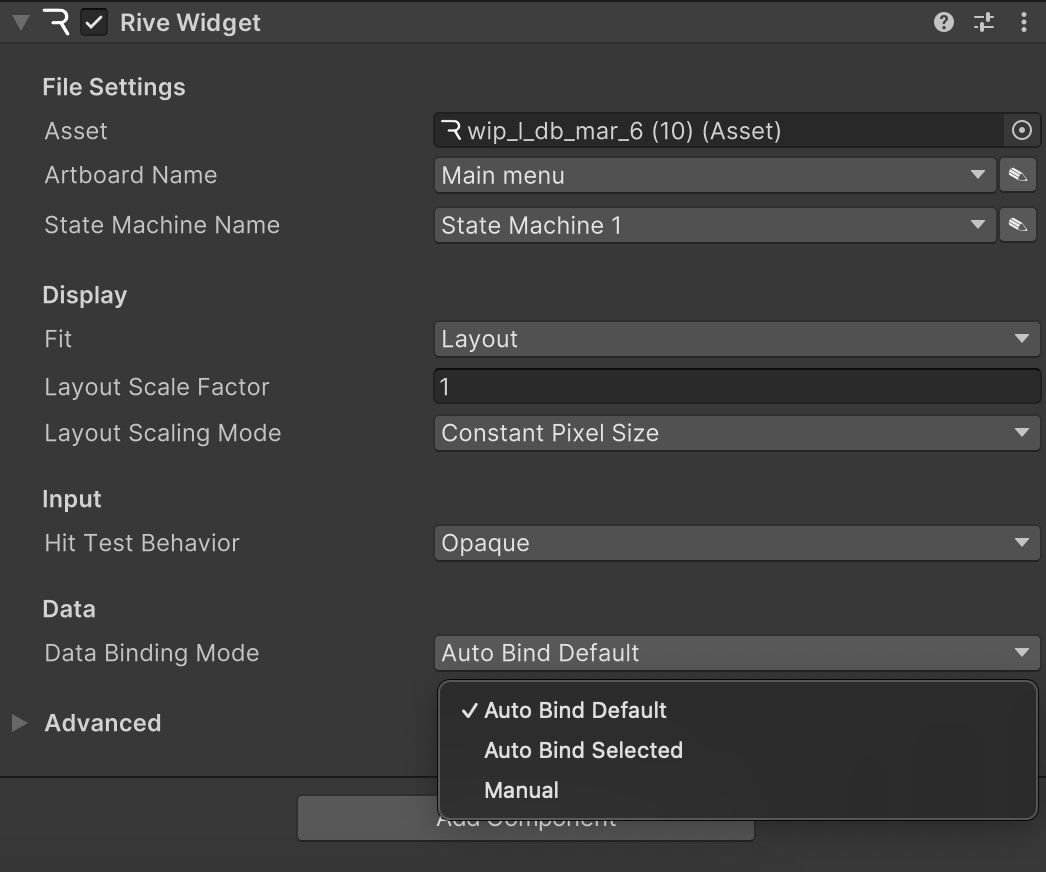 To enable auto-binding programmatically, use the following APIs:
// Before the widget is loaded:

// Option 1: Auto bind the default instance
riveWidget.BindingMode = DataBindingMode.AutoBindDefault;

// Option 2: Auto bind a specific instance by name
riveWidget.BindingMode = DataBindingMode.AutoBindSelected;
riveWidget.ViewModelInstanceName = "My Instance";

// Load the Rive file after setting the binding mode
riveWidget.Load(riveFile, artboardName, stateMachineName);

...
// Access the current instance that was auto-bound
ViewModelInstance boundInstance = riveWidget.StateMachine.ViewModelInstance;
If you choose to use the low-level API to control the render loop, you’ll need to manually set up data binding in your scripts.For reference, check this RiveScreen example that demonstrates one way to implement auto binding in a custom render loop.Using the low-level API requires additional implementation effort and understanding of the Rive runtime. Unless you have a specific need to setup a custom render loop, we recommend using the Component API.
Properties
A property is a value that can be read, set, or observed on a view model instance. Properties can be of the following types:
| Type | Supported |
|---|
| Floating point numbers | ✅ |
| Booleans | ✅ |
| Triggers | ✅ |
| Strings | ✅ |
| Enumerations | ✅ |
| Colors | ✅ |
| Nested View Models | ✅ |
| Lists | ✅ |
| Images | ✅ |
| Artboards | ✅ |
Listing Properties
Property descriptors can be inspected on a view model to discover at runtime which are available. These are not the mutable properties themselves though - once again those are on instances. These descriptors have a type and name.
var vm = riveWidget.File.GetViewModelByName("My View Model");

// A list of properties
var properties = vm.Properties;
foreach (var prop in properties)
{
    Debug.Log($"Property: {prop.Name}, Type: {prop.Type}");
}
Reading and Writing Properties
References to these properties can be retrieved by name or path.
Some properties are mutable and have getters, setters, and observer operations for their values. Getting or observing the value will retrieve the latest value set on that property’s binding, as of the last state machine or artboard advance. Setting the value will update the value and all of its bound elements.
After setting a property’s value, the changes will not apply to their bound elements until the state machine or artboard advances.
private void OnEnable()
{
    riveWidget.OnWidgetStatusChanged += HandleWidgetStatusChanged;
}

private void OnDisable()
{
    riveWidget.OnWidgetStatusChanged -= HandleWidgetStatusChanged;
}

private void HandleWidgetStatusChanged()
{
    // Check if the widget is loaded before accessing the view model instance
    if (riveWidget.Status == WidgetStatus.Loaded)
    {
        ViewModelInstance viewModelInstance = riveWidget.StateMachine.ViewModelInstance;

        //==========================================================================
    // STRING PROPERTIES
    //==========================================================================
        ViewModelInstanceStringProperty stringProperty = viewModelInstance.GetStringProperty("title");
        Debug.Log($"String value: {stringProperty.Value}");
        stringProperty.Value = "New Text";

    //==========================================================================
    // NUMBER PROPERTIES
    //==========================================================================
        ViewModelInstanceNumberProperty numberProperty = viewModelInstance.GetNumberProperty("count");
        Debug.Log($"Number value: {numberProperty.Value}");
        numberProperty.Value = 42.5f;

    //==========================================================================
    // BOOLEAN PROPERTIES
    //==========================================================================
        ViewModelInstanceBooleanProperty boolProperty = viewModelInstance.GetBooleanProperty("isActive");
        Debug.Log($"Boolean value: {boolProperty.Value}");
        boolProperty.Value = true;

    //==========================================================================
    // COLOR PROPERTIES
    //==========================================================================
        ViewModelInstanceColorProperty colorProperty = viewModelInstance.GetColorProperty("backgroundColor");
        // Using Unity Color (float values 0-1)
        Color currentColor = colorProperty.Value;
        colorProperty.Value = new UnityEngine.Color(1, 0, 0, 1); // Red color
        // Or using Color32 (byte values 0-255)
        Color32 currentColor32 = colorProperty.Value32;
        colorProperty.Value32 = new Color32(0, 255, 0, 255); // Green color

    //==========================================================================
    // ENUM PROPERTIES
    //==========================================================================
        ViewModelInstanceEnumProperty enumProperty = viewModelInstance.GetEnumProperty("category");
        Debug.Log($"Enum current value: {enumProperty.Value}");
        Debug.Log($"Enum available values: {string.Join(", ", enumProperty.EnumValues)}");
        enumProperty.Value = "option_name";

    //==========================================================================
    // TRIGGER PROPERTIES
    //==========================================================================
        ViewModelInstanceTriggerProperty triggerProperty = viewModelInstance.GetTriggerProperty("onSubmit");
        triggerProperty.Trigger(); // Fire the trigger
    }
}
Nested Property Paths
View models can have properties of type view model, allowing for arbitrary nesting. You can chain property calls on each instance starting from the root until you get to the property of interest. Alternatively, you can do this through a path parameter, which is similar to a URI in that it is a forward slash delimited list of property names ending in the name of the property of interest.
if (riveWidget.Status == WidgetStatus.Loaded)
{
    var viewModelInstance = riveWidget.StateMachine.ViewModelInstance;

    // Accessing nested view models using chaining
    var nestedNumberByChain = viewModelInstance
        .GetViewModelInstanceProperty("My Nested View Model")
        .GetViewModelInstanceProperty("My Second Nested VM")
        .GetNumberProperty("My Nested Number");

    // Accessing nested properties using path notation
    var nestedNumberByPath = viewModelInstance
        .GetNumberProperty("My Nested View Model/My Second Nested VM/My Nested Number");


}
Observability
You can observe changes over time to property values, either by using listeners or a platform equivalent method. Once observed, you will be notified when the property changes are applied by a state machine advance, whether that is a new value that has been explicitly set or if the value was updated as a result of a binding.
private ViewModelInstanceNumberProperty numberProperty;
private ViewModelInstanceStringProperty stringProperty;
private ViewModelInstanceBooleanProperty boolProperty;
private ViewModelInstanceColorProperty colorProperty;
private ViewModelInstanceEnumProperty enumProperty;
private ViewModelInstanceTriggerProperty triggerProperty;

private void OnEnable()
{
    riveWidget.OnWidgetStatusChanged += HandleWidgetStatusChanged;
}

private void OnDisable()
{
    riveWidget.OnWidgetStatusChanged -= HandleWidgetStatusChanged;
}

private void HandleWidgetStatusChanged()
{
    if (riveWidget.Status == WidgetStatus.Loaded)
    {
        ViewModelInstance viewModelInstance = riveWidget.StateMachine.ViewModelInstance;

        // Add listeners to properties
        numberProperty = viewModelInstance.GetNumberProperty("count");
        numberProperty.OnValueChanged += OnNumberPropertyChanged;

        stringProperty = viewModelInstance.GetStringProperty("title");
        stringProperty.OnValueChanged += OnStringPropertyChanged;

        boolProperty = viewModelInstance.GetBooleanProperty("isActive");
        boolProperty.OnValueChanged += OnBoolPropertyChanged;

        colorProperty = viewModelInstance.GetColorProperty("backgroundColor");
        colorProperty.OnValueChanged += OnColorPropertyChanged;

        enumProperty = viewModelInstance.GetEnumProperty("category");
        enumProperty.OnValueChanged += OnEnumPropertyChanged;

        triggerProperty = viewModelInstance.GetTriggerProperty("onSubmit");
        triggerProperty.OnTriggered += OnTriggerPropertyFired;


    }
}

private void OnNumberPropertyChanged(float newValue)
{
    Debug.Log($"Number changed to: {newValue}");
}

private void OnStringPropertyChanged(string newValue)
{
    Debug.Log($"String changed to: {newValue}");
}

private void OnBoolPropertyChanged(bool newValue)
{
    Debug.Log($"Boolean changed to: {newValue}");
}

private void OnColorPropertyChanged(UnityEngine.Color newValue)
{
    Debug.Log($"Color changed to: {ColorUtility.ToHtmlStringRGBA(newValue)}");
}

private void OnEnumPropertyChanged(string newValue)
{
    Debug.Log($"Enum changed to: {newValue}");
}

private void OnTriggerPropertyFired()
{
    Debug.Log("Trigger fired!");
}

private void OnDestroy()
{
    // You should remove listeners when no longer needed,
    numberProperty.OnValueChanged -= OnNumberPropertyChanged;
    stringProperty.OnValueChanged -= OnStringPropertyChanged;
    boolProperty.OnValueChanged -= OnBoolPropertyChanged;
    colorProperty.OnValueChanged -= OnColorPropertyChanged;
    enumProperty.OnValueChanged -= OnEnumPropertyChanged;
    triggerProperty.OnTriggered -= OnTriggerPropertyFired;
}
Images
Image properties let you set and replace raster images at runtime, with each instance of the image managed independently. For example, you could build an avatar creator and dynamically update features — like swapping out a hat — by setting a view model’s image property.
[SerializeField] private ImageOutOfBandAsset m_lightImageAsset;
[SerializeField] private ImageOutOfBandAsset m_darkImageAsset;

private ViewModelInstanceImageProperty imageProperty;
private bool isDarkMode = false;

private void OnEnable()
{
    riveWidget.OnWidgetStatusChanged += HandleWidgetStatusChanged;
}

private void OnDisable()
{
    riveWidget.OnWidgetStatusChanged -= HandleWidgetStatusChanged;
}

private void HandleWidgetStatusChanged()
{
    if (riveWidget.Status == WidgetStatus.Loaded)
    {
        m_lightImageAsset.Load();
        m_darkImageAsset.Load();
        ViewModelInstance viewModelInstance = riveWidget.StateMachine.ViewModelInstance;

        // Get the image property by name
        imageProperty = viewModelInstance.GetImageProperty("profileImage");
        // or alternatively:
        // imageProperty = viewModelInstance.GetProperty<ViewModelInstanceImageProperty>("profileImage");

        // Set up change callback
        imageProperty.OnValueChanged += OnImageChanged;

        // Set initial image (light mode)
        imageProperty.Value = m_lightImageAsset;
    }
}

private void OnImageChanged()
{
    Debug.Log("Image updated!");
}

// Example method to toggle between light and dark mode images
public void ToggleTheme()
{
    if (imageProperty != null)
    {
        isDarkMode = !isDarkMode;
        imageProperty.Value = isDarkMode ? m_darkImageAsset : m_lightImageAsset;
    }
}

// Example method to clear the image
public void ClearImage()
{
    if (imageProperty != null)
    {
        imageProperty.Value = null;
    }
}

private void OnDestroy()
{
    m_lightImageAsset.Unload();
    m_darkImageAsset.Unload();

    // Remove the event listener
    if (imageProperty != null)
    {
        imageProperty.OnValueChanged -= OnImageChanged;
    }
}
Render Textures
Experimental FeatureThis feature is not enabled out of the box. Add RIVE_USING_EXPERIMENTAL under Project Settings → Player → Scripting Define Symbols to use it.These APIs are still in development and may change before they become stable.Unity applies scripting defines per platform. If you ship to multiple targets (Standalone, iOS, Android, and so on), add the define on each platform tab where you need this feature.
ImageOutOfBandAsset to bind static raster images loaded from disk. Use RenderTextureImageSource when the image comes from a live Unity RenderTexture instead, such as VideoPlayer output, a camera render target, or custom GPU content you change each frame.
RenderTextureImageSource wraps the texture as a native Rive image and binds it to a view model image property through SetFromRenderTextureImageSource. Once bound, the runtime keeps the visuals up to date for you.
The example below binds a VideoPlayer render target to a view model image property named "video". Wait until the Rive widget is loaded before binding, then call SetFromRenderTextureImageSource once. The runtime handles per-frame updates after that.
#if RIVE_USING_EXPERIMENTAL
using System.Collections;
using UnityEngine;
using UnityEngine.Video;
using Rive;
using Rive.Components;

public class VideoImageBinding : MonoBehaviour
{
    [SerializeField] private RiveWidget riveWidget;
    [SerializeField] private RenderTexture videoTexture;
    [SerializeField] private string viewModelImagePath = "video";
    [SerializeField] private VideoPlayer videoPlayer;

    [Tooltip("How the video is adapted before Rive samples it.")]
    [SerializeField]
    private RenderTextureImageSource.TextureProcessingMode processingMode =
        RenderTextureImageSource.TextureProcessingMode.Auto;

    private RenderTextureImageSource renderTextureSource;

    private void Start()
    {
        if (videoTexture == null || riveWidget == null || videoPlayer == null)
        {
            Debug.LogWarning("Assign videoTexture, riveWidget, and videoPlayer in the Inspector.");
            return;
        }

        videoPlayer.renderMode = VideoRenderMode.RenderTexture;
        videoPlayer.targetTexture = videoTexture;
        videoPlayer.prepareCompleted += OnVideoPrepared;
        videoPlayer.Prepare();
    }

    private void OnVideoPrepared(VideoPlayer source)
    {
        StartCoroutine(BindAndPlay());
    }

    private IEnumerator BindAndPlay()
    {
        while (riveWidget.Status != WidgetStatus.Loaded ||
               riveWidget.StateMachine == null)
        {
            yield return null;
        }

        ViewModelInstance viewModelInstance = riveWidget.StateMachine.ViewModelInstance;
        if (viewModelInstance == null)
        {
            Debug.LogWarning("No ViewModelInstance on the widget.");
            yield break;
        }

        ViewModelInstanceImageProperty imageProperty =
            viewModelInstance.GetImageProperty(viewModelImagePath);
        if (imageProperty == null)
        {
            Debug.LogWarning($"Image property '{viewModelImagePath}' not found.");
            yield break;
        }

        renderTextureSource = new RenderTextureImageSource(videoTexture, processingMode);
        imageProperty.SetFromRenderTextureImageSource(renderTextureSource);
        videoPlayer.Play();
    }

    private void OnDestroy()
    {
        if (videoPlayer != null)
        {
            videoPlayer.prepareCompleted -= OnVideoPrepared;
            videoPlayer.Stop();
            videoPlayer.targetTexture = null;
        }

        renderTextureSource?.Dispose();
    }
}
#endif
When to use it
| Approach | Use when |
|---|
ImageOutOfBandAsset | You have a static image file (PNG, JPG, WebP, etc.) loaded at runtime |
RenderTextureImageSource | You already have a Unity RenderTexture whose contents change over time |
ImageOutOfBandAsset through Value automatically unbinds an active render-texture source, and vice versa.
Requirements and limitations
The source must be a stable, user-allocated 2D RenderTexture. Do not use transient RenderGraph resources. Their backing memory can be reused and produce stale samples or crashes.
Supported source formats:
- Single-sample, non-MSAA
- 2D only (not cube, array, or 3D)
- Created and kept alive for as long as the binding is active
Supported graphics backends:
| Backend | Supported |
|---|
| Metal | Yes |
| Direct3D 11 | Yes |
| Direct3D 12 | Yes |
| Vulkan | Yes |
| OpenGL / WebGL | No |
Texture processing
Unity backends differ in whether render texture texels are stored top-down or bottom-up. In Linear color space projects, Unity may also hand Rive gamma-encoded values that get decoded twice when the panel composites.
To avoid requiring every project to handle these fixes manually, the default TextureProcessingMode.Auto blits through an owned intermediate render texture and applies a flip and/or gamma re-encode only when the active backend or project settings actually need it.
| Mode | Behavior |
|---|
Auto | Apply orientation and color fixes when needed. This is the default processing mode. |
Orientation | Flip upside-down textures on backends that store texels top-down. Leave color alone. |
Color | Re-encode to gamma in Linear projects so colors composite correctly. Leave orientation alone. |
None | Bind the source render texture directly with no intermediate blit. Use this when your texture is already correctly oriented and encoded. |
// Default: let the runtime decide what processing is needed
var source = new RenderTextureImageSource(renderTexture);

// Opt out when you already produce a correctly oriented, correctly encoded texture
var directSource = new RenderTextureImageSource(
    renderTexture,
    RenderTextureImageSource.TextureProcessingMode.None);
Refresh behavior
RenderTextureImageSource controls how often the bound image property is updated from the source texture.
| Mode | Behavior |
|---|
PerFrame | Rebuild and re-push every frame. This is the default refresh mode. Use for live sources such as video or camera output. |
Manual | Update only when you call Refresh(). Use for snapshots, baked textures, or content that isn’t updated very often. |
// Live source (default)
var liveSource = new RenderTextureImageSource(
    renderTexture,
    refreshMode: RenderTextureImageSource.RefreshMode.PerFrame);

// Snapshot / on-demand source
var snapshotSource = new RenderTextureImageSource(
    renderTexture,
    refreshMode: RenderTextureImageSource.RefreshMode.Manual);

// After writing new content into the render texture:
snapshotSource.Refresh();
Clearing and switching images
To clear a render-texture-backed image:
imageProperty.SetFromRenderTextureImageSource(null);
imageAsset.Load();
imageProperty.Value = imageAsset;
Value automatically detaches any active RenderTextureImageSource binding on that property.
Lifecycle and teardown
While a RenderTextureImageSource is bound to at least one image property, the runtime keeps it alive and updating.
When you are done with a source, call Dispose() to stop updates and release any intermediate GPU resources owned by Rive.
Recommended teardown order
RenderTextureImageSource does not own your RenderTexture. When shutting down, use this order:
- Stop producers. Stop or disconnect anything still writing into the texture (
VideoPlayer, camera, custom blit loop, etc.).
- Unbind and dispose the image source. Call
Dispose() on the RenderTextureImageSource, or call SetFromRenderTextureImageSource(null) and then Dispose().
- Release your render texture (if you created it). If you allocated the
RenderTexture at runtime, call Release() and then Destroy() on it.
private void OnDestroy()
{
    // 1. Stop writing into the texture
    if (videoPlayer != null)
    {
        videoPlayer.Stop();
        videoPlayer.targetTexture = null;
    }

    // 2. Unbind and dispose the Rive image source
    renderTextureSource?.Dispose();
    renderTextureSource = null;

    // 3. Only if you created the RenderTexture at runtime
    if (ownsRenderTexture && renderTexture != null)
    {
        renderTexture.Release();
        Destroy(renderTexture);
    }
}
If your RenderTexture is a project asset assigned in the Inspector (as in the video example above), you only need steps 1 and 2. Do not call Destroy() on shared or asset-backed render textures.
Lists
List properties let you manage a dynamic set of view model instances at runtime. For example, you can build a TODO app where users can add and remove tasks in a scrollable Layout.
See the Editor section on creating data bound lists.
A single list property can include different view model types, with each view model tied to its own Component, making it easy to populate a list with a variety of Component instances.
With list properties, you can:
- Add a new view model instance (optionally at an index)
- Remove an existing view model instance (optionally by index)
- Swap two view model instances by index
- Get the size of a list
For more information on list properties, see the Data Binding List Property editor documentation.
private ViewModelInstanceListProperty listProperty;

private void OnEnable()
{
    riveWidget.OnWidgetStatusChanged += HandleWidgetStatusChanged;
}

private void OnDisable()
{
    riveWidget.OnWidgetStatusChanged -= HandleWidgetStatusChanged;
}

private void HandleWidgetStatusChanged()
{
    if (riveWidget.Status == WidgetStatus.Loaded)
    {
        ViewModelInstance viewModelInstance = riveWidget.StateMachine.ViewModelInstance;

        // Get the list property by name
        listProperty = viewModelInstance.GetListProperty("todos");
        // or alternatively:
        // var listProperty = viewModelInstance.GetProperty<ViewModelInstanceListProperty>("todos");

        Debug.Log($"List count: {listProperty.Count}");

        // Set up change callback
        listProperty.OnChanged += OnListChanged;

        // Get the view model for creating new instances
        var todoItemVM = riveWidget.File.GetViewModelByName("TodoItem");

        // Create a blank instance from the view model
        var newTodo = todoItemVM.CreateInstance();
        newTodo.GetStringProperty("description").Value = "Buy groceries";

        // Add the newly created instance to the list
        listProperty.Add(newTodo);

        // Insert an instance at a specific index
        var anotherTodo = todoItemVM.CreateInstance();
        listProperty.Insert(anotherTodo, 0); // Insert at beginning

        // Access items by index
        for (int i = 0; i < listProperty.Count; i++)
        {
            var item = listProperty.GetInstanceAt(i);
            Debug.Log($"Item {i}: {item}");
        }

        // Remove a specific instance from the list
        listProperty.Remove(newTodo);

        // Remove instance at index
        listProperty.RemoveAt(0);

        // Swap two instances in the list at index 0 and 1
        if (listProperty.Count > 1)
        {
            listProperty.Swap(0, 1);
        }
    }
}

private void OnListChanged()
{
    Debug.Log("List updated!");
}

private void OnDestroy()
{
    if (listProperty != null)
    {
        listProperty.OnChanged -= OnListChanged;
    }
}
Artboards
Artboard properties allows you to swap out entire components at runtime. This is useful for creating modular components that can be reused across different designs or applications, for example:
- Creating a skinning system that supports a large number of variations, such as a character creator where you can swap out different body parts, clothing, and accessories.
- Creating a complex scene that is a composition of various artboards loaded from various different Rive files (drawn to a single canvas/texture/widget).
- Reducing the size (complexity) of a single Rive file by breaking it up into smaller components that can be loaded on demand and swapped in and out as needed.
Artboard properties work with the BindableArtboard class, which is different from the regular Artboard class in the package.
BindableArtboard is a runtime wrapper for interacting with artboards through data binding. These instances reference existing artboards in your file, so no additional setup is required in the Rive Editor.
[SerializeField] private Asset m_externalRiveAsset;

private ViewModelInstanceArtboardProperty artboardProperty;
private File externalFile;

private void OnEnable()
{
    riveWidget.OnWidgetStatusChanged += HandleWidgetStatusChanged;
}

private void OnDisable()
{
    riveWidget.OnWidgetStatusChanged -= HandleWidgetStatusChanged;
}

private void HandleWidgetStatusChanged()
{
    if (riveWidget.Status == WidgetStatus.Loaded)
    {
        ViewModelInstance viewModelInstance = riveWidget.StateMachine.ViewModelInstance;

        // Get the artboard property by name
        artboardProperty = viewModelInstance.GetArtboardProperty("artboard_1");
        // or alternatively:
        // artboardProperty = viewModelInstance.GetProperty<ViewModelInstanceArtboardProperty>("artboard_1");

        // Set up change callback
        artboardProperty.OnValueChanged += OnArtboardChanged;

        // Set artboard from same file.
        var blueArtboard = riveWidget.File.BindableArtboard("ArtboardBlue");
        artboardProperty.Value = blueArtboard;

        // Load external file if needed
        if (m_externalRiveAsset != null)
        {
            externalFile = File.Load(m_externalRiveAsset);
        }
    }
}

private void OnArtboardChanged()
{
    Debug.Log("Artboard changed");
}

// Example method to assign a different artboard from the same file
public void SwitchToRedArtboard()
{
    if (artboardProperty != null)
    {
        var redArtboard = riveWidget.File.BindableArtboard("ArtboardRed");
        artboardProperty.Value = redArtboard;
    }
}

// Example method to assign an artboard from a different file
// This is useful for creating modular components that can be reused across different Rive files.
public void SwitchToExternalArtboard()
{
    if (artboardProperty != null && externalFile != null)
    {
        var externalArtboard = externalFile.BindableArtboard("SomeArtboard");
        artboardProperty.Value = externalArtboard;
    }
}

private void OnDestroy()
{
    // Clean up external file
    externalFile?.Dispose();

    // Remove the event listener
    if (artboardProperty != null)
    {
        artboardProperty.OnValueChanged -= OnArtboardChanged;
    }
}
Using Custom View Model Instances with Bindable Artboards
You can link a custom ViewModelInstance to a bindable artboard, giving you control over the data being used by that artboard.
To create a bindable artboard with a custom view model instance, use the overload on the File instance that contains the artboard:
var file = riveWidget.File;
var viewModelInstance = file.GetViewModelByName("CharacterData").CreateInstance();
var bindableArtboard = file.BindableArtboard("FeaturedCharacterCard", viewModelInstance);
private ViewModelInstanceArtboardProperty featuredContentSlot;

private ViewModelInstance characterData;
private ViewModelInstance eventData;
private ViewModelInstance offerData;

private BindableArtboard featuredCharacter;
private BindableArtboard limitedEvent;
private BindableArtboard specialOffer;

private void HandleWidgetStatusChanged()
{
    if (riveWidget.Status == WidgetStatus.Loaded)
    {
        ViewModelInstance viewModelInstance = riveWidget.StateMachine.ViewModelInstance;

        // Get the featured content slot from your main UI
        featuredContentSlot = viewModelInstance.GetArtboardProperty("featuredContentSlot");

        // Featured Character has its own unique data structure
        var characterViewModel = riveWidget.File.GetViewModelByName("CharacterData");
        characterData = characterViewModel.CreateInstance();
        var charName = characterData.GetStringProperty("name");
        var charClass = characterData.GetStringProperty("class");
        var attackPower = characterData.GetNumberProperty("attackPower");
        var specialAbility = characterData.GetStringProperty("specialAbility");
        var isUnlocked = characterData.GetBoolProperty("unlocked");
        charName.Value = "Shadowblade";
        charClass.Value = "Assassin";
        attackPower.Value = 92;
        specialAbility.Value = "Phantom Strike";
        isUnlocked.Value = false;

        // Limited-Time Event has its own unique data structure
        var eventViewModel = riveWidget.File.GetViewModelByName("EventData");
        eventData = eventViewModel.CreateInstance();
        var eventTitle = eventData.GetStringProperty("title");
        var eventDescription = eventData.GetStringProperty("description");
        var hoursRemaining = eventData.GetNumberProperty("hoursRemaining");
        var participantCount = eventData.GetNumberProperty("participants");
        var isActive = eventData.GetBoolProperty("active");
        eventTitle.Value = "Dragon Raid Weekend";
        eventDescription.Value = "Team up to defeat the ancient dragon";
        hoursRemaining.Value = 36;
        participantCount.Value = 1247;
        isActive.Value = true;

        // Special Offer has its own unique data structure
        var offerViewModel = riveWidget.File.GetViewModelByName("OfferData");
        offerData = offerViewModel.CreateInstance();
        var offerName = offerData.GetStringProperty("itemName");
        var originalPrice = offerData.GetNumberProperty("originalPrice");
        var discountPercent = offerData.GetNumberProperty("discount");
        var currency = offerData.GetStringProperty("currencyType");
        var timeLeftHours = offerData.GetNumberProperty("expiresInHours");
        offerName.Value = "Legendary Weapon Pack";
        originalPrice.Value = 2999;
        discountPercent.Value = 50;
        currency.Value = "Gems";
        timeLeftHours.Value = 12;

        // Create bindable artboards. Each uses a DIFFERENT artboard with unique design
        featuredCharacter = riveWidget.File.BindableArtboard("FeaturedCharacterCard", characterData);
        limitedEvent = riveWidget.File.BindableArtboard("EventBanner", eventData);
        specialOffer = riveWidget.File.BindableArtboard("OfferCard", offerData);

        // Start by showing the featured character
        featuredContentSlot.Value = featuredCharacter;
    }
}

// Switch to showing the limited-time event
public void ShowLimitedEvent()
{
    if (featuredContentSlot != null && limitedEvent != null)
    {
        featuredContentSlot.Value = limitedEvent;
    }
}

// Switch to showing the special offer
public void ShowSpecialOffer()
{
    if (featuredContentSlot != null && specialOffer != null)
    {
        featuredContentSlot.Value = specialOffer;
    }
}

// Update event countdown timer
public void UpdateEventTimer(float deltaTime)
{
    if (eventData != null)
    {
        var hoursRemaining = eventData.GetNumberProperty("hoursRemaining");
        hoursRemaining.Value -= (deltaTime / 3600f); // Convert seconds to hours
    }
}

private void OnDestroy()
{
    // Clean up view model instances
    characterData?.Dispose();
    eventData?.Dispose();
    offerData?.Dispose();

    // Clean up bindable artboards
    featuredCharacter?.Dispose();
    limitedEvent?.Dispose();
    specialOffer?.Dispose();

    // Remove event listeners if any were added
    if (featuredContentSlot != null)
    {
        featuredContentSlot.OnValueChanged -= OnArtboardChanged;
    }
}
Enums
Enums properties come in two flavors: system and user-defined. In practice, you will not need to worry about the distinction, but just be aware that system enums are available in any Rive file that binds to an editor-defined enum set, representing options from the editor’s dropdowns, where user-defined enums are those defined by a designer in the editor.
Enums are string typed. The Rive file contains a list of enums. Each enum in turn has a name and a list of strings.
var viewModelInstance = riveWidget.StateMachine.ViewModelInstance;

// Accessing enums from the file
var enums = riveWidget.File.ViewModelEnums;
foreach (var enumType in enums)
{
    Debug.Log($"Enum: {enumType.Name}");
    foreach (var value in enumType.Values)
    {
        Debug.Log($" - Value: {value}");
    }
}

...
// Using enum properties
var enumProperty = viewModelInstance.GetEnumProperty("category");
Debug.Log($"Current value: {enumProperty.Value}");
Debug.Log($"Available values: {string.Join(", ", enumProperty.EnumValues)}");
enumProperty.Value = enumProperty.EnumValues[0]; // Set to first value