If you've played with the State Machine, you already know about its ability to build interactive content. Designers and developers can use Inputs and Transitions to link animations together. However, there's still some runtime code required to trigger the Input changes in your product, website, app, or game.
With the release of Listeners, we've simplified this process by allowing you to hook up on-hover and on-click events directly in the Rive editor. Designers and animators define these interactions at design time, and at runtime, they work!
In this post, we'll look at Listeners, how you can add them to your file, and their impact on implementation.
Listeners
Listeners give us a way to have our Inputs "listen" for user actions in an artboard. This allows us to preview our content by interacting with it on the stage.

Additionally, listeners simplify the implementation of on-click and on-hover interactions. Combine listeners with our share links and you can create interactive content for blogs and websites without knowing any code (like me)!
Anatomy of a Listener
Listeners are made up of 3 parts:
Target
Listener type
Input

The Target tells the listener which object to "listen" to. Listeners can target any object on the stage, but we recommend using shapes with no fill as a hitbox.

The listener type tells the listener what action it is "listening" for. we currently support the following listener types:
Pointer down - click/tap down on the target
Pointer up - click/tap release of the target
Pointer enter - pointer hovers over target
Pointer exit - pointer exits target

The input defines which input fires when the predefined user action happens on the target. We can fire triggers, set booleans to true or false, or change a number value. With this set of listener types alone, we can create many types of interactions like the ones below.
Getting started
In this example, we'll create a simple state machine, then add some listeners to turn this static icon into a playful experience.
Create the State Machine
Drag the Idle and Hovered animations onto the graph.

Create transitions

Create boolean and rename it isHovered

Configure transitions

At this point, we can test the State Machine out and ensure that our interaction is functioning correctly. If you're satisfied, we can move on to adding the listener.
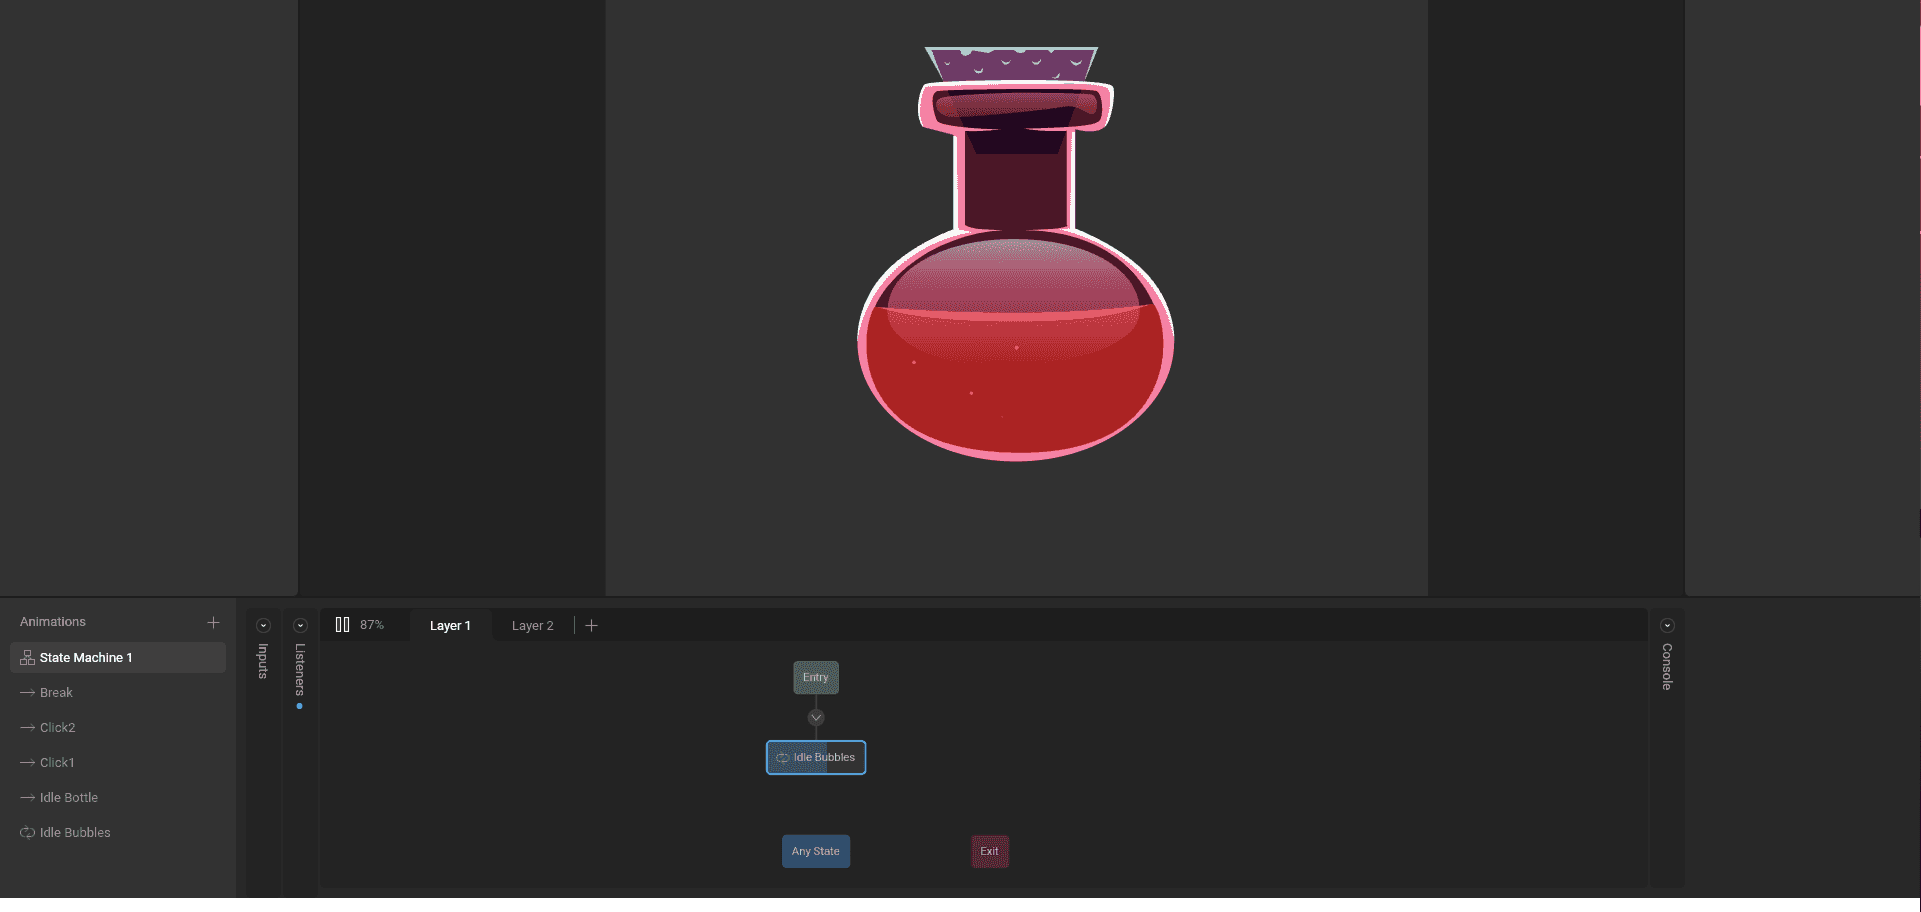
Add Listeners
Add a procedural shape and remove the fill. We'll use this as our hitbox.

Add a new listener from the listener's tab.

Hit the target button and select the new shape in the hierarchy.

The listener type is already set to pointer enter, so we don’t need to change anything here.
Select the isHovered input and set it to true.

Add a new listener.

Hit the target button and select the new shape as the target.
Select the pointer exit listener type.

Select the isHovered input and set it to false.

Now when we play the state machine, we can hover the icon and you'll notice the hovered animation plays. When our cursor moves outside of the icon, the idle animation plays. Our asset is now ready to be implemented into our app, website, game, or shared on social media.

Impact on implementation
Coding impact
While Listeners don't completely remove the need for code, they do reduce the code needed to make simple interactions work. Simply load the .riv file into your project, create the Rive instance with the appropriate artboard and state machine name, and that’s it! The interactions defined at design-time will propagate as expected at runtime.
Share links
Share links are a great way to share your work internally or with a client, but they also allow you to embed your files into your favorite apps like Twitter, Notion, Webflow, or blogs such as this one! We also recently announced a custom Framer integration, be sure to check that out!
Follow this link if you’d like to learn more about it!
If you've played with the State Machine, you already know about its ability to build interactive content. Designers and developers can use Inputs and Transitions to link animations together. However, there's still some runtime code required to trigger the Input changes in your product, website, app, or game.
With the release of Listeners, we've simplified this process by allowing you to hook up on-hover and on-click events directly in the Rive editor. Designers and animators define these interactions at design time, and at runtime, they work!
In this post, we'll look at Listeners, how you can add them to your file, and their impact on implementation.
Listeners
Listeners give us a way to have our Inputs "listen" for user actions in an artboard. This allows us to preview our content by interacting with it on the stage.
Additionally, listeners simplify the implementation of on-click and on-hover interactions. Combine listeners with our share links and you can create interactive content for blogs and websites without knowing any code (like me)!
Anatomy of a Listener
Listeners are made up of 3 parts:
Target
Listener type
Input
The Target tells the listener which object to "listen" to. Listeners can target any object on the stage, but we recommend using shapes with no fill as a hitbox.
The listener type tells the listener what action it is "listening" for. we currently support the following listener types:
Pointer down - click/tap down on the target
Pointer up - click/tap release of the target
Pointer enter - pointer hovers over target
Pointer exit - pointer exits target
The input defines which input fires when the predefined user action happens on the target. We can fire triggers, set booleans to true or false, or change a number value. With this set of listener types alone, we can create many types of interactions like the ones below.
Getting started
In this example, we'll create a simple state machine, then add some listeners to turn this static icon into a playful experience.
Create the State Machine
Drag the Idle and Hovered animations onto the graph.
Create transitions
Create boolean and rename it isHovered
Configure transitions
At this point, we can test the State Machine out and ensure that our interaction is functioning correctly. If you're satisfied, we can move on to adding the listener.
Add Listeners
Add a procedural shape and remove the fill. We'll use this as our hitbox.
Add a new listener from the listener's tab.
Hit the target button and select the new shape in the hierarchy.
The listener type is already set to pointer enter, so we don’t need to change anything here.
Select the isHovered input and set it to true.
Add a new listener.
Hit the target button and select the new shape as the target.
Select the pointer exit listener type.
Select the isHovered input and set it to false.
Now when we play the state machine, we can hover the icon and you'll notice the hovered animation plays. When our cursor moves outside of the icon, the idle animation plays. Our asset is now ready to be implemented into our app, website, game, or shared on social media.
Impact on implementation
Coding impact
While Listeners don't completely remove the need for code, they do reduce the code needed to make simple interactions work. Simply load the .riv file into your project, create the Rive instance with the appropriate artboard and state machine name, and that’s it! The interactions defined at design-time will propagate as expected at runtime.
Share links
Share links are a great way to share your work internally or with a client, but they also allow you to embed your files into your favorite apps like Twitter, Notion, Webflow, or blogs such as this one! We also recently announced a custom Framer integration, be sure to check that out!
Follow this link if you’d like to learn more about it!
Join our newsletter
Get all the latest Rive news delivered to your inbox.