An animated login screen is a fun way to personalize and enhance the user experience of an application or website. This post will look at how we created the Teddy login example. We'll walk through the design, rig, and animations. We'll also cover how the state machine brings everything together. This tutorial does not cover character creation, animation, or how to build a login experience in your application (though we'll explore that in a follow-up post).
If you are interested in taking a look at the file in the Rive Community, you can find it here.
How the login screen works
Let's start by looking at how the login screen works. When you type your username, Teddy looks at the text field and follows with his eyes. Teddy covers his eyes when you're typing your password. If the password is wrong, Teddy is shocked. If the password is correct, Teddy is happy.
Let’s take a look at how to put all of this together.
Design
You can use Rive's Editor tools to design each part of the character. In this case, I’ve used the Pen Tool to create almost all the parts of the character aside from the eyes, which I used ellipses. Feel free to build your own character. My advice is to start with a very simple design to understand the process.
Rig
Bones, groups, and constraints allow you to animate the character easily, like moving an arm or tilting the head. With Teddy, the most important part is the eyes. When the user interacts with the text field, Teddy's eyes move and follow the text. To achieve this, we need to create a rig that allows us to move the character's eyes and head.
There are different ways to create a rig like this. One way is using a Translation constraint, which allows an object to follow a target using different strength values. In this way, some elements move more than others creating a 3D effect.
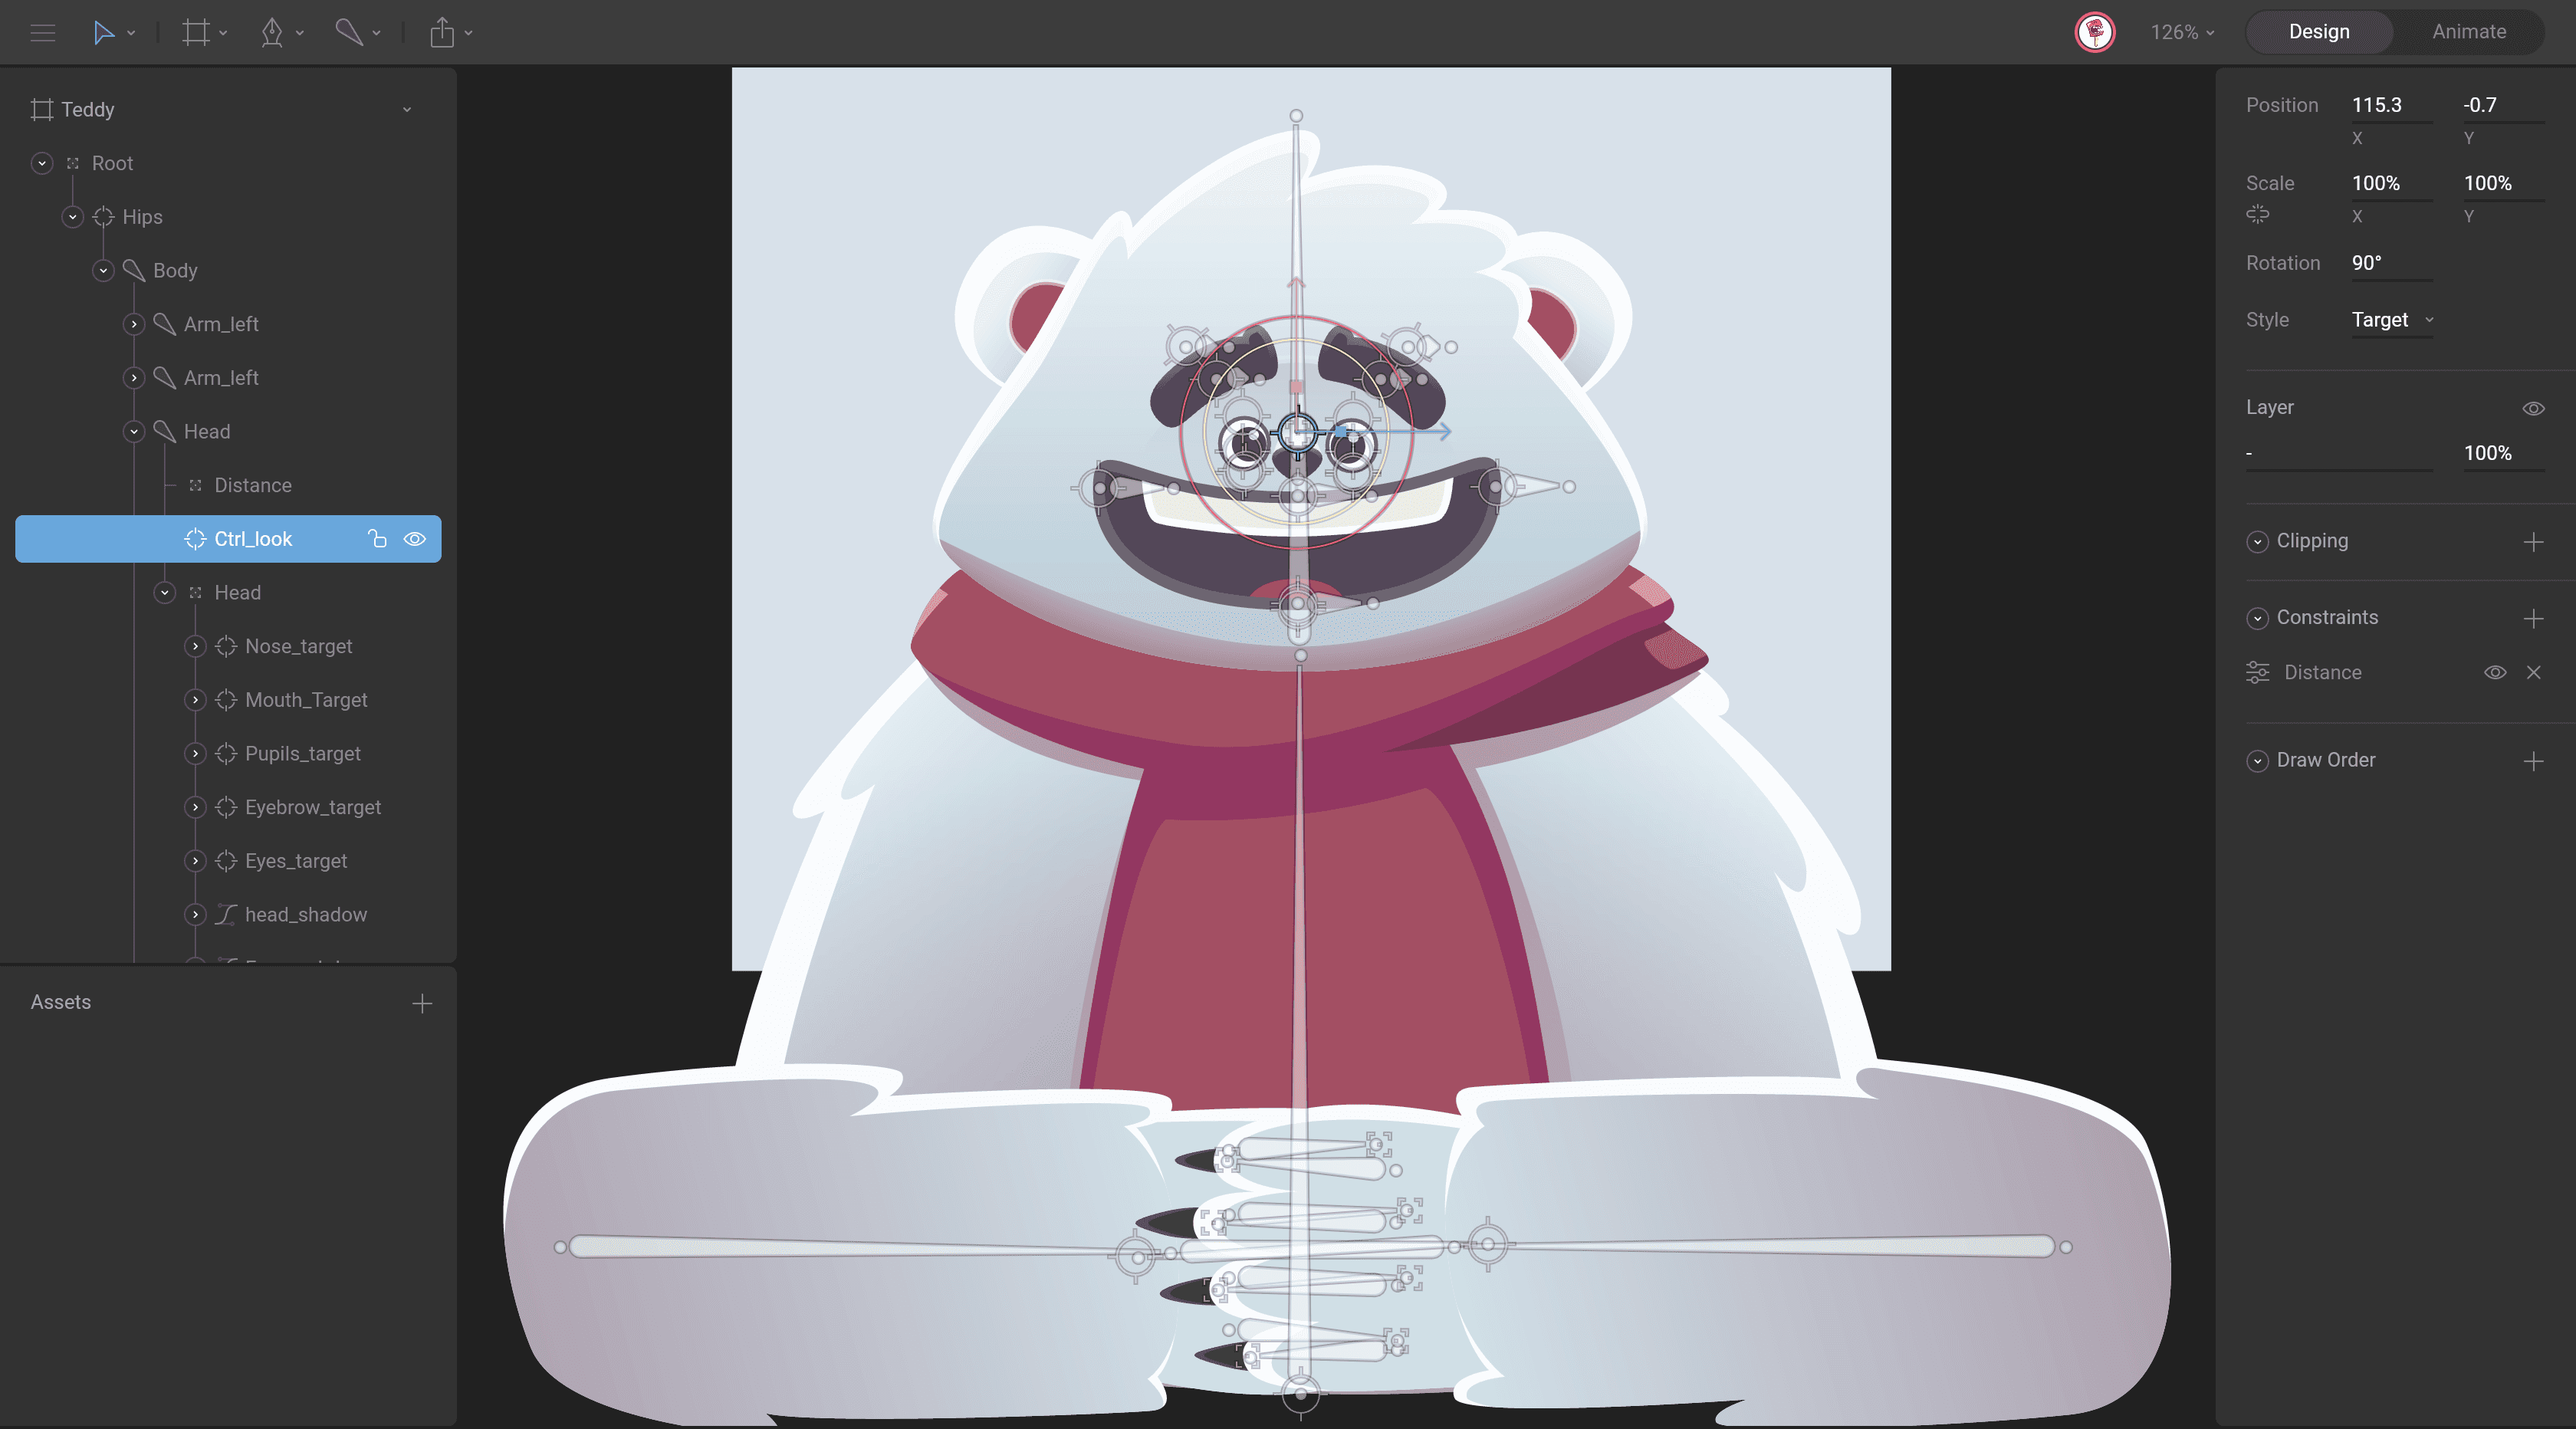
See Ctrl_look group in the hierarchy.
The first thing you need to do is create a Target to control the look.

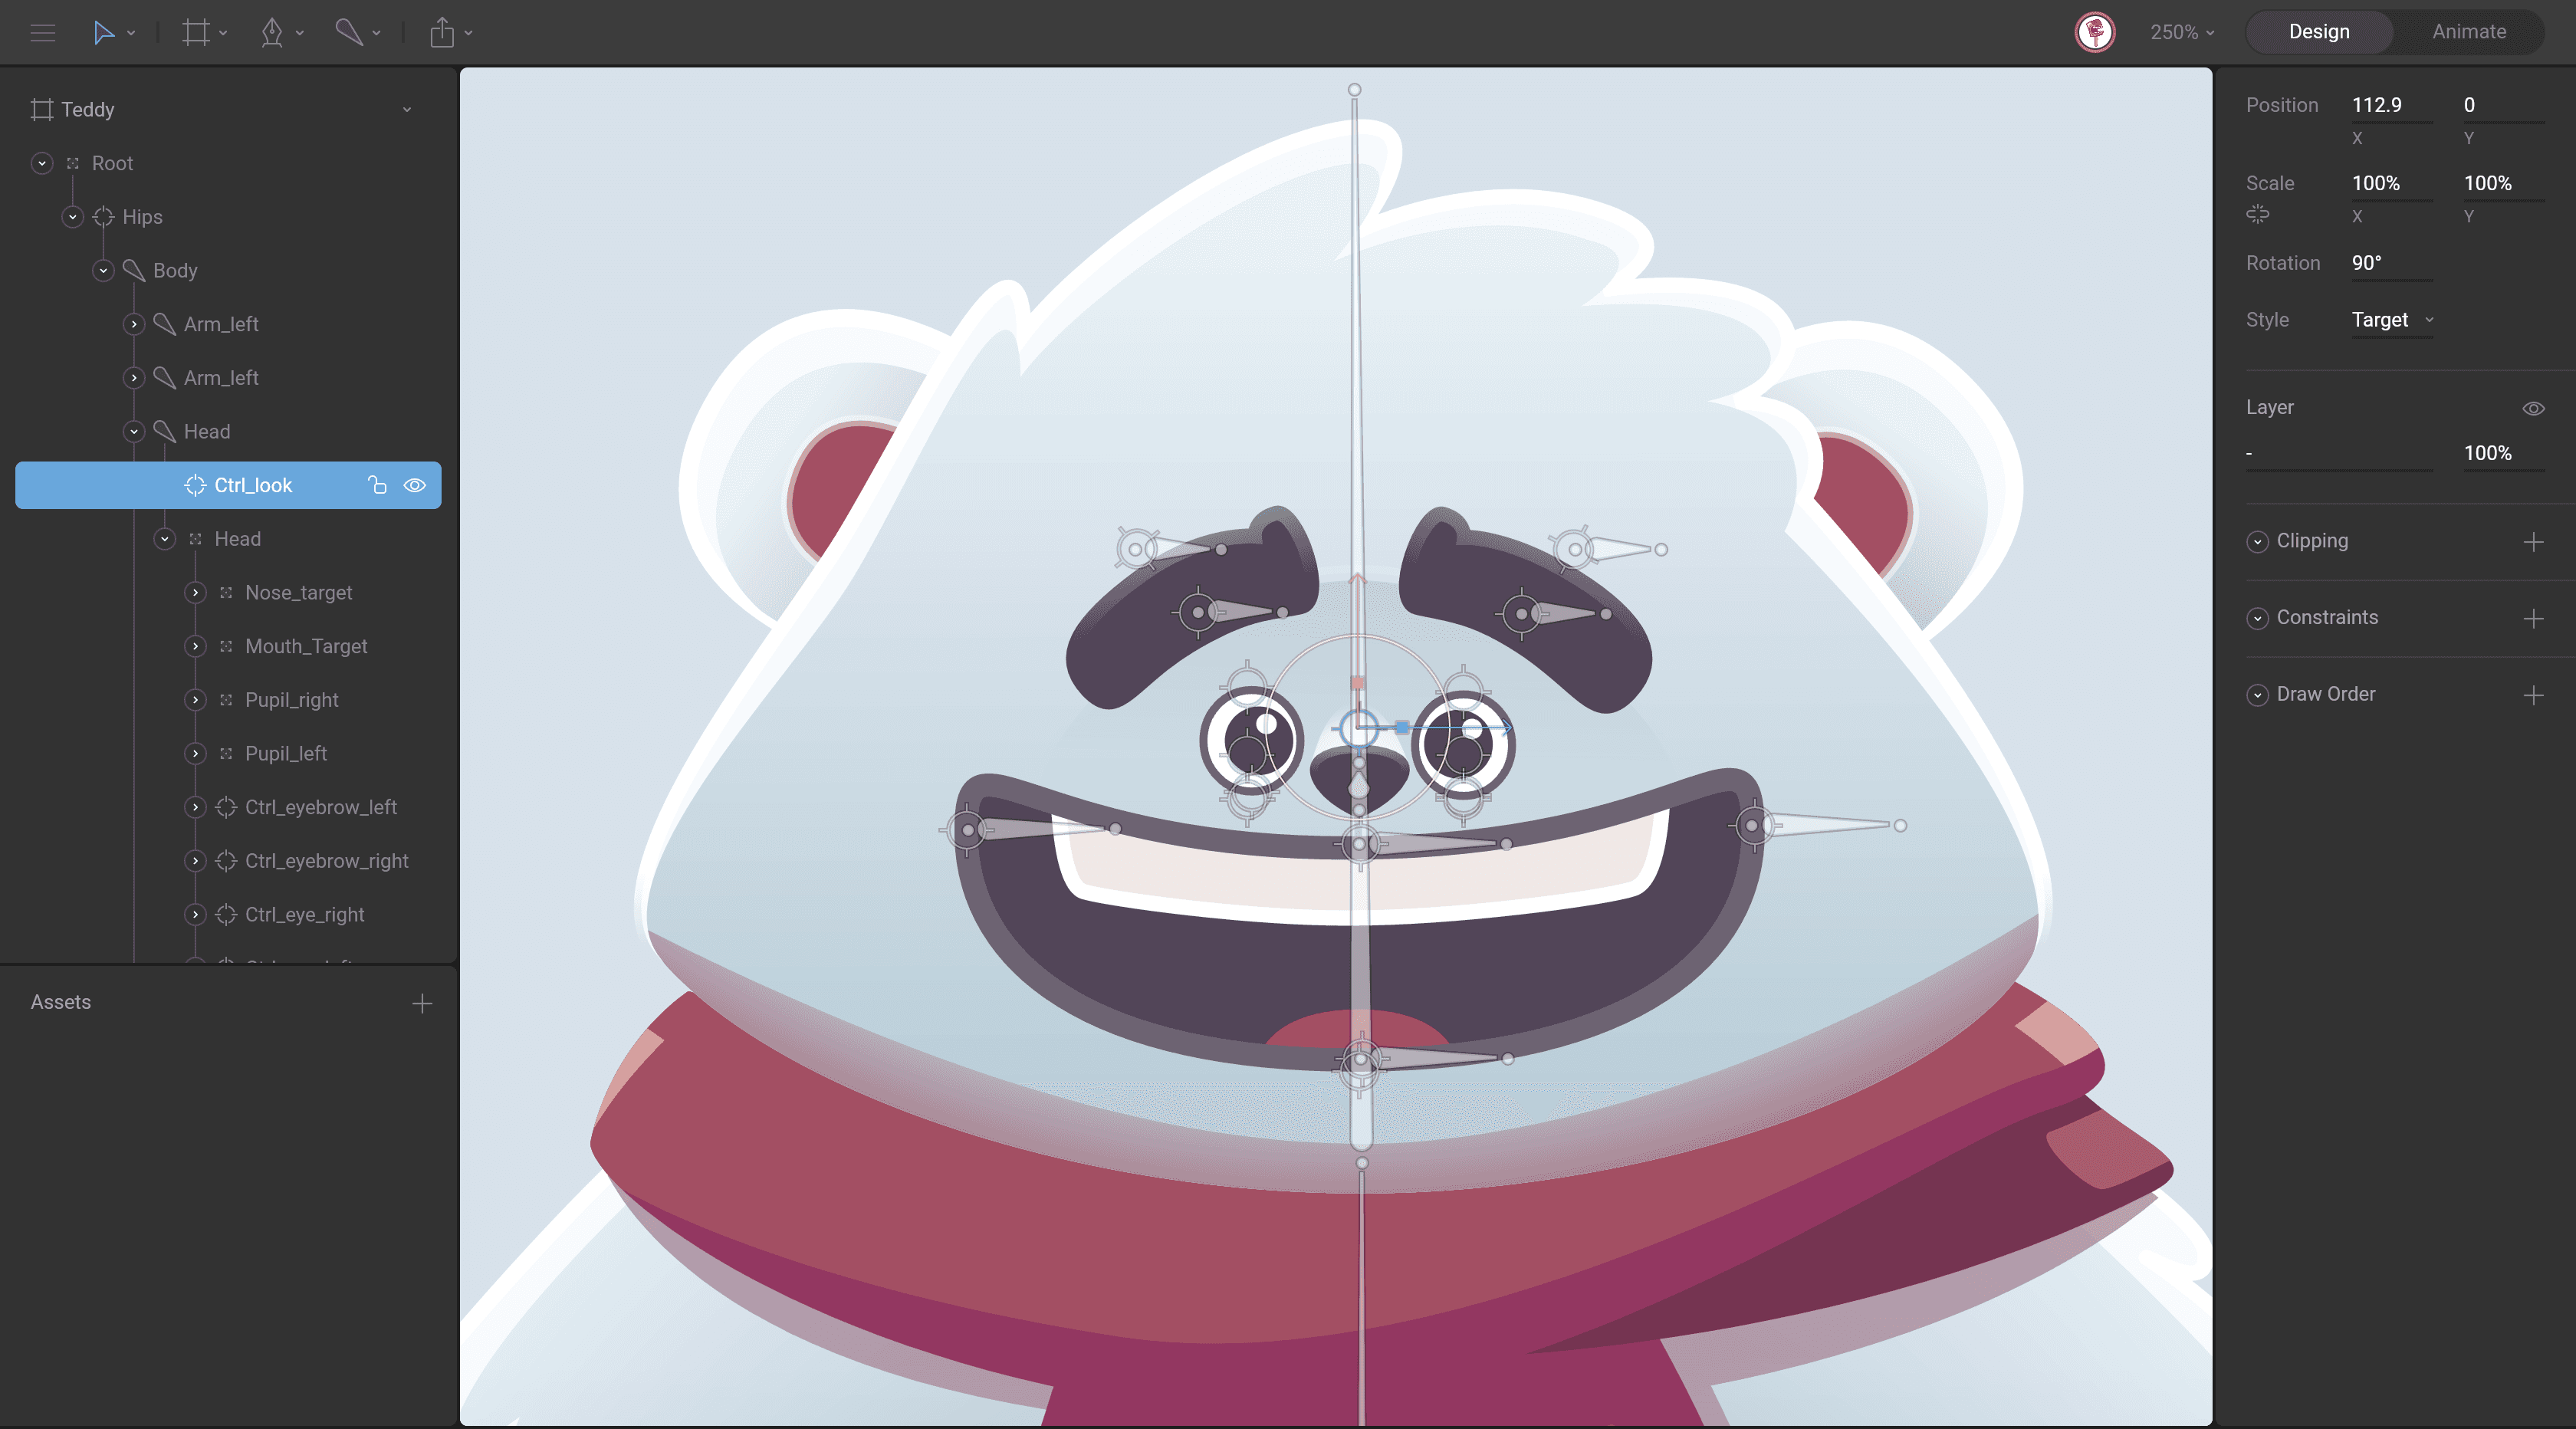
Now, group the different elements of the face and move the origin of this group to the same position as the Ctrl_look. In this case, I’ve grouped the pupils, eyes, nose, mouth, and the ears.
Add a translation constraint to each of these groups, selecting Ctrl_look as the target and adding different strength values for each of them. The pupils have 40 because this group moves the most. The eyes, mouth, and eyebrows have 20. The nose has 25 because it moves a little more than the eyes. The ears are on the back of the head and need to move in the opposite direction of Ctrl_Look, so we need to give them a negative value.
Time for the magic! When you move the Ctrl_look, you can see how the character's face follows the control.
You probably noticed that the character can start breaking if we push the rig too far. To fix this, we can limit the movement of the Ctrl_look group with a distance constraint. To make this work, we need a target that works as a limit. Add a new group (Distance) at the same position as the Ctrl_look, and select this group as a target of the Distance constraint. Now you just need to adjust the distance you want to have the limit.
Animation
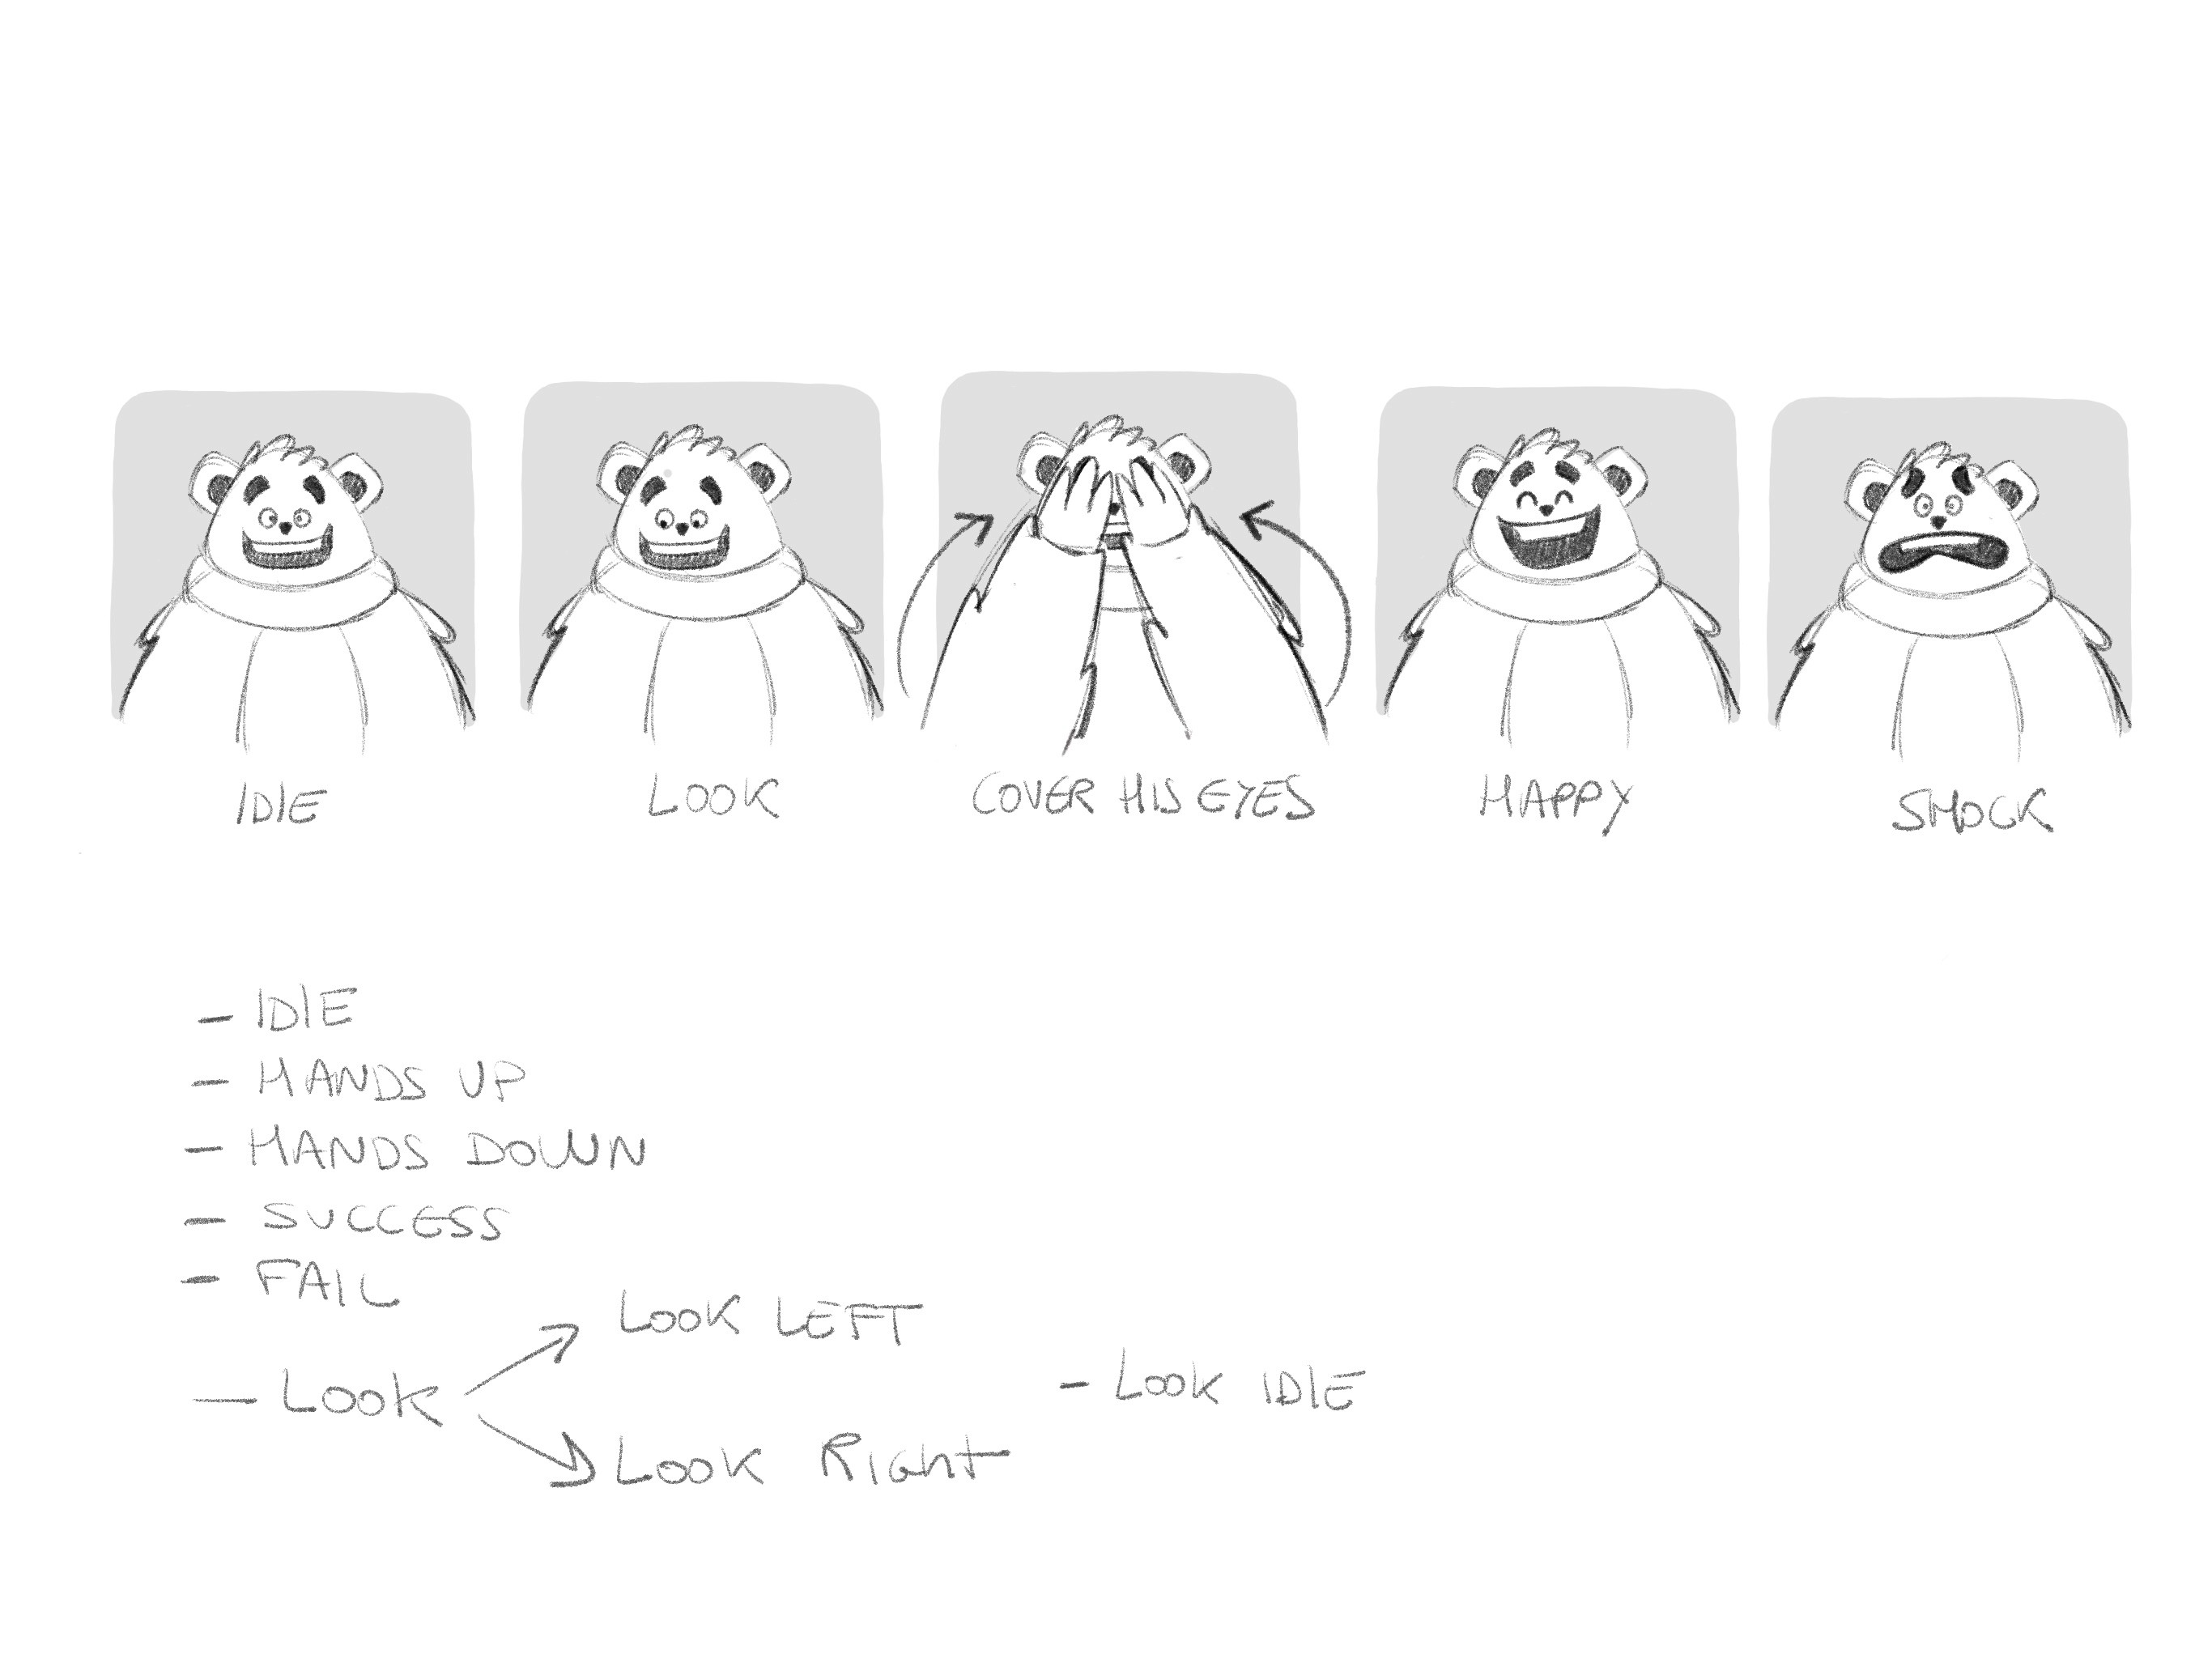
The first thing we need to decide is what the character can do. Determining what the character can do will inform what animations we need to build. In Teddy's case, the idea is that the character starts in an Idle animation, breathing. In the app at runtime, when the user interacts with the text field, the character moves their eyes to the text field and follows the cursor. Teddy covers his eyes with his hands when the user enters the password. Once the user hits enter, two options can happen. One option is, if the username and password are correct, Teddy is happy. If the username or password is wrong, Teddy is in shock.
The animations we need for Teddy are:
Idle
The idea is to create a breathing animation. Ideally, it should be a slow animation, accompanied by one or two blinks.
Hands up
The character covers his eyes with his hands. The animation begins in the same position as Idle. Then, he brings his hands to his eyes. Here the important part is that this movement has two parts. First, the character raises his arms and opens them. Second, he closes his arms and covers his eyes. Two details we want to include are the anticipation before Teddy raises his hands, and the fingers opening and closing as he covers his eyes.
Hands down
The character starts in the last position of Hands up. From this position, he lowers his arms until reaching the idle position. One detail of this animation is the way he drags his face as he lowers his hands. For this, you can use Ctrl_look.
Success
In this animation the character changes into a happy pose. The character starts in the idle position, makes an anticipation and changes his face to happiness by opening his mouth and stretching his body upwards.
Fail
This animation works the same as Success, but the expression changes to shock. The detail here is the movement of the character's head before the final pose.
Look left/Look right
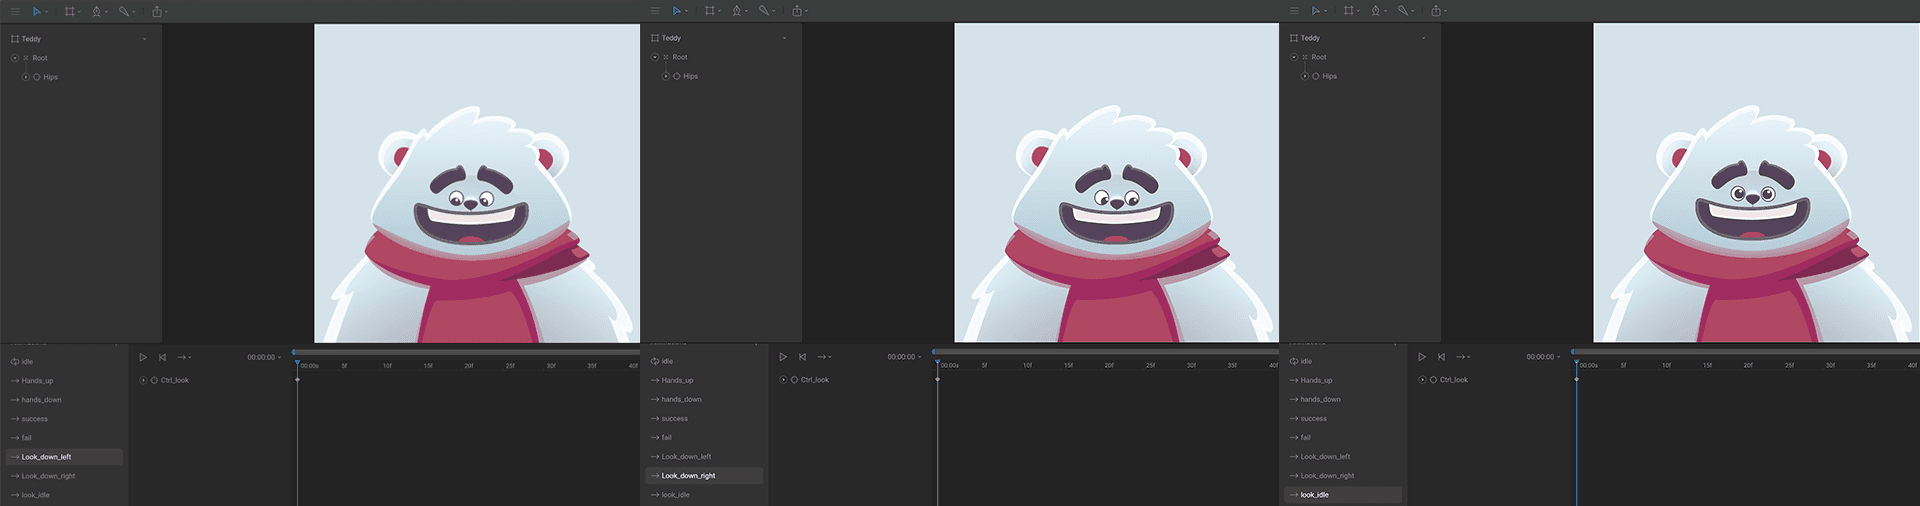
These two animations are the ones we are going to use in the 1D Blend state. The idea is to mix them so that they create the effect of looking from one side to the other. We just need to create a right look position key for one animation and a left look position key for the other animation. For both cases I have used Ctrl_look. Another important thing here is that I don't have keys on the position of the character, only on the eyes. This way I can mix the idle with the look in the state machine and make the character move the look while is breathing.
State Machine
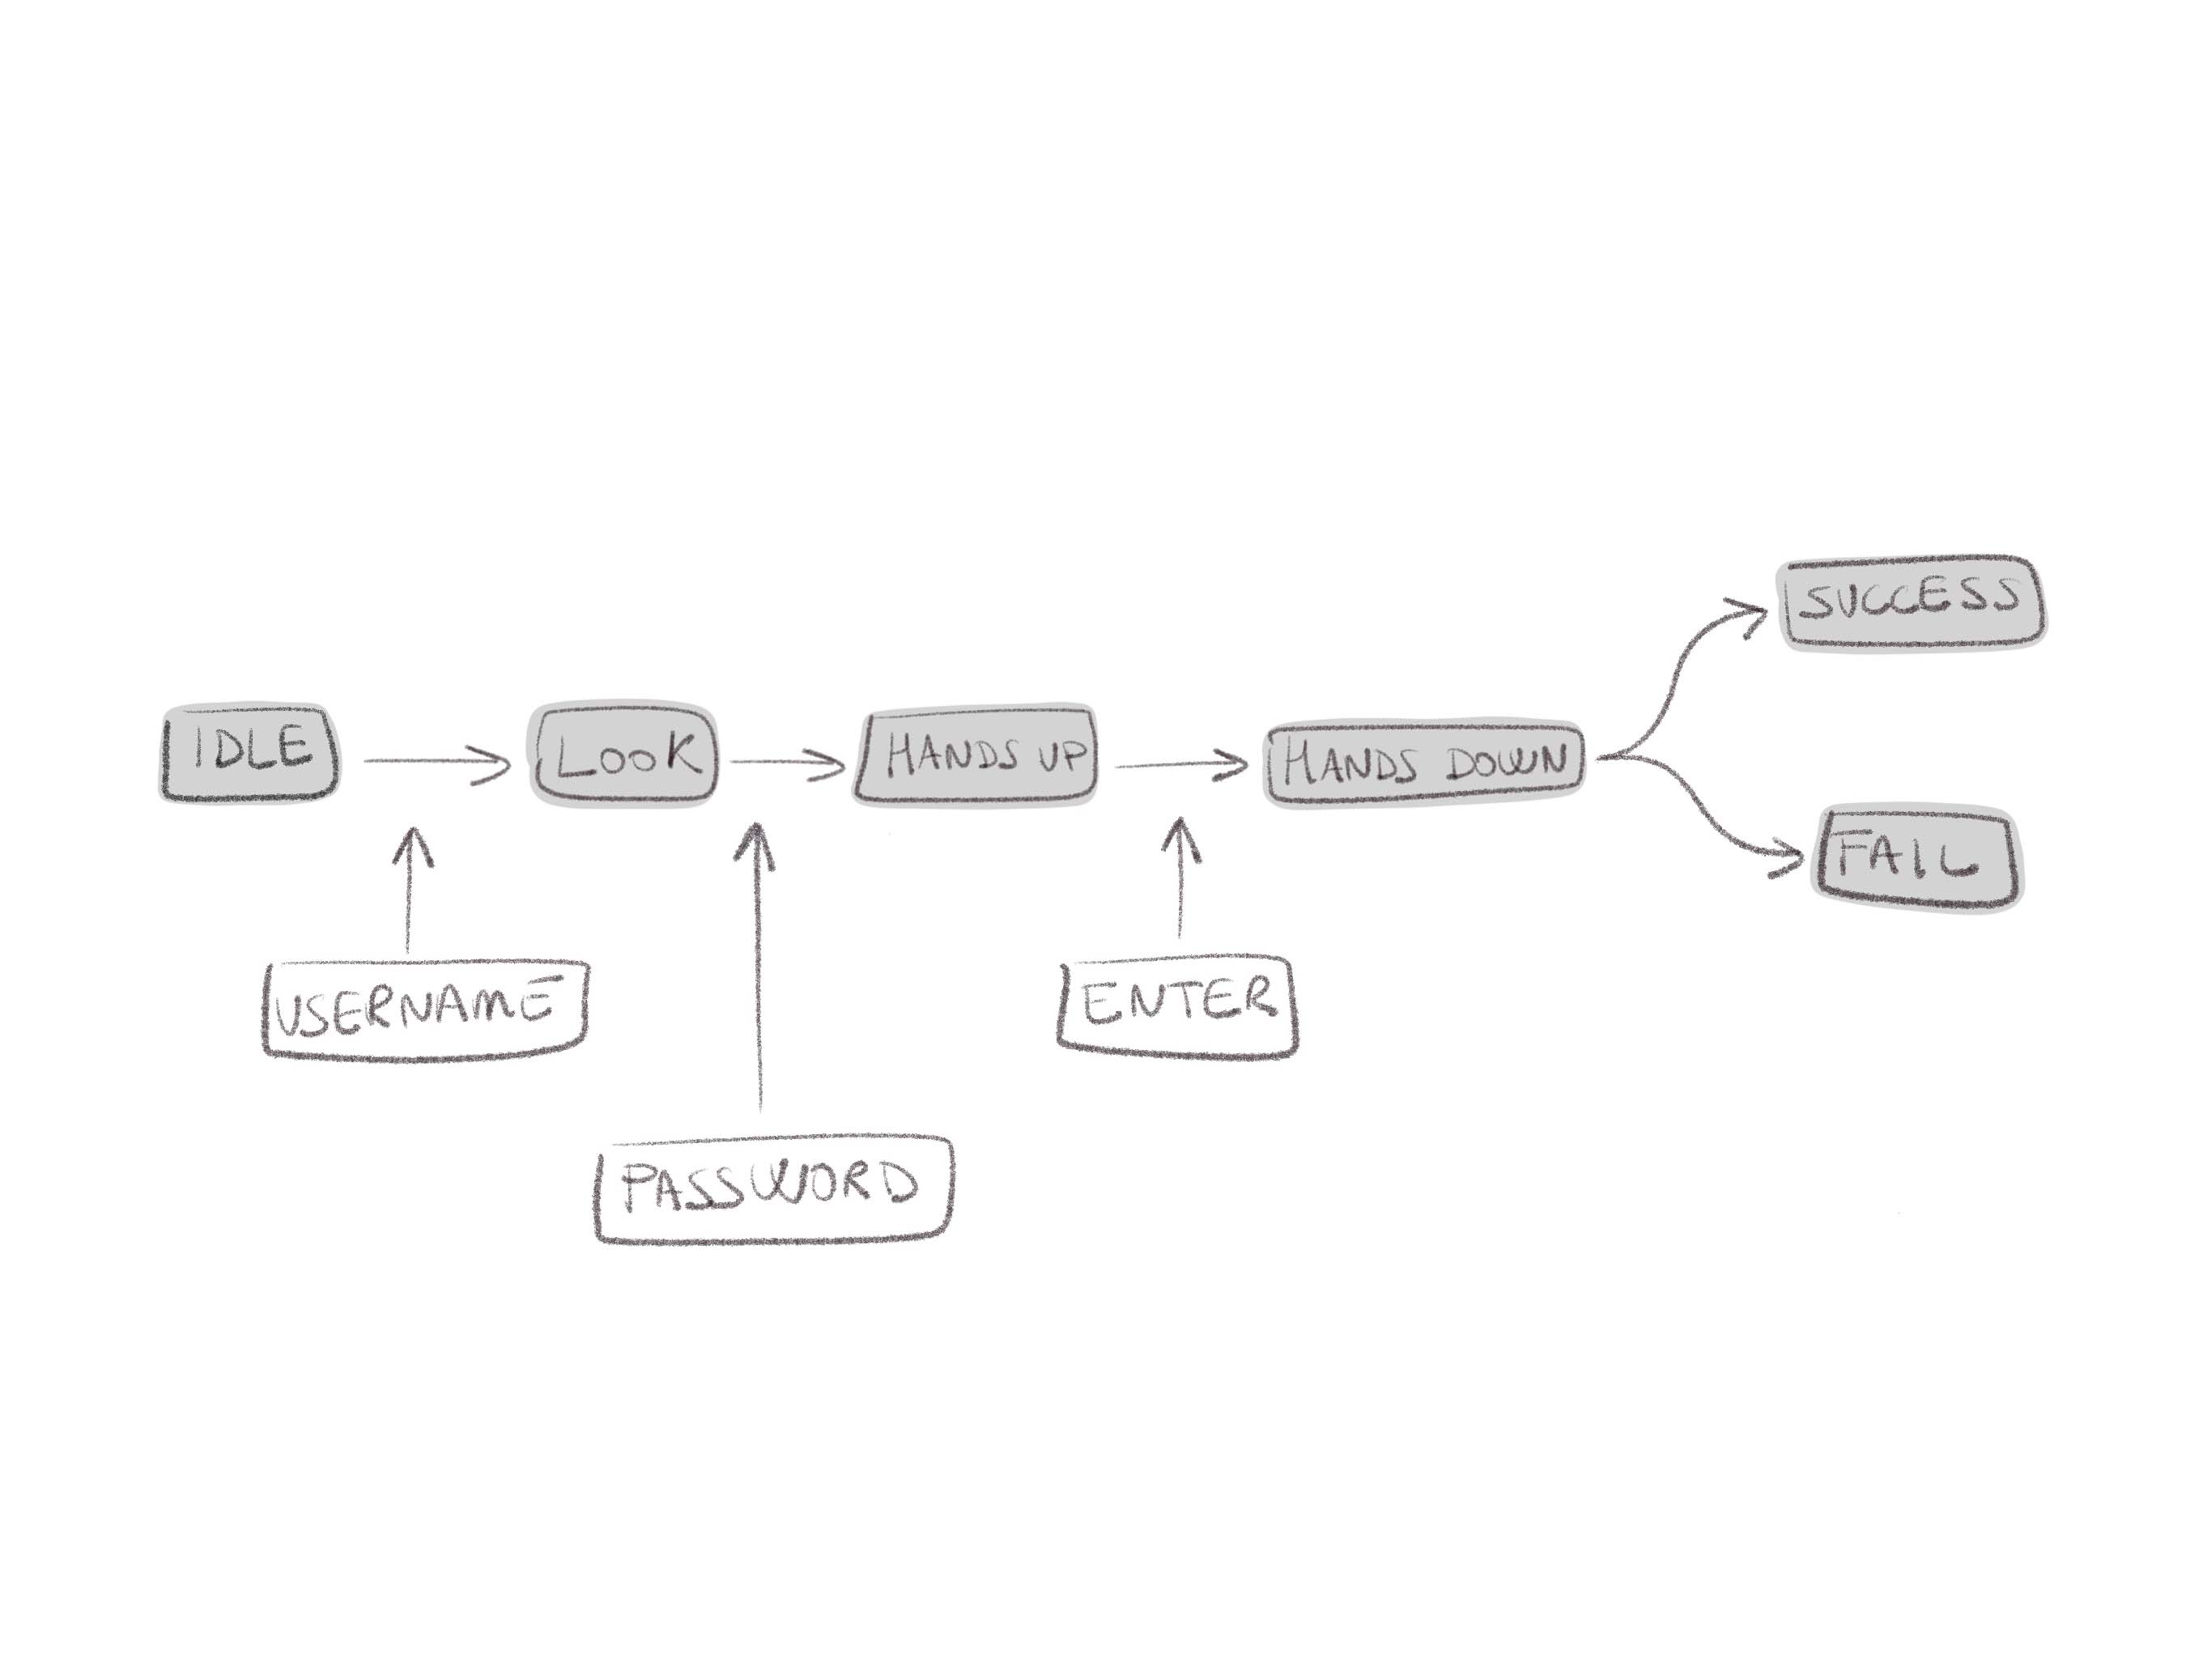
One thing I usually do is create a sketch of the different states that I need. It is not something definitive, just a guide to understand how I can configure the state machine.
Thinking about how the state machine will work from a login form perspective in the app, the idea is that the state machine starts with Idle. Then, when the user enters the username in the text field, the look animation is triggered. When the user enters the password, the Hands up animation is triggered and when the user finishes, the Hands down animation is triggered. Finally, when the user hits Login, at that time two things can happen. If the data is correct, the Success animation is activated or if the data is incorrect, the Fail animation is activated.
Start naming the state machine (Login Machine) and the first layer where you will work (States).

Now, drag and drop the Idle animation and add a transition between Entry and Idle. This way the state machine will start with the Idle animation.

The next animation is the look. Here, we want to make the character move his look while he is in the Idle state, so we need to mix these two animations, and for this, we need to add another layer in the state machine (Type). Drag and drop the Look idle animation in this new layer, and add a transition from Entry.

Now add "Look left" animation and create a transition from Look Idle. To make this transition works, we need an input. Add a new input of type Boolean (isChecking). This input will fire when the user interacts with the text field and will cause the state machine to jump from Look Idle to Look Left. The other thing we need is a condition. In this case, the condition we need is that the input (isChecking) has to be true. Good, this is starting to work!
You will now see the character's eyes jump from the Idle position to the left position. But we want the eyes to move from one position to another. For this, add duration to this transition. This way, Idle and Look left states will be mixed, so the character's eyes will move from the idle position to the left position. In this case we can add 200ms. Now it looks better.
Now, we need Teddy to follow the text with his eyes. We need to use a 1D Blend state because it allows you to mix two animations and control them with a number input. For this, select the "look left" animation and change it to blend 1D in the properties panel. Add the two animations that we want to mix, "looks left" and "look right," and modify the value of "look right" to 100. This means that when the input value is 0, the look is on the left; when the input value is 100 the look is on the right.
For this to work I need a new input. In this case, a number input (numLook) and don't forget to select the input in the Blend 1D properties.

In order for the look to return to the idle position when the user finishes typing, we need a transition in the opposite direction with the condition where the input (isChecking) has to be false. Remember to add a duration of 200 for Teddy's eyes to move to the idle position.
Try the state machine, use (isChecking) and (numLook) inputs and see how Teddy moves his eyes.
Go back to the (States) layer and add the rest of the animations. Let's start with the Hand up and Hand down animations. Drag and drop these two animations and create a transition from idle to Hands up. Another transition from Hands up to Hands down and one last transition from Hands down to Idle.

To make these transitions work we need an other input. In this case , a Boolean type (isHandsUp). For the transition between Idle and Hands up, the condition we need is that the input (isHandsUp) has to be true. For the transition between Hands up and Hands down, the condition we need is that the (isHandsUp) input has to be false and for the state machine to return to the Idle state, we have to activate the Exit Time option and change the value to 100%, which means that when the animation is complete the state machine will jump to the Idle state.
Add duration to the transitions between Idle and Hands up (500ms) and between Hands down and Idle (1000ms), so that the states are mixed and work better.

Now drag and drop Success and Fail animations and create two-way transitions to idle for each of them.
For Success, we need an input to trigger this animation. In this case, we are going to use a trigger type (trigSuccess), because it is perfect to activate an animation at a specific moment. Now, the condition we need for the state machine to jump to Success is when the input (trigSuccess) is used. Once the animation is over, the state machine should jump to the Idle state. To do this we are going to do two things. First, activate the Exit Time option with a value of 100%. this way when the animation completes, the state machine will jump to the Idle state. The second thing is to add duration to this transition (1000ms) so that the character doesn't change suddenly and has a transition to the Idle pose.
For Fail, we will do the same, but with a new trigger input (trigFail) and add duration to the transitions between Fail and Idle (500ms) and idle.
But there is one thing that does not work well. If you notice, in the Fail animation, Teddy doesn't move his head sideways like in the animation. To fix this, he changes the order of the layers of the state machine. What's happening here is that the (Type) layer is getting mixed up with the (State) layer. In the state machine the blending is from the bottom layer to the top layer, so the look animation, which we have on the (Type) layer, is on top of Teddy's head animation on the (State) layer. When you change the order, now Teddy's head animation is on top the look animation. So now when we try with Fail animation, Teddy shakes his head as expected.
Now that we've set up the state machine, it's time to check everything to make sure everything is ok. If something doesn't work right check the transitions and make sure you have the correct conditions.
I'm looking forward to seeing what you can do with all this. Remember to start with something very simple so you can understand the process and then you can try something more complex.
Explore how we work with dev to integrate Teddy into the example login page in a React application.
An animated login screen is a fun way to personalize and enhance the user experience of an application or website. This post will look at how we created the Teddy login example. We'll walk through the design, rig, and animations. We'll also cover how the state machine brings everything together. This tutorial does not cover character creation, animation, or how to build a login experience in your application (though we'll explore that in a follow-up post).
If you are interested in taking a look at the file in the Rive Community, you can find it here.
How the login screen works
Let's start by looking at how the login screen works. When you type your username, Teddy looks at the text field and follows with his eyes. Teddy covers his eyes when you're typing your password. If the password is wrong, Teddy is shocked. If the password is correct, Teddy is happy.
Let’s take a look at how to put all of this together.
Design
You can use Rive's Editor tools to design each part of the character. In this case, I’ve used the Pen Tool to create almost all the parts of the character aside from the eyes, which I used ellipses. Feel free to build your own character. My advice is to start with a very simple design to understand the process.
Rig
Bones, groups, and constraints allow you to animate the character easily, like moving an arm or tilting the head. With Teddy, the most important part is the eyes. When the user interacts with the text field, Teddy's eyes move and follow the text. To achieve this, we need to create a rig that allows us to move the character's eyes and head.
There are different ways to create a rig like this. One way is using a Translation constraint, which allows an object to follow a target using different strength values. In this way, some elements move more than others creating a 3D effect.
See Ctrl_look group in the hierarchy.
The first thing you need to do is create a Target to control the look.
Now, group the different elements of the face and move the origin of this group to the same position as the Ctrl_look. In this case, I’ve grouped the pupils, eyes, nose, mouth, and the ears.
Add a translation constraint to each of these groups, selecting Ctrl_look as the target and adding different strength values for each of them. The pupils have 40 because this group moves the most. The eyes, mouth, and eyebrows have 20. The nose has 25 because it moves a little more than the eyes. The ears are on the back of the head and need to move in the opposite direction of Ctrl_Look, so we need to give them a negative value.
Time for the magic! When you move the Ctrl_look, you can see how the character's face follows the control.
You probably noticed that the character can start breaking if we push the rig too far. To fix this, we can limit the movement of the Ctrl_look group with a distance constraint. To make this work, we need a target that works as a limit. Add a new group (Distance) at the same position as the Ctrl_look, and select this group as a target of the Distance constraint. Now you just need to adjust the distance you want to have the limit.
Animation
The first thing we need to decide is what the character can do. Determining what the character can do will inform what animations we need to build. In Teddy's case, the idea is that the character starts in an Idle animation, breathing. In the app at runtime, when the user interacts with the text field, the character moves their eyes to the text field and follows the cursor. Teddy covers his eyes with his hands when the user enters the password. Once the user hits enter, two options can happen. One option is, if the username and password are correct, Teddy is happy. If the username or password is wrong, Teddy is in shock.
The animations we need for Teddy are:
Idle
The idea is to create a breathing animation. Ideally, it should be a slow animation, accompanied by one or two blinks.
Hands up
The character covers his eyes with his hands. The animation begins in the same position as Idle. Then, he brings his hands to his eyes. Here the important part is that this movement has two parts. First, the character raises his arms and opens them. Second, he closes his arms and covers his eyes. Two details we want to include are the anticipation before Teddy raises his hands, and the fingers opening and closing as he covers his eyes.
Hands down
The character starts in the last position of Hands up. From this position, he lowers his arms until reaching the idle position. One detail of this animation is the way he drags his face as he lowers his hands. For this, you can use Ctrl_look.
Success
In this animation the character changes into a happy pose. The character starts in the idle position, makes an anticipation and changes his face to happiness by opening his mouth and stretching his body upwards.
Fail
This animation works the same as Success, but the expression changes to shock. The detail here is the movement of the character's head before the final pose.
Look left/Look right
These two animations are the ones we are going to use in the 1D Blend state. The idea is to mix them so that they create the effect of looking from one side to the other. We just need to create a right look position key for one animation and a left look position key for the other animation. For both cases I have used Ctrl_look. Another important thing here is that I don't have keys on the position of the character, only on the eyes. This way I can mix the idle with the look in the state machine and make the character move the look while is breathing.
State Machine
One thing I usually do is create a sketch of the different states that I need. It is not something definitive, just a guide to understand how I can configure the state machine.
Thinking about how the state machine will work from a login form perspective in the app, the idea is that the state machine starts with Idle. Then, when the user enters the username in the text field, the look animation is triggered. When the user enters the password, the Hands up animation is triggered and when the user finishes, the Hands down animation is triggered. Finally, when the user hits Login, at that time two things can happen. If the data is correct, the Success animation is activated or if the data is incorrect, the Fail animation is activated.
Start naming the state machine (Login Machine) and the first layer where you will work (States).
Now, drag and drop the Idle animation and add a transition between Entry and Idle. This way the state machine will start with the Idle animation.
The next animation is the look. Here, we want to make the character move his look while he is in the Idle state, so we need to mix these two animations, and for this, we need to add another layer in the state machine (Type). Drag and drop the Look idle animation in this new layer, and add a transition from Entry.
Now add "Look left" animation and create a transition from Look Idle. To make this transition works, we need an input. Add a new input of type Boolean (isChecking). This input will fire when the user interacts with the text field and will cause the state machine to jump from Look Idle to Look Left. The other thing we need is a condition. In this case, the condition we need is that the input (isChecking) has to be true. Good, this is starting to work!
You will now see the character's eyes jump from the Idle position to the left position. But we want the eyes to move from one position to another. For this, add duration to this transition. This way, Idle and Look left states will be mixed, so the character's eyes will move from the idle position to the left position. In this case we can add 200ms. Now it looks better.
Now, we need Teddy to follow the text with his eyes. We need to use a 1D Blend state because it allows you to mix two animations and control them with a number input. For this, select the "look left" animation and change it to blend 1D in the properties panel. Add the two animations that we want to mix, "looks left" and "look right," and modify the value of "look right" to 100. This means that when the input value is 0, the look is on the left; when the input value is 100 the look is on the right.
For this to work I need a new input. In this case, a number input (numLook) and don't forget to select the input in the Blend 1D properties.
In order for the look to return to the idle position when the user finishes typing, we need a transition in the opposite direction with the condition where the input (isChecking) has to be false. Remember to add a duration of 200 for Teddy's eyes to move to the idle position.
Try the state machine, use (isChecking) and (numLook) inputs and see how Teddy moves his eyes.
Go back to the (States) layer and add the rest of the animations. Let's start with the Hand up and Hand down animations. Drag and drop these two animations and create a transition from idle to Hands up. Another transition from Hands up to Hands down and one last transition from Hands down to Idle.
To make these transitions work we need an other input. In this case , a Boolean type (isHandsUp). For the transition between Idle and Hands up, the condition we need is that the input (isHandsUp) has to be true. For the transition between Hands up and Hands down, the condition we need is that the (isHandsUp) input has to be false and for the state machine to return to the Idle state, we have to activate the Exit Time option and change the value to 100%, which means that when the animation is complete the state machine will jump to the Idle state.
Add duration to the transitions between Idle and Hands up (500ms) and between Hands down and Idle (1000ms), so that the states are mixed and work better.
Now drag and drop Success and Fail animations and create two-way transitions to idle for each of them.
For Success, we need an input to trigger this animation. In this case, we are going to use a trigger type (trigSuccess), because it is perfect to activate an animation at a specific moment. Now, the condition we need for the state machine to jump to Success is when the input (trigSuccess) is used. Once the animation is over, the state machine should jump to the Idle state. To do this we are going to do two things. First, activate the Exit Time option with a value of 100%. this way when the animation completes, the state machine will jump to the Idle state. The second thing is to add duration to this transition (1000ms) so that the character doesn't change suddenly and has a transition to the Idle pose.
For Fail, we will do the same, but with a new trigger input (trigFail) and add duration to the transitions between Fail and Idle (500ms) and idle.
But there is one thing that does not work well. If you notice, in the Fail animation, Teddy doesn't move his head sideways like in the animation. To fix this, he changes the order of the layers of the state machine. What's happening here is that the (Type) layer is getting mixed up with the (State) layer. In the state machine the blending is from the bottom layer to the top layer, so the look animation, which we have on the (Type) layer, is on top of Teddy's head animation on the (State) layer. When you change the order, now Teddy's head animation is on top the look animation. So now when we try with Fail animation, Teddy shakes his head as expected.
Now that we've set up the state machine, it's time to check everything to make sure everything is ok. If something doesn't work right check the transitions and make sure you have the correct conditions.
I'm looking forward to seeing what you can do with all this. Remember to start with something very simple so you can understand the process and then you can try something more complex.
Explore how we work with dev to integrate Teddy into the example login page in a React application.
Join our newsletter
Get all the latest Rive news delivered to your inbox.