We recommend continuous testing of your animations on your target devices/platforms.
Design-time Considerations
See below for some techniques to employ in the Rive editor to keep Rive performant:Asset Optimizations
Image, audio, and font assets are often the biggest source of bloat in .riv files. Unoptimized assets increase download size and must be loaded into memory, which can lead to slowdowns—especially on lower-end devices.Only assets used in artboards will be compiled for runtime. Items in the Assets panel that aren’t used in an artboard will not increase the size of your .riv file.
Fonts
Font files often include thousands of glyphs you may not need, such as Greek letters, mathematical operators, and icons. To reduce the size of the exported font or .riv file, select which glyphs to include.Raster Image Sizes & Dimensions
It is crucial to ensure that the size of an image asset is appropriate for its usage. For instance, avoid using an image with large dimensions (e.g., 8192 x 7022) when it will be displayed in a small section of your artboard (e.g., sized 100 x 100). Using large images can quickly consume device memory. This is particularly true on mobile devices where applications are more memory-constrained. Even if these images are compressed, their dimensions will still impact the amount of application memory used. If you have a very large image and only part of it will be visible at any given time (ie; a scrolling background), consider breaking the image into smaller chunks or mixing raster and recreating part of it as a vector.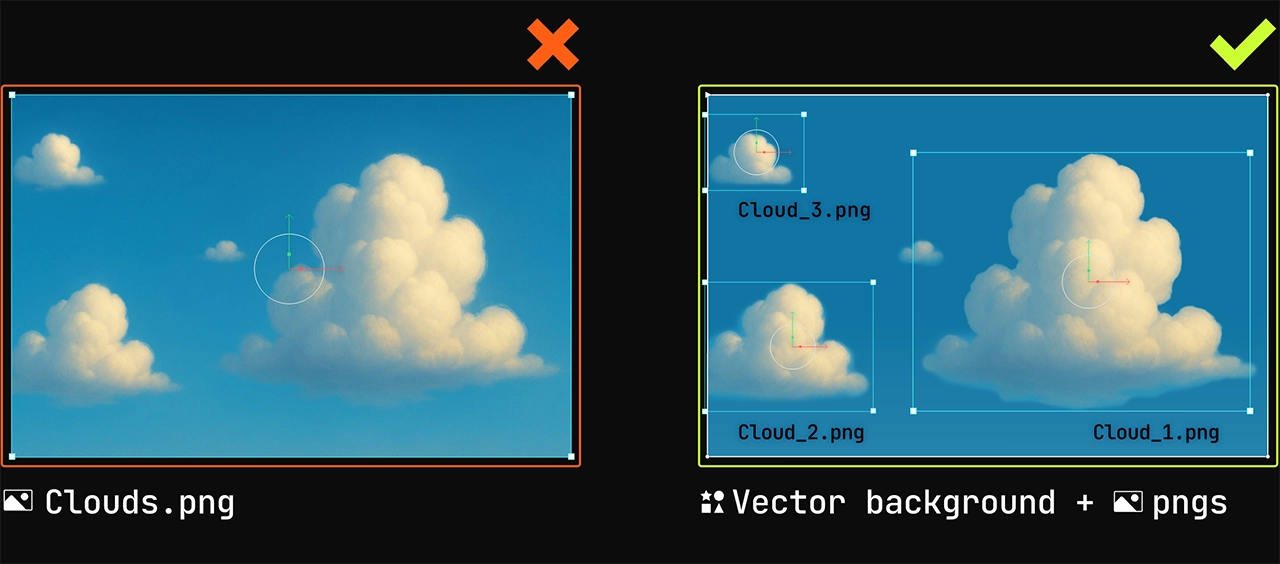
Raster Image Compression
Compression involves reducing the file size by employing various algorithms to discard some image data. You can compress images directly from the Rive editor, which means you maintain the original image but compress the images for runtime use. If the asset is embedded in the animation, this will reduce the file size of the exported riv. For the smallest image file size and best performance, we recommend exporting assets using the WebP Format.Vector Images
Be efficient with the number of vertices in your vector image. While a few extra vertices won’t have much of an impact, thousands might. Be especially careful when importing vectors that were generated with AI, converted from raster images, or were created in drawing apps.Layer Blend Modes for Web
Blend modes are particularly expensive on the web because WebGL doesn’t expose mechanisms for accessing the framebuffer. To apply a blend mode, Rive must copy rendered pixels into a separate texture before compositing, which introduces significant performance and memory overhead. While there are efforts underway to improve this through new WebGL capabilities, these solutions are still pending broader support. Until then, it’s best to use blend modes sparingly in web projects to ensure optimal performance.Artboard Considerations
Clipped Artboards
Clipping artboards is generally fine, but if you’re experiencing performance issues, it’s worth minimizing their use. Clipping can be computationally expensive, as the renderer must evaluate every object—including component instances—to determine pixel visibility. Instead, consider applying clips to specific objects or groups within the artboard. In most cases you can safely remove the clip from the main artboard itself, since nothing outside the Rive instance will be rendered at runtime.Unused Artboards
Unused artboards are still included in the compiled .riv file and are parsed when the file is first loaded. This can lead to unnecessary memory usage and performance overhead, especially if the unused artboards contain complex animations or large assets. To keep your file lean and efficient, it’s best practice to remove any artboards that aren’t actively being used.Idle Animations
If you have idle animation states where the graphic remains static at a given state in a state machine, consider using a “one-shot” animation and ensuring that the timeline animation is not unnecessarily long. At runtime in a state machine, if no looping animations or active blend states are playing, the runtime will preemptively “pause” itself until a transition to another state. This is useful because resource consumption (i.e., CPU usage) may decrease to the point of making Rive impact on resources negligible in applications. Scenarios: Icons, buttons, graphics that only animate based on user interaction, etc.Using Solos
A Solo is similar to a group but with the added ability to toggle the rendering of nested objects. It functions like a radio button, deactivating other objects on the same level. When you’re looking to show or hide a specific object, using a Solo can be a more efficient since it stops the rendering of any non active objects. Solos can also be an effective way to build skins for a character, but it’s important to note that this should only be used if your skins require binding and weighting. Data Binding ArtboardsWhen looking to build more complex skins (that don’t require binding and weighting), or wanting to swap out widgets, icons, ect… data binding an artboard node is the most performant way to do this.
In addition to only rendering the things you need, you also save yourself both memory and CPU usage by providing only the graphics you need.
Blend States
Similar to the guidance in “Idle Animations”, ensure blend states transition out to other states, or move to an exit state when finished if possible. When blend states are activated at runtime, Rive will continually play the state machine, even if it is not necessary anymore. Providing some transition away from the blend state when complete ensures Rive has one less “active” animation to track when considering whether to self-pause at any point while playing the state machine.Runtime Considerations
See below for some techniques to employ when using Rive runtimes in application to keep Rive performant:Out-of-band Assets
See our documentation on Loading Assets. This feature allows you to dynamically load and replace assets (such as fonts, images, and audio) at runtime through code and provide the resources to your Rive graphic. This has the following benefits:- Reduces the exported
.rivbinary size. - Assets can be reused across multiple Rive files or other areas of your application.
- Assets can be preloaded and cached to be more readily available before displaying a Rive graphic.
- Assets can be swapped based on the users’ screen size and resolution, like in this web JS example.
Caching your .riv
If you’re using the same Rive file in multiple places across your page or app, you can cache the .riv file to improve performance. The key benefit of caching is that the file only needs to be parsed and decoded once. Creating new artboard instances from a cached, already-decoded file is significantly faster than decoding the file each time before instantiating an artboard.Pausing Programmatically
There are several cases where you may want to pause a state machine configured with Rive programmatically. By pausing the Rive graphic at runtime, you may notice that Rive’s impact on the application has negligible resource consumption (i.e., CPU).- Rive graphic is offscreen
a. If a Rive graphic is scrolled offscreen and does not need to continue playing, call the
pauseAPI on the respective runtime you’re using to prevent Rive from continuing to animate and consume resources when not needed. b. Call theplayAPI to continue playing Rive when the graphic needs to continue animating if back onscreen. - Accessibility
- If a user has set in device settings that they prefer reduced motion, you may want to read this property at runtime and programmatically either call
pauseor setautoplay: falsewith the Rive runtime to ensure these users have reduced motion when navigating the application. Alternatively, different artboards or state machines can be created and loaded at runtime that function differently.
- If a user has set in device settings that they prefer reduced motion, you may want to read this property at runtime and programmatically either call
- State machine is idle with static graphics
a.
Pausewhen the Rive graphic is idling while it waits for a transition in the state machine from user interaction, data resolving, etc.