> ## Documentation Index
> Fetch the complete documentation index at: https://rive.app/docs/llms.txt
> Use this file to discover all available pages before exploring further.
# WGSL Shaders
> Create and render custom WGSL shaders in Rive.
export const VideoEmbed = ({src}) => {
return
;
};
Shaders are currently only available in [Early Access](https://rive.app/downloads?utm_source=docs\&utm_medium=content). Runtime support is either in development or available as experimental builds.
Have feedback? Join the [Early Access community](https://community.rive.app/c/early-access/) to share your thoughts and help shape the feature.
Shaders in Rive let you write custom WGSL programs that run on the GPU and render to a GPU canvas, which can then be drawn in your Rive file. They are useful for effects, procedural graphics, and visuals that go beyond what the vector renderer and standard Node scripts can produce.
**What's a shader?**
A shader is a small program that runs on the GPU. GPUs are good at running the same program across many vertices or pixels in parallel, which makes shaders useful for graphics effects.
A typical GPU pipeline uses two shader functions:
* **Vertex shader** - decides where vertices are drawn.
* **Fragment shader** - decides the color of each pixel covered by those vertices.
## Creating a Shader Asset
[Create a new script](/scripting/creating-scripts), select **Shader** as the type, and name it `BasicShader`.
The [AI Agent](/editor/ai-agent/ai-agent) can be a helpful way to create or iterate on shader code. Describe the effect you want, then review and test the generated WGSL in your file.
## Basic WGSL Shader
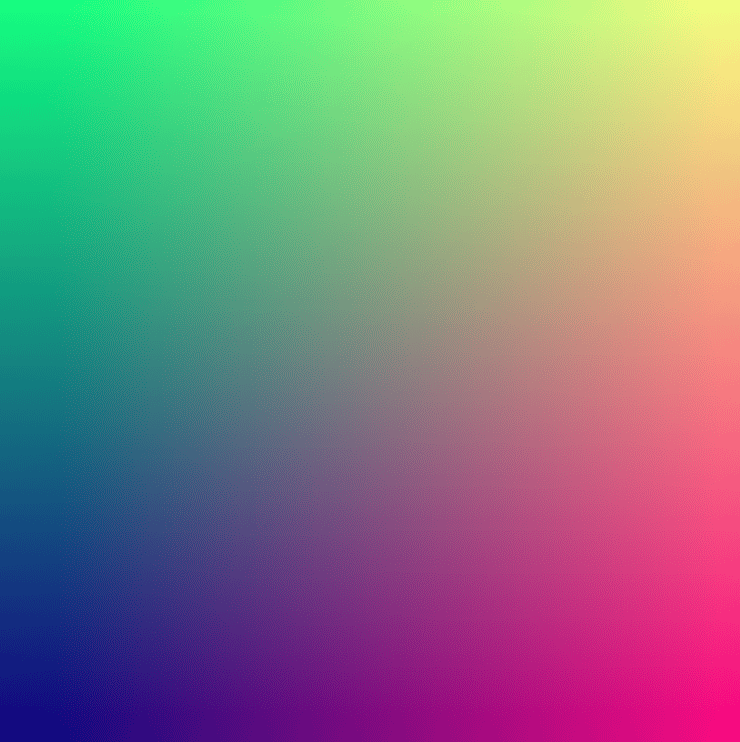
This shader draws a single large triangle that covers the render target. This is a common technique called a fullscreen triangle. The fragment shader then colors each pixel with a gradient.
No vertex or index buffers are needed because the triangle points are defined directly in the shader.
 ```wgsl theme={null}
// ----------------------------------------------------------------------------
// VertexOutput describes the data that flows OUT of the vertex shader and
// INTO the fragment shader. Think of it as a small "package" of values that
// gets automatically interpolated (smoothly blended) across each pixel of
// the triangle before the fragment shader receives it.
// ----------------------------------------------------------------------------
struct VertexOutput {
// @builtin(position) is REQUIRED — it tells the GPU where this vertex
// sits on screen, in "clip space" (x and y roughly range from -1 to 1).
@builtin(position) position: vec4,
// @location(0) is a CUSTOM output we're choosing to pass along — in this
// case, UV coordinates (a 2D position ranging from 0 to 1) that we will
// use in the fragment shader to build our gradient.
@location(0) uv: vec2,
}
// ----------------------------------------------------------------------------
// The VERTEX shader.
// @vertex marks this function as the entry point that runs once per vertex.
// The GPU calls this function 3 times (once per corner of our triangle),
// automatically passing in vertexIndex = 0, 1, then 2.
// ----------------------------------------------------------------------------
@vertex
fn vs_main(@builtin(vertex_index) vertexIndex: u32) -> VertexOutput {
// Here we define 3 fixed 2D points that make up one giant triangle.
// It's intentionally bigger than the screen (-1..3 instead of -1..1) so
// that after clipping, it ends up covering the ENTIRE visible area with
// just a single triangle — a cheap way to draw a fullscreen effect.
var pos = array, 3>(
vec2(-1.0, -1.0),
vec2(3.0, -1.0),
vec2(-1.0, 3.0),
);
// Look up which of the 3 points we're currently processing.
let p = pos[vertexIndex];
// Create the output package described by VertexOutput above.
var out: VertexOutput;
// Clip space positions need to be a vec4 (x, y, z, w). We use z = 0.0
// (no depth) and w = 1.0 (no perspective division needed for 2D).
out.position = vec4(p, 0.0, 1.0);
// Convert our clip-space point (range -1..1) into UV space (range 0..1),
// which is a more convenient range for coloring/texturing later on.
// Formula: uv = position * 0.5 + 0.5
out.uv = p * 0.5 + vec2(0.5, 0.5);
return out;
}
// ----------------------------------------------------------------------------
// The FRAGMENT shader.
// @fragment marks this function as the entry point that runs once per pixel
// covered by the triangle. It receives the interpolated VertexOutput values
// (the "in" parameter) and must return a final color for that pixel.
// ----------------------------------------------------------------------------
@fragment
fn fs_main(in: VertexOutput) -> @location(0) vec4 {
// The returned color is a vec4: (red, green, blue, alpha), with each
// channel ranging from 0.0 (none) to 1.0 (full intensity).
//
// Here we build a simple gradient:
// - red grows from left (0.0) to right (1.0) following UV.x
// - green grows from top/bottom (0.0) to (1.0) following UV.y
// - blue stays fixed at 0.5 (a constant medium blue tint)
// - alpha is 1.0, meaning fully opaque (not transparent)
return vec4(in.uv.x, in.uv.y, 0.5, 1.0);
}
```
## Rendering the Shader with a Script
```lua theme={null}
type ShaderDemo = {
-- The GPUCanvas is an offscreen render target we draw our shader into.
-- It behaves like a small texture we fully control with the GPU.
canvas: GPUCanvas?,
-- The GPUPipeline bundles our compiled shader together with the
-- fixed-function GPU settings (what format to draw into, how vertices
-- are laid out, etc). It's built once and reused every frame.
pipeline: GPUPipeline?,
}
function init(self: ShaderDemo, context: Context): boolean
-- Create a 200x200 GPU canvas to render our shader's output into.
self.canvas = context:gpuCanvas({ width = 200, height = 200 })
-- Fetch the compiled shader asset named "BasicShader"
local shader = context:shader("BasicShader")
if shader and self.canvas then
-- Build the pipeline: the same shader module provides both the
-- @vertex (vs_main) and @fragment (fs_main) entry points.
self.pipeline = GPUPipeline.new({
vertex = shader,
fragment = shader,
-- No vertex buffers needed — BasicShader generates its fullscreen
-- triangle's positions directly from the vertex index.
vertexLayout = {},
-- The pipeline's output color format must match the canvas format
-- it will be rendering into.
colorTargets = { { format = self.canvas.format } },
})
end
return true
end
function drawCanvas(self: ShaderDemo)
if self.canvas and self.pipeline then
-- Start a GPU render pass targeting our canvas. "clear" wipes it to
-- clearColor (opaque black here) before drawing anything new.
local pass = self.canvas:beginRenderPass({
color = { { loadOp = "clear", storeOp = "store", clearColor = { 0, 0, 0, 1 } } },
})
-- Tell the GPU which pipeline (shader + settings) to use for the
-- draw call below.
pass:setPipeline(self.pipeline)
-- Draw 3 vertices with no vertex/index buffers — this runs vs_main
-- three times (vertexIndex 0, 1, 2), producing our fullscreen triangle,
-- then runs fs_main once per covered pixel to shade it.
pass:draw(3)
-- Submit the pass; the canvas now holds the shader's rendered image.
pass:finish()
end
end
function draw(self: ShaderDemo, renderer: Renderer)
if self.canvas then
-- The GPU canvas exposes its rendered result as a normal Image, so we
-- can composite it into the rest of the Rive scene like any other
-- image — no special shader knowledge needed here.
local sampler = ImageSampler("clamp", "clamp", "bilinear")
renderer:drawImage(self.canvas.image, sampler, "srcOver", 1)
end
end
return function(): Node
return {
canvas = nil,
pipeline = nil,
init = init,
drawCanvas = drawCanvas,
draw = draw,
}
end
```
### How It Works
#### `context:shader`
`context:shader("BasicShader")` retrieves the compiled shader asset by name. The name must match the shader asset in your file.
#### `GPUCanvas`
`context:gpuCanvas()` creates the render target the shader draws into. The canvas exposes its rendered result as `canvas.image`.
#### `GPUPipeline`
`GPUPipeline.new()` combines the shader with render settings such as vertex layout and color target format.
#### `drawCanvas`
Use `drawCanvas` for GPU rendering. This is where you begin a render pass, set the pipeline, and issue draw calls.
#### `draw`
Use `draw` to draw the rendered canvas image into the Rive scene.
## Shader Targets
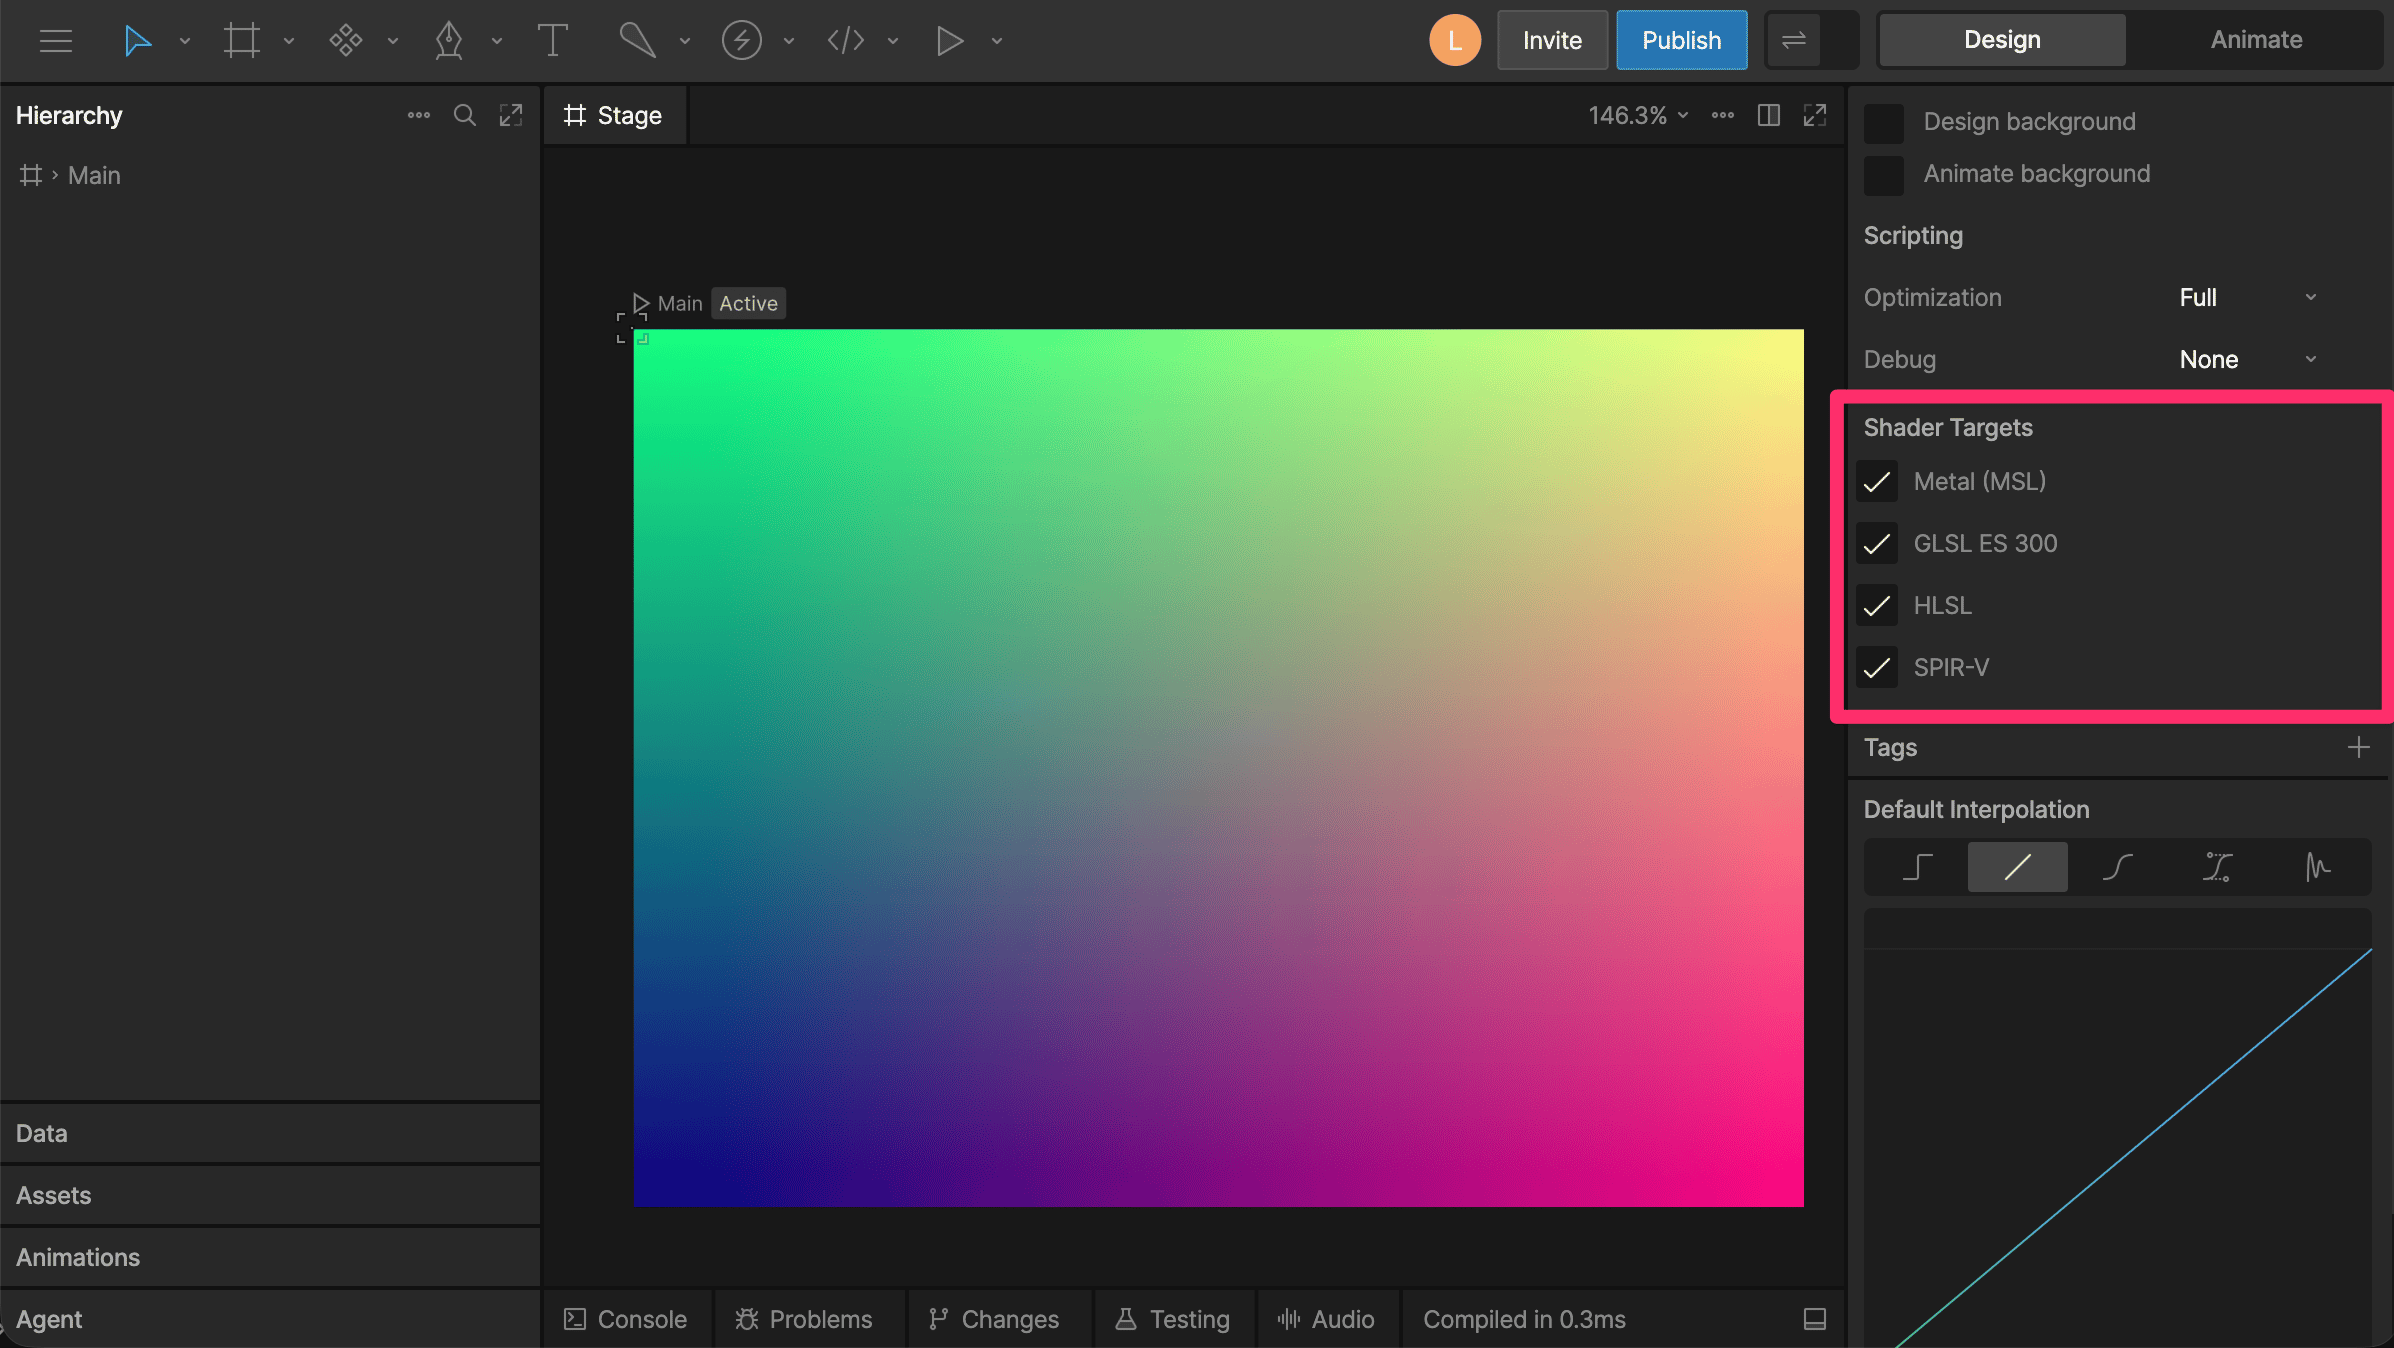
When nothing is selected in the editor, the Inspector shows file-level **Shader Targets** options.
Use these options to choose which shader languages Rive should generate from your WGSL shaders:
* **Metal (MSL)**
* **GLSL ES 300**
* **HLSL**
* **SPIR-V**
Enable the targets required by the runtimes and platforms where your file will be used.
```wgsl theme={null}
// ----------------------------------------------------------------------------
// VertexOutput describes the data that flows OUT of the vertex shader and
// INTO the fragment shader. Think of it as a small "package" of values that
// gets automatically interpolated (smoothly blended) across each pixel of
// the triangle before the fragment shader receives it.
// ----------------------------------------------------------------------------
struct VertexOutput {
// @builtin(position) is REQUIRED — it tells the GPU where this vertex
// sits on screen, in "clip space" (x and y roughly range from -1 to 1).
@builtin(position) position: vec4,
// @location(0) is a CUSTOM output we're choosing to pass along — in this
// case, UV coordinates (a 2D position ranging from 0 to 1) that we will
// use in the fragment shader to build our gradient.
@location(0) uv: vec2,
}
// ----------------------------------------------------------------------------
// The VERTEX shader.
// @vertex marks this function as the entry point that runs once per vertex.
// The GPU calls this function 3 times (once per corner of our triangle),
// automatically passing in vertexIndex = 0, 1, then 2.
// ----------------------------------------------------------------------------
@vertex
fn vs_main(@builtin(vertex_index) vertexIndex: u32) -> VertexOutput {
// Here we define 3 fixed 2D points that make up one giant triangle.
// It's intentionally bigger than the screen (-1..3 instead of -1..1) so
// that after clipping, it ends up covering the ENTIRE visible area with
// just a single triangle — a cheap way to draw a fullscreen effect.
var pos = array, 3>(
vec2(-1.0, -1.0),
vec2(3.0, -1.0),
vec2(-1.0, 3.0),
);
// Look up which of the 3 points we're currently processing.
let p = pos[vertexIndex];
// Create the output package described by VertexOutput above.
var out: VertexOutput;
// Clip space positions need to be a vec4 (x, y, z, w). We use z = 0.0
// (no depth) and w = 1.0 (no perspective division needed for 2D).
out.position = vec4(p, 0.0, 1.0);
// Convert our clip-space point (range -1..1) into UV space (range 0..1),
// which is a more convenient range for coloring/texturing later on.
// Formula: uv = position * 0.5 + 0.5
out.uv = p * 0.5 + vec2(0.5, 0.5);
return out;
}
// ----------------------------------------------------------------------------
// The FRAGMENT shader.
// @fragment marks this function as the entry point that runs once per pixel
// covered by the triangle. It receives the interpolated VertexOutput values
// (the "in" parameter) and must return a final color for that pixel.
// ----------------------------------------------------------------------------
@fragment
fn fs_main(in: VertexOutput) -> @location(0) vec4 {
// The returned color is a vec4: (red, green, blue, alpha), with each
// channel ranging from 0.0 (none) to 1.0 (full intensity).
//
// Here we build a simple gradient:
// - red grows from left (0.0) to right (1.0) following UV.x
// - green grows from top/bottom (0.0) to (1.0) following UV.y
// - blue stays fixed at 0.5 (a constant medium blue tint)
// - alpha is 1.0, meaning fully opaque (not transparent)
return vec4(in.uv.x, in.uv.y, 0.5, 1.0);
}
```
## Rendering the Shader with a Script
```lua theme={null}
type ShaderDemo = {
-- The GPUCanvas is an offscreen render target we draw our shader into.
-- It behaves like a small texture we fully control with the GPU.
canvas: GPUCanvas?,
-- The GPUPipeline bundles our compiled shader together with the
-- fixed-function GPU settings (what format to draw into, how vertices
-- are laid out, etc). It's built once and reused every frame.
pipeline: GPUPipeline?,
}
function init(self: ShaderDemo, context: Context): boolean
-- Create a 200x200 GPU canvas to render our shader's output into.
self.canvas = context:gpuCanvas({ width = 200, height = 200 })
-- Fetch the compiled shader asset named "BasicShader"
local shader = context:shader("BasicShader")
if shader and self.canvas then
-- Build the pipeline: the same shader module provides both the
-- @vertex (vs_main) and @fragment (fs_main) entry points.
self.pipeline = GPUPipeline.new({
vertex = shader,
fragment = shader,
-- No vertex buffers needed — BasicShader generates its fullscreen
-- triangle's positions directly from the vertex index.
vertexLayout = {},
-- The pipeline's output color format must match the canvas format
-- it will be rendering into.
colorTargets = { { format = self.canvas.format } },
})
end
return true
end
function drawCanvas(self: ShaderDemo)
if self.canvas and self.pipeline then
-- Start a GPU render pass targeting our canvas. "clear" wipes it to
-- clearColor (opaque black here) before drawing anything new.
local pass = self.canvas:beginRenderPass({
color = { { loadOp = "clear", storeOp = "store", clearColor = { 0, 0, 0, 1 } } },
})
-- Tell the GPU which pipeline (shader + settings) to use for the
-- draw call below.
pass:setPipeline(self.pipeline)
-- Draw 3 vertices with no vertex/index buffers — this runs vs_main
-- three times (vertexIndex 0, 1, 2), producing our fullscreen triangle,
-- then runs fs_main once per covered pixel to shade it.
pass:draw(3)
-- Submit the pass; the canvas now holds the shader's rendered image.
pass:finish()
end
end
function draw(self: ShaderDemo, renderer: Renderer)
if self.canvas then
-- The GPU canvas exposes its rendered result as a normal Image, so we
-- can composite it into the rest of the Rive scene like any other
-- image — no special shader knowledge needed here.
local sampler = ImageSampler("clamp", "clamp", "bilinear")
renderer:drawImage(self.canvas.image, sampler, "srcOver", 1)
end
end
return function(): Node
return {
canvas = nil,
pipeline = nil,
init = init,
drawCanvas = drawCanvas,
draw = draw,
}
end
```
### How It Works
#### `context:shader`
`context:shader("BasicShader")` retrieves the compiled shader asset by name. The name must match the shader asset in your file.
#### `GPUCanvas`
`context:gpuCanvas()` creates the render target the shader draws into. The canvas exposes its rendered result as `canvas.image`.
#### `GPUPipeline`
`GPUPipeline.new()` combines the shader with render settings such as vertex layout and color target format.
#### `drawCanvas`
Use `drawCanvas` for GPU rendering. This is where you begin a render pass, set the pipeline, and issue draw calls.
#### `draw`
Use `draw` to draw the rendered canvas image into the Rive scene.
## Shader Targets
When nothing is selected in the editor, the Inspector shows file-level **Shader Targets** options.
Use these options to choose which shader languages Rive should generate from your WGSL shaders:
* **Metal (MSL)**
* **GLSL ES 300**
* **HLSL**
* **SPIR-V**
Enable the targets required by the runtimes and platforms where your file will be used.