> ## Documentation Index
> Fetch the complete documentation index at: https://rive.app/docs/llms.txt
> Use this file to discover all available pages before exploring further.
# States
export const VideoEmbed = ({src}) => {
return
;
};
export const YouTube = ({id, timestamp}) => {
const videoSrc = timestamp ? `https://www.youtube.com/embed/${id}?start=${timestamp}` : `https://www.youtube.com/embed/${id}`;
return ;
};
States are simply timeline animations that can play at any point in your state machine. A state could be as simple as changing the color and position of an object, or as complex as blending multiple timelines together.
There are a few types of states that you’ll end up using as you work with the State Machine, including Default States, Single animations, and Blend States. We’ll explore each of these below.
## Default States
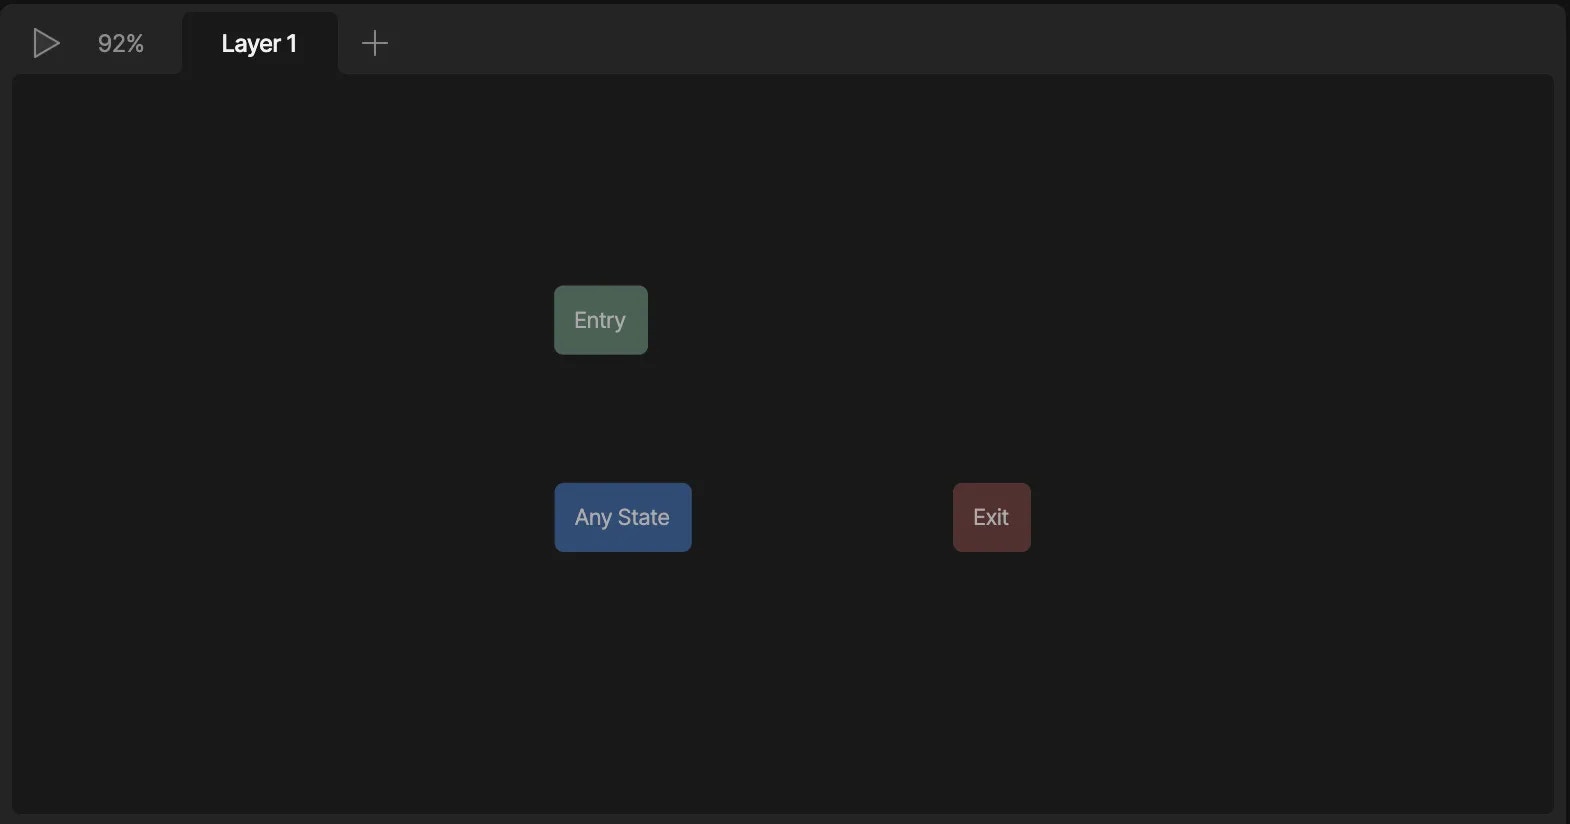
The Default States are the states that, by default, are added to every State Machine.
 ### Entry State
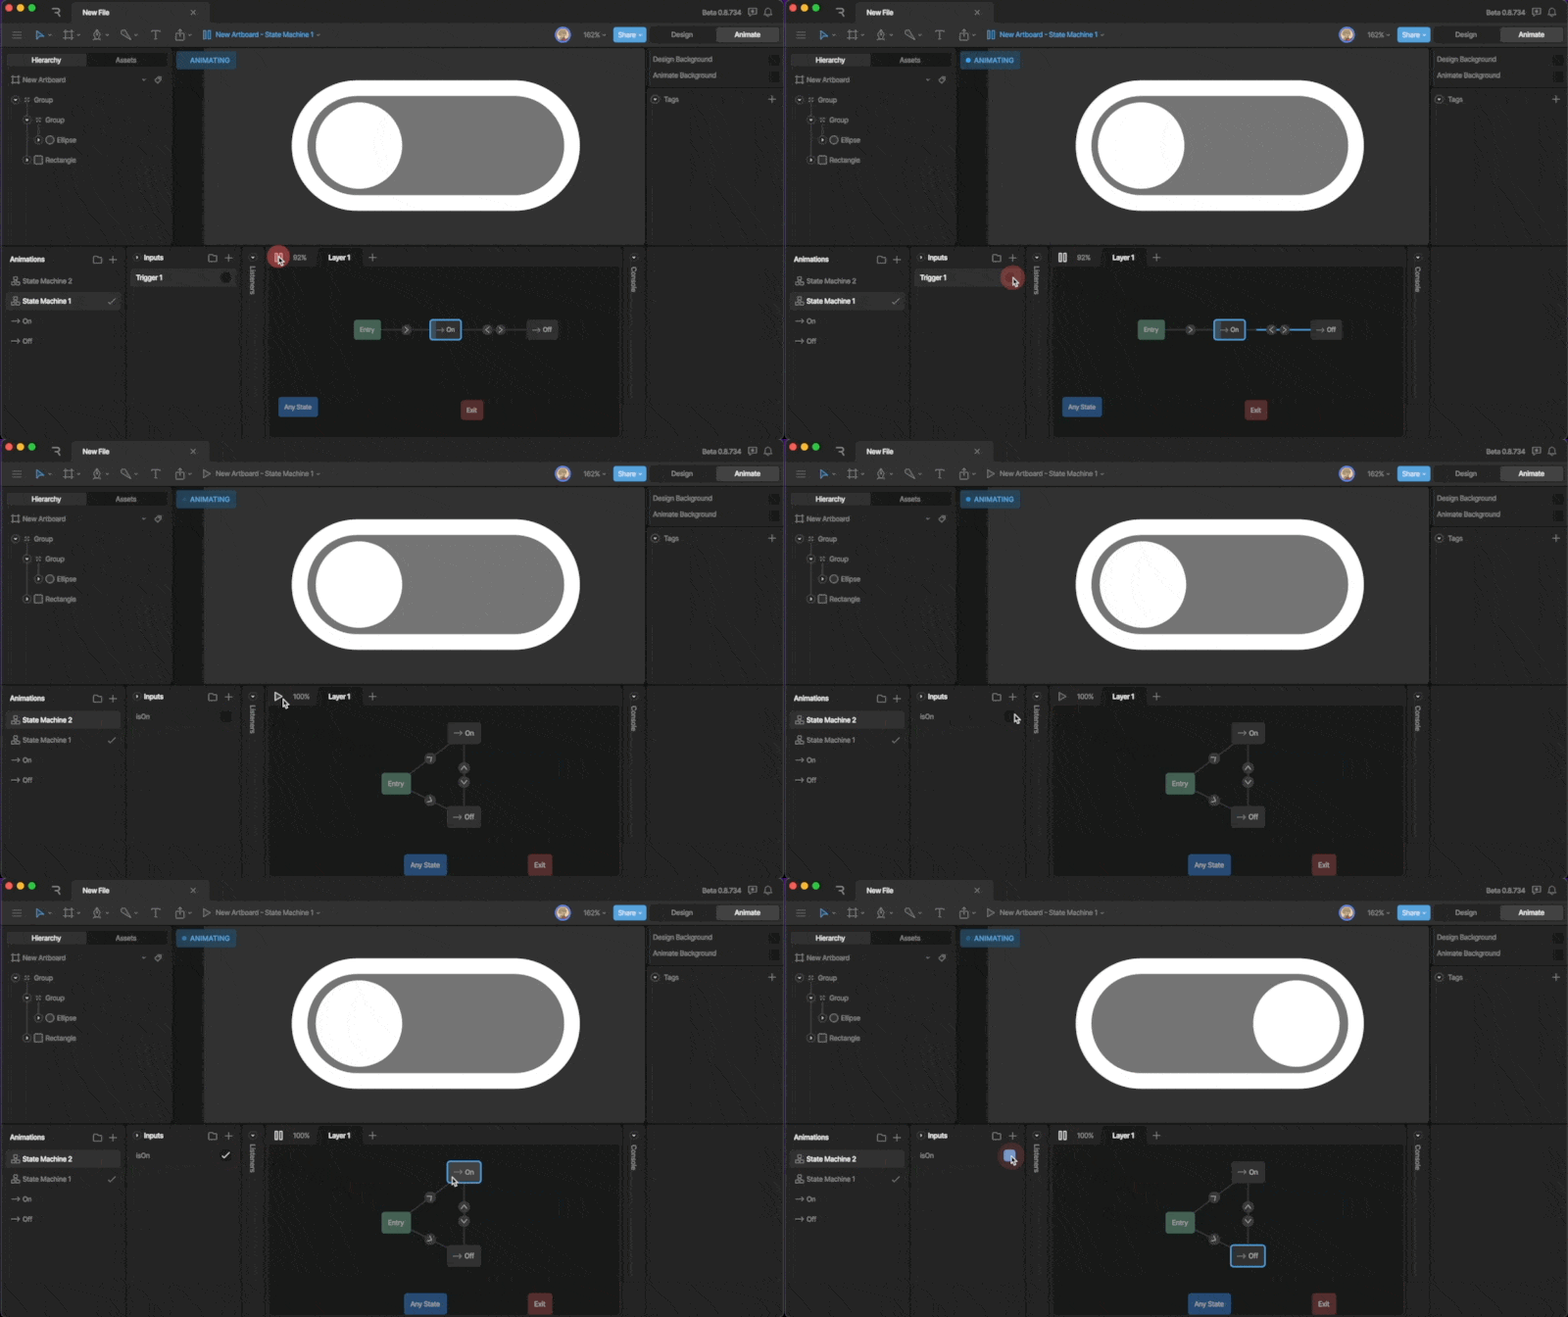
The Entry State is the state that your State Machine will start from. You’ll notice that by default, your state machine will already have an animation attached to the Entry State, but you can change this animation at any time. Note that you can connect multiple animations to the Entry State if you need I.E. you want to build a switch that can start in either the on or off state.
### Exit State
The Exit State tells the State Machine layer to stop playing. This niche state has uses when multiple layers are being used.
### Any State
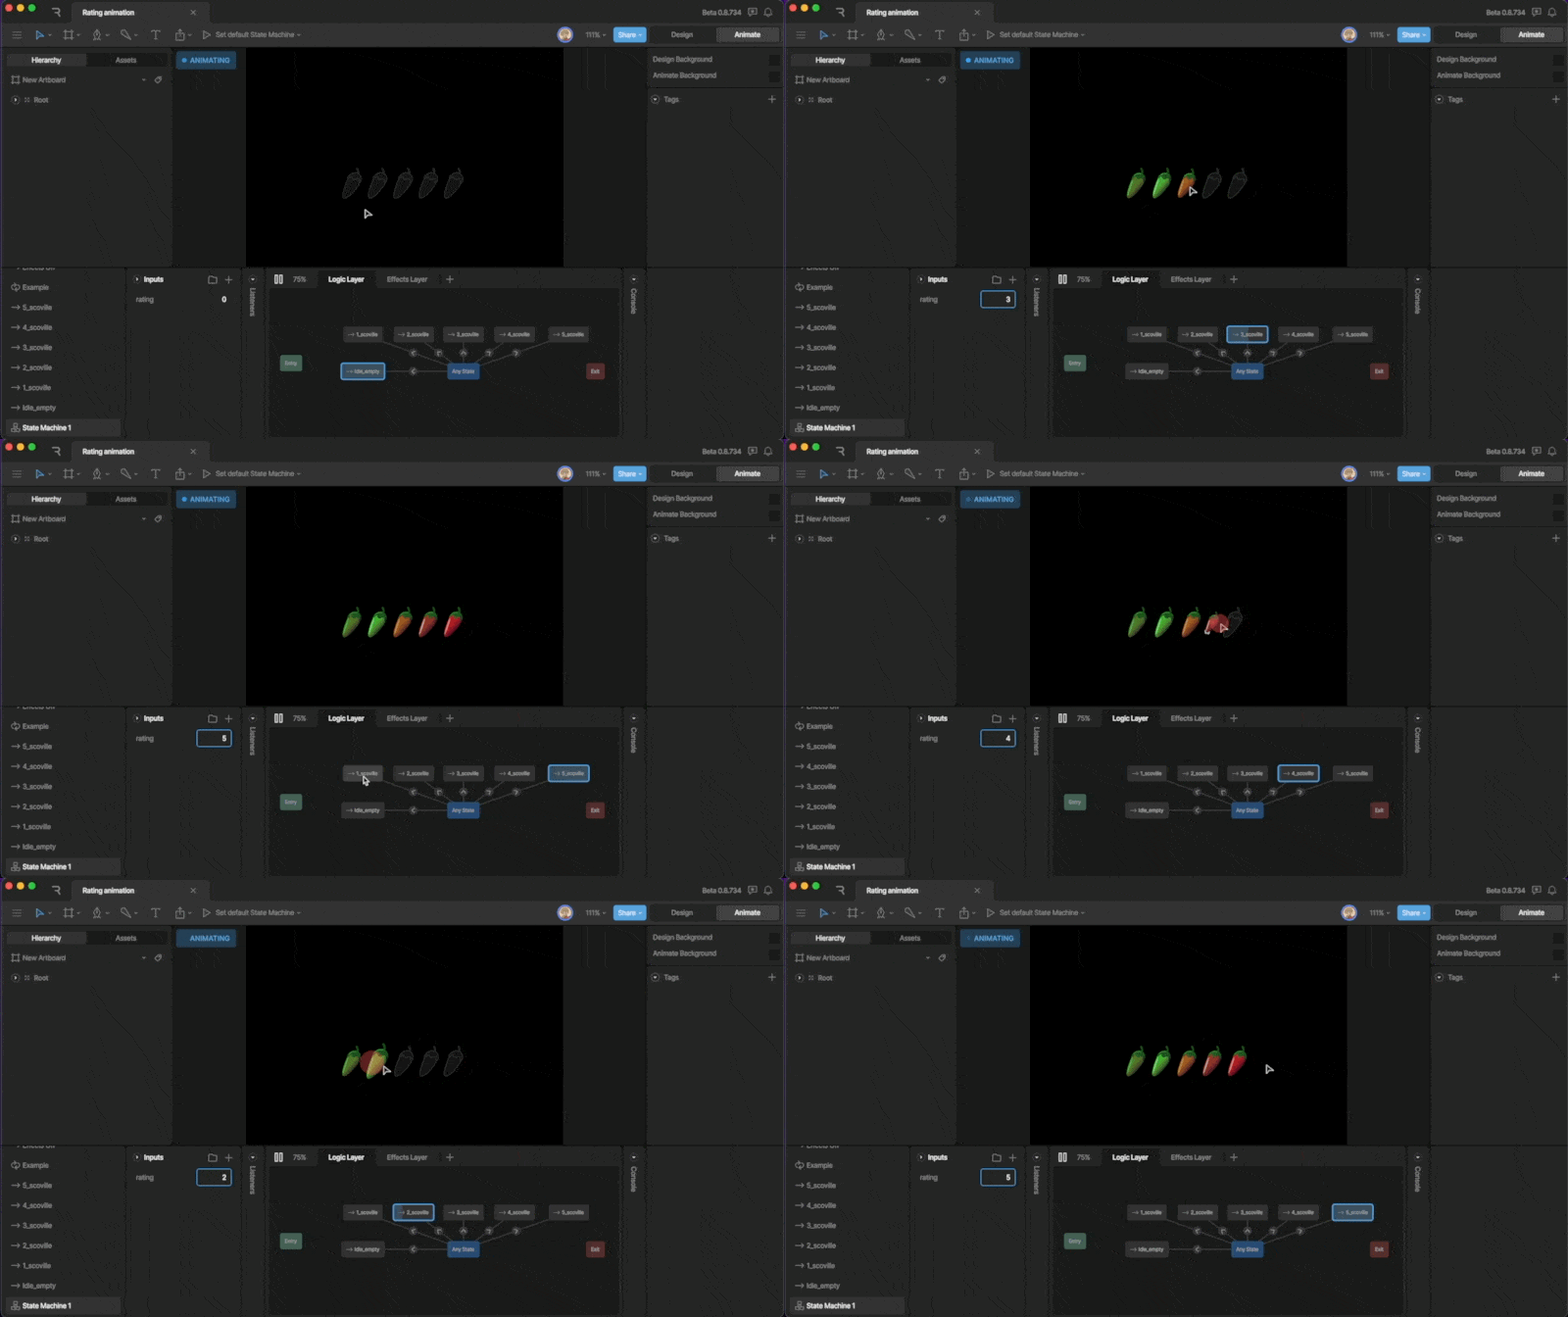
Unlike normal states, states connected to the Any State can be played at any time, regardless of which state your state machine is in. Any States are great to use when you want to create an array of states that can be activated at any time, such as changing the skin of a character.
## Animation States
Animation states include all states other than the default states added to a State Machine. These states will control the look and motion of your interactive content. There are three types of animation states; Single Animation, 1D blend, and Direct blend states.
To add a State to the Graph, you can drag and drop an animation from the Animations List directly onto the Graph. Notice that this will create a Single Animation state. You can change the state type using the inspector.
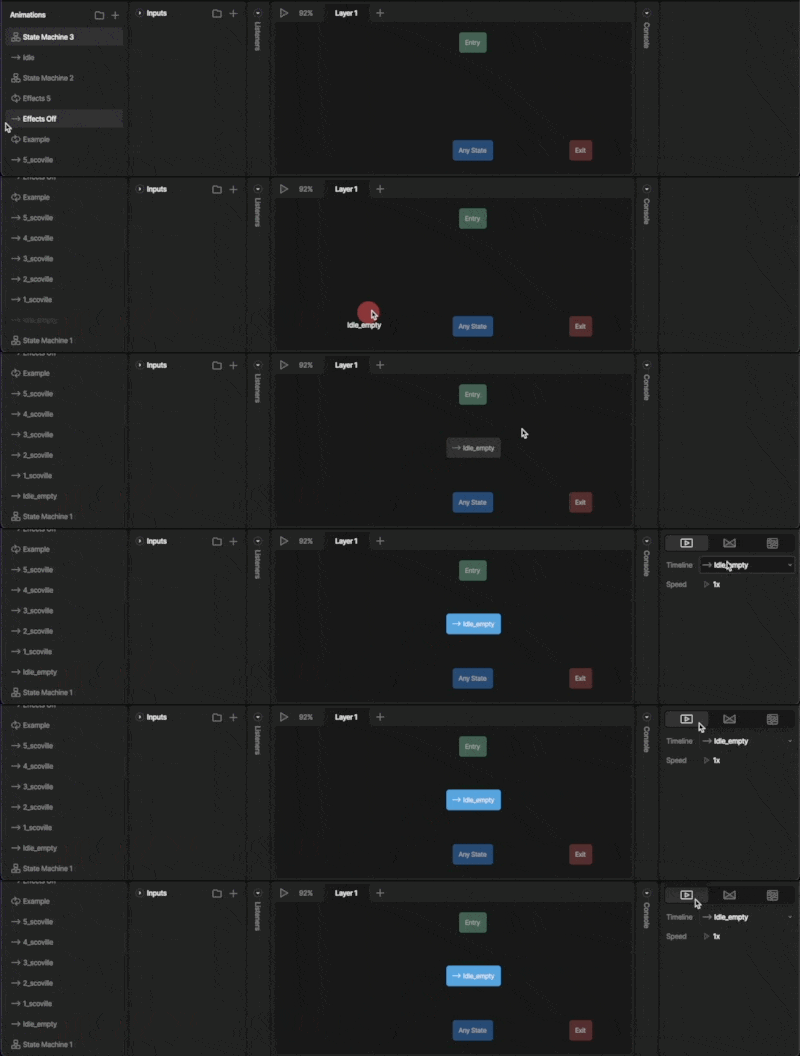
Additionally, you can right-click on the graph and create a blank state of any type with no associated timelines.
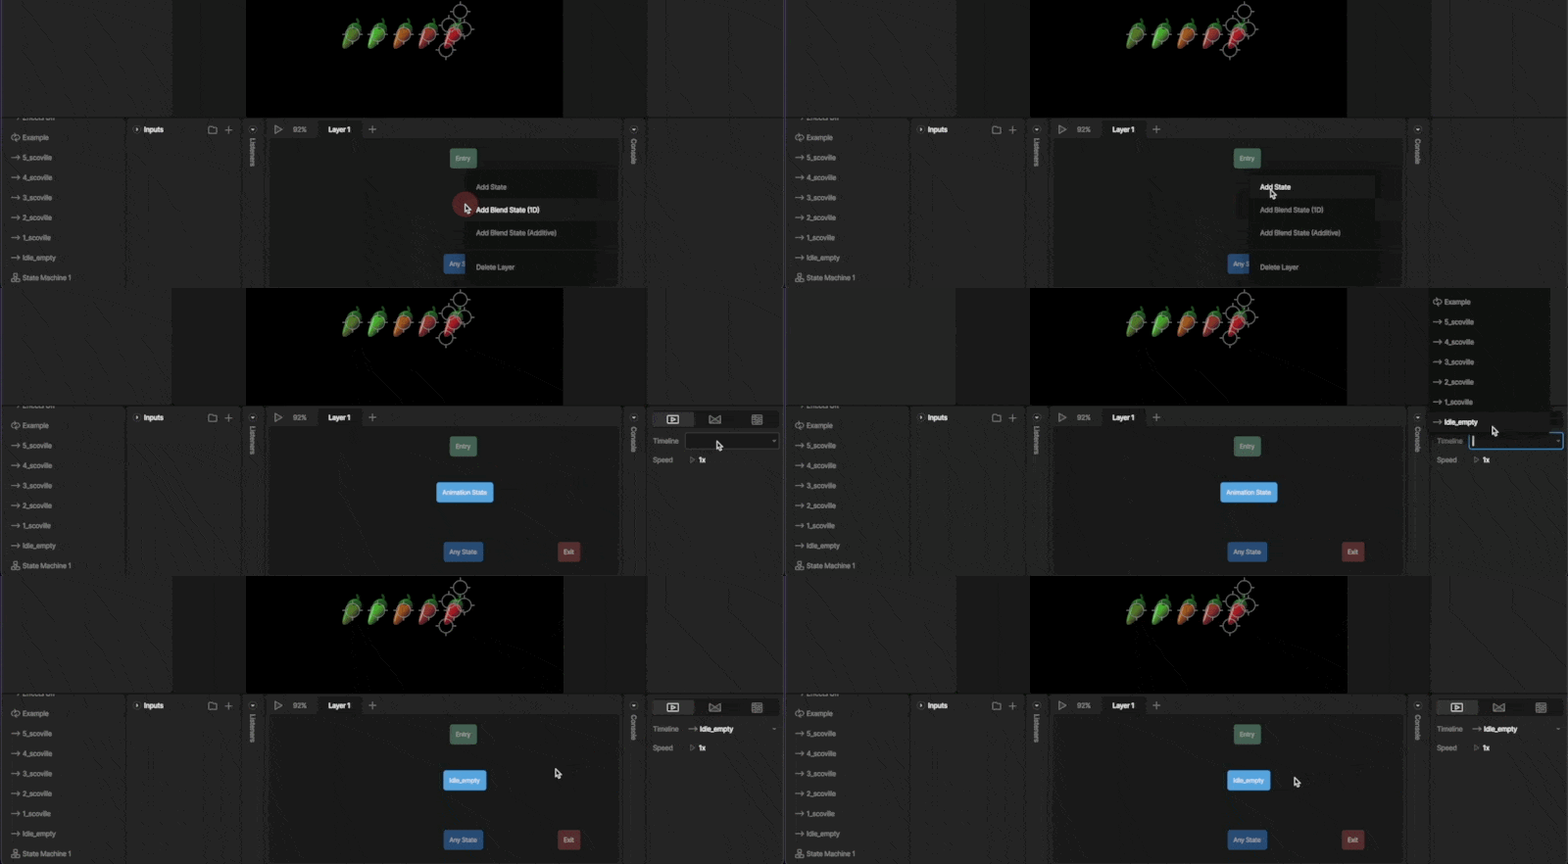
Right-click to add State
To assign a timeline to a state, use the timeline dropdown in the inspector.
### Single animation state
Any timeline that we create can be used as a single animation state. Depending on the type of animation we are using, the single animation state could be a one-shot, looping, or ping-pong state. In most cases, you’ll be using single animation states to create most of your state machines.
### Blend states
A Blend State is any state that blends together two or more timeline animations. We use these states for content like loading bars, health systems, scrolling interactions, and dynamic face rigs.
There are two types of blend states; 1D and Direct Blend states.
#### 1D Blend state:
A 1D Blend State allows us to mix multiple timelines together with a single numerical view model property. This state works by ramping up one animation and ramping down the other while you increase or decrease a number value. Note that this mixing is not linear, but is additive and could give you unexpected results.
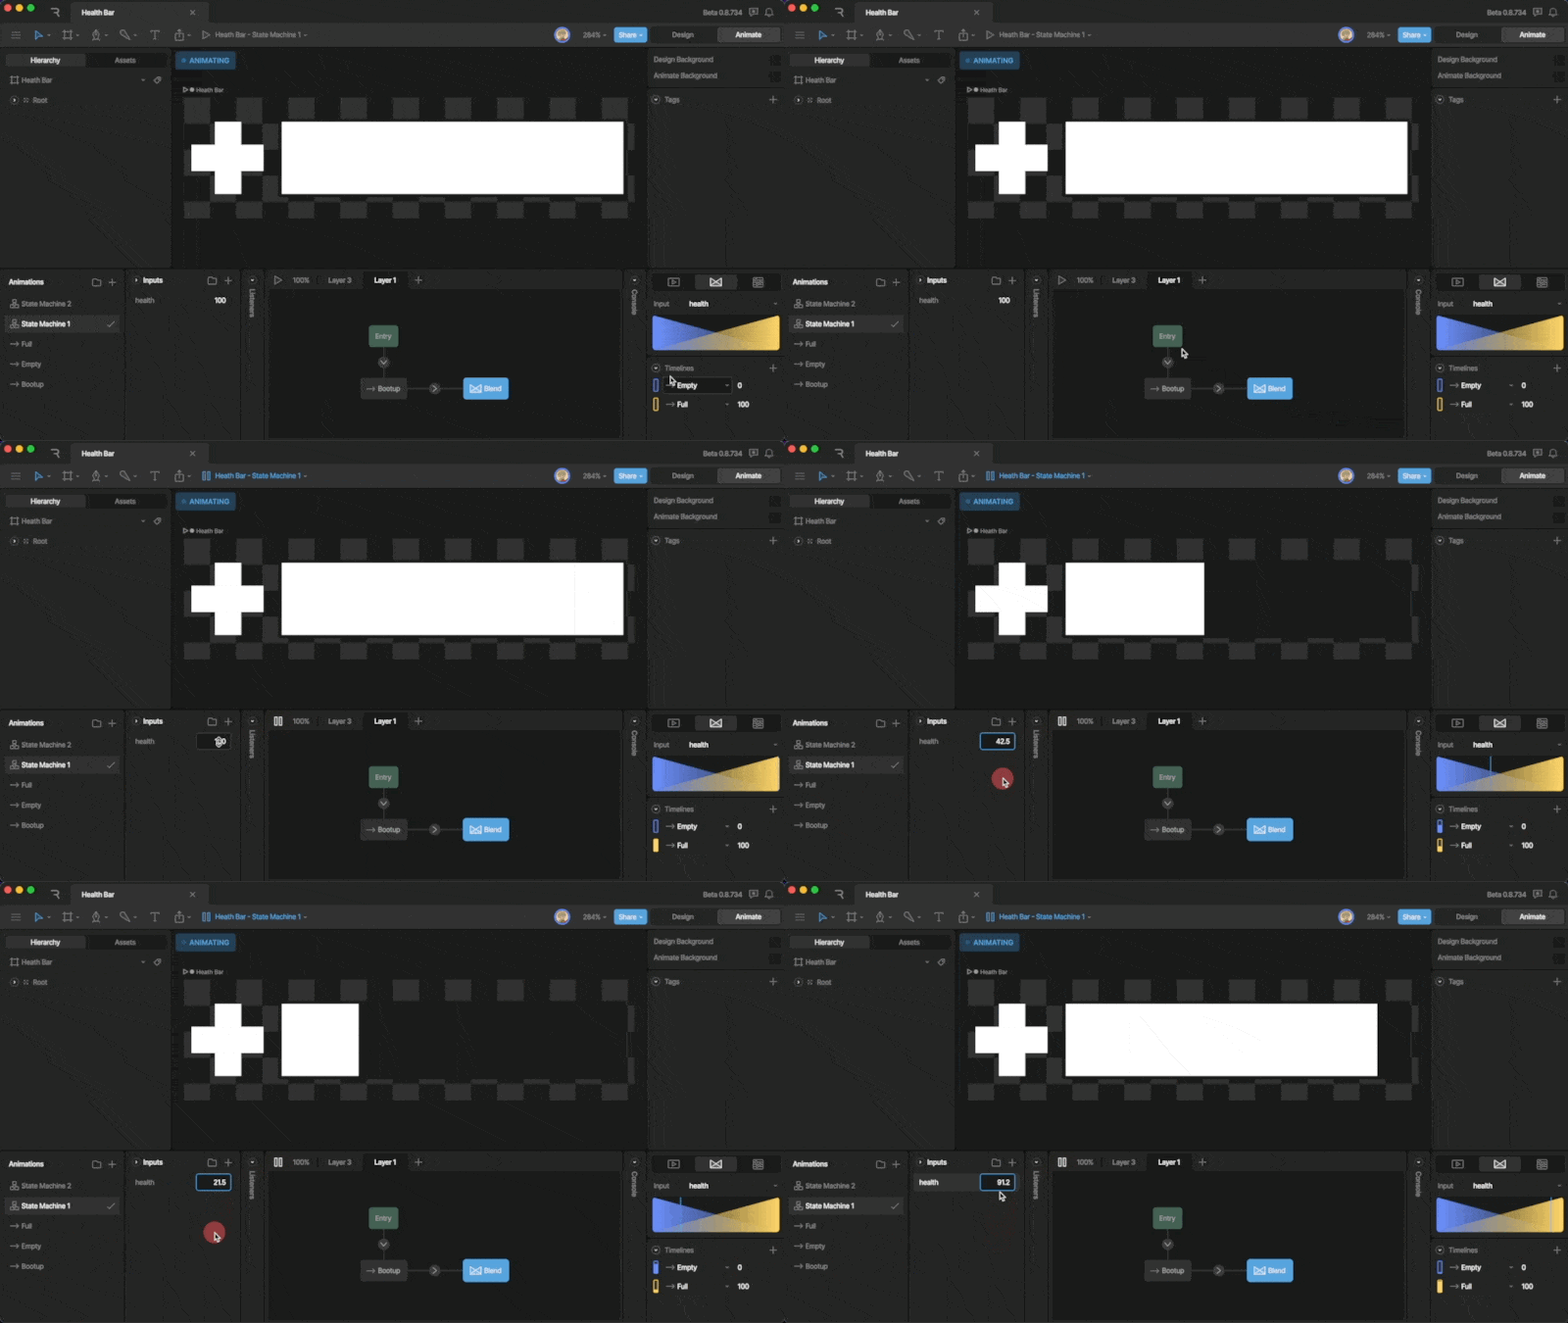
**Configuring a 1D Blend State:**
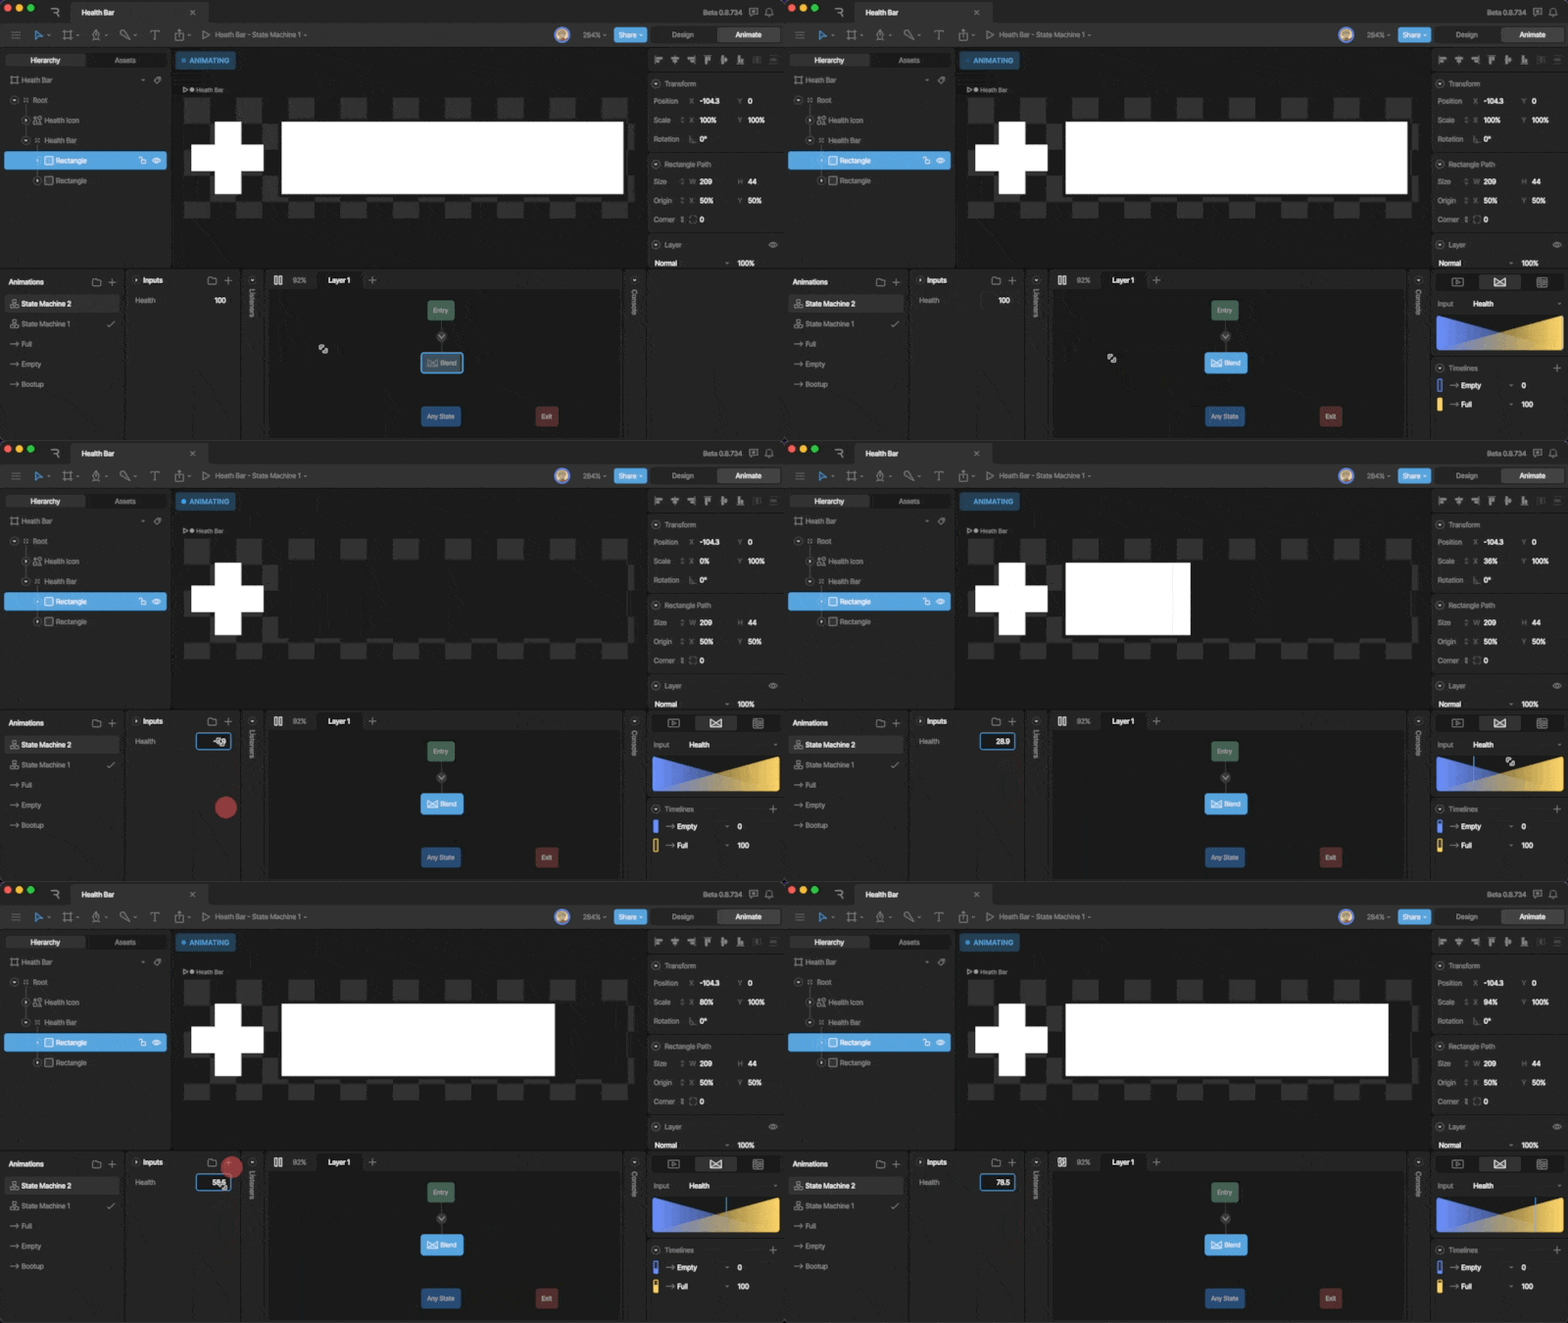
You'll want to start by creating a few timelines for your Blend state. Keep in mind that it's often best to use timelines with only a few properties keyed. In this health bar example, only the X scale is keyed.
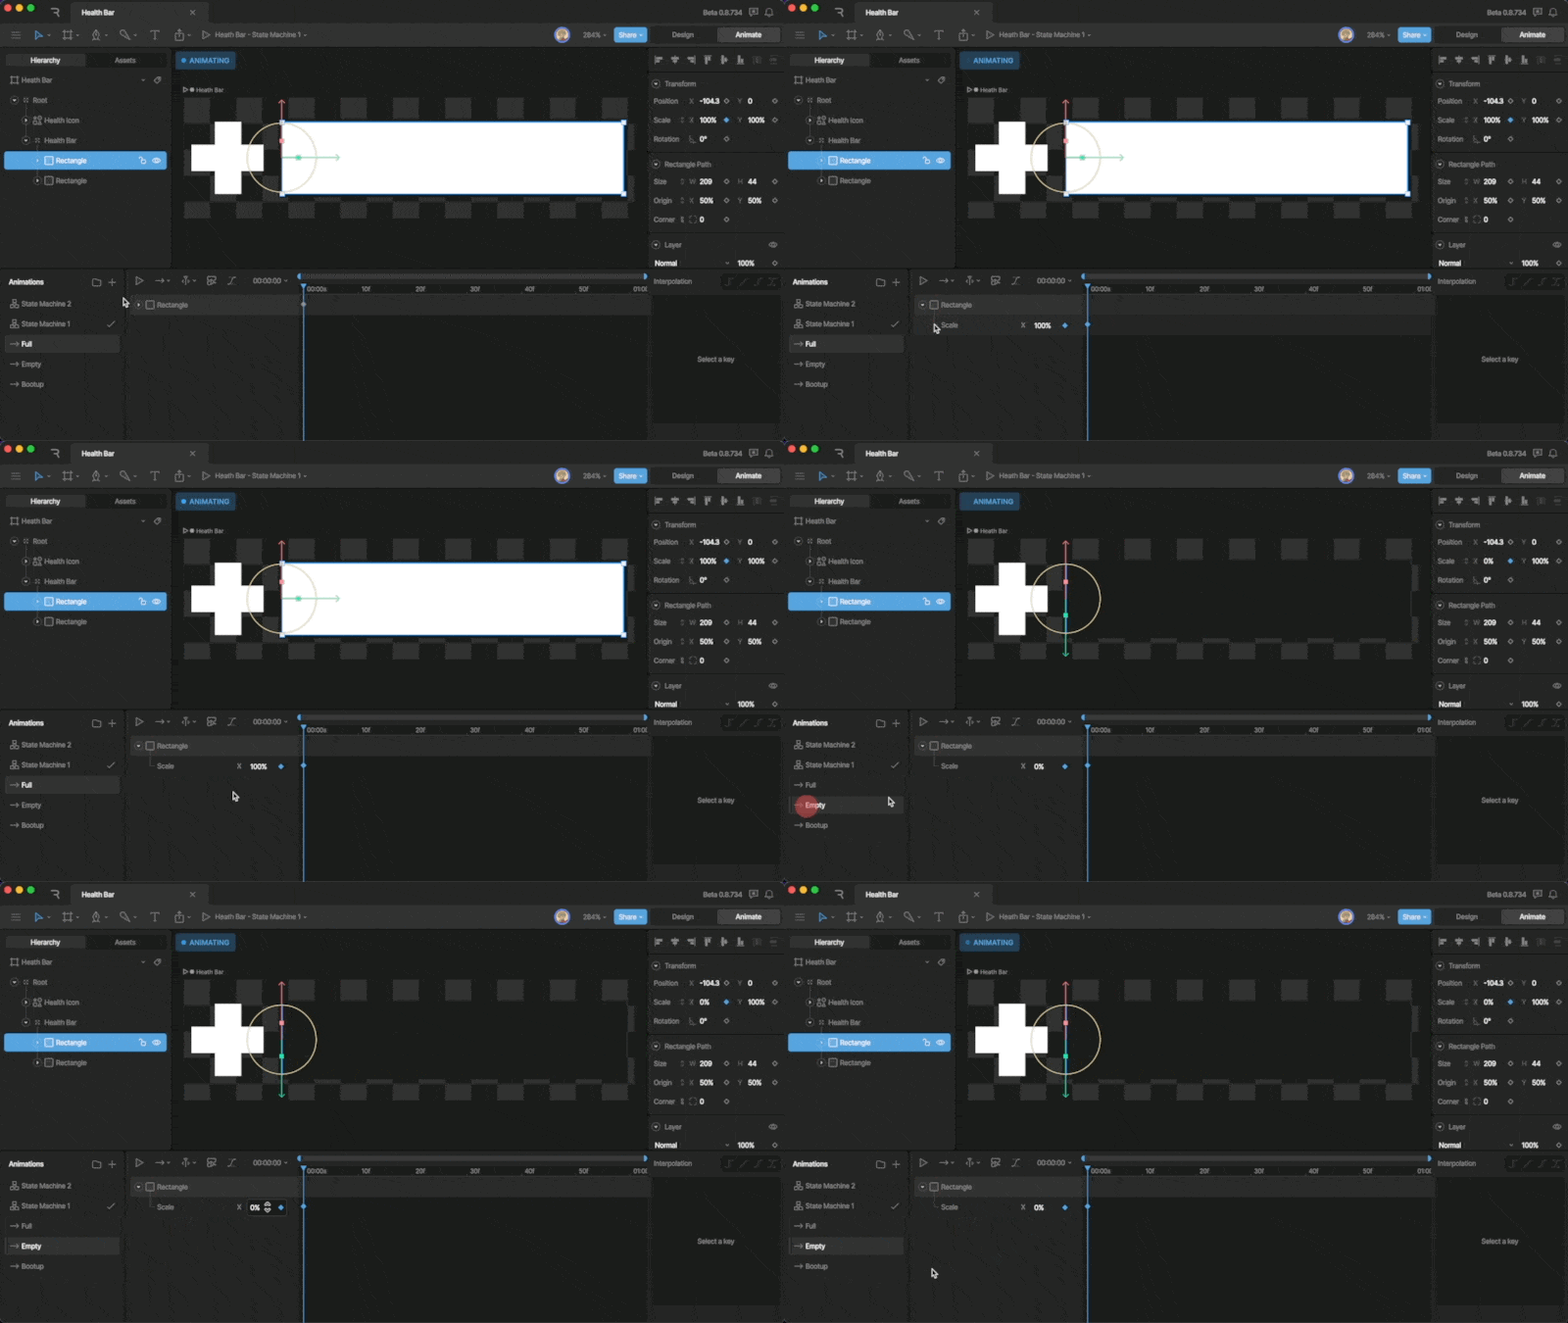
Timelines for health bar
After adding a 1D Blend State to the graph, use the Inspector to configure the state.
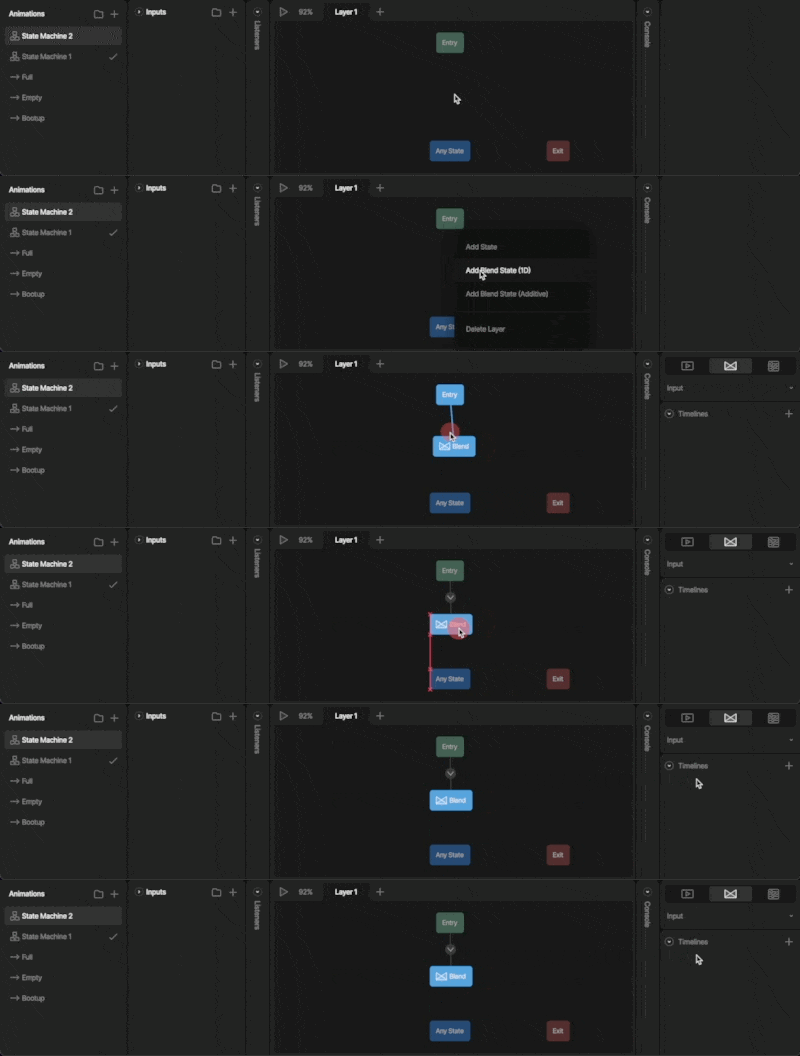
First, add the number property you want to drive the blend using the dropdown. If you haven’t created one yet, you’ll notice that nothing appears here.
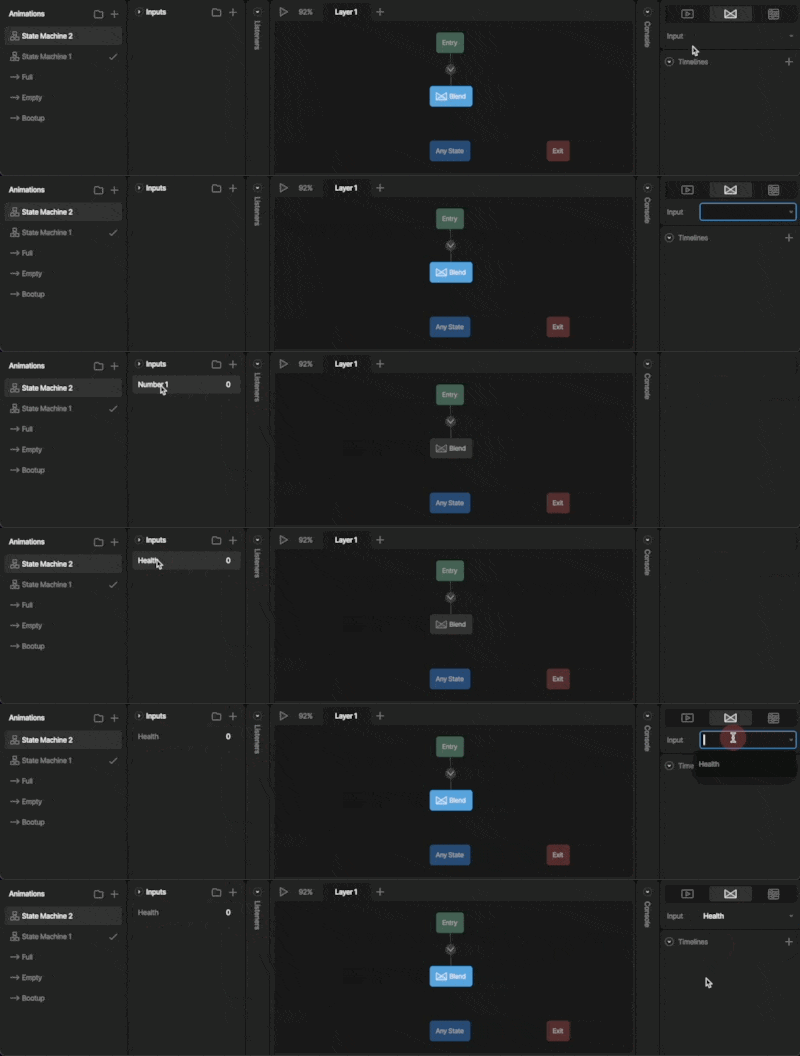
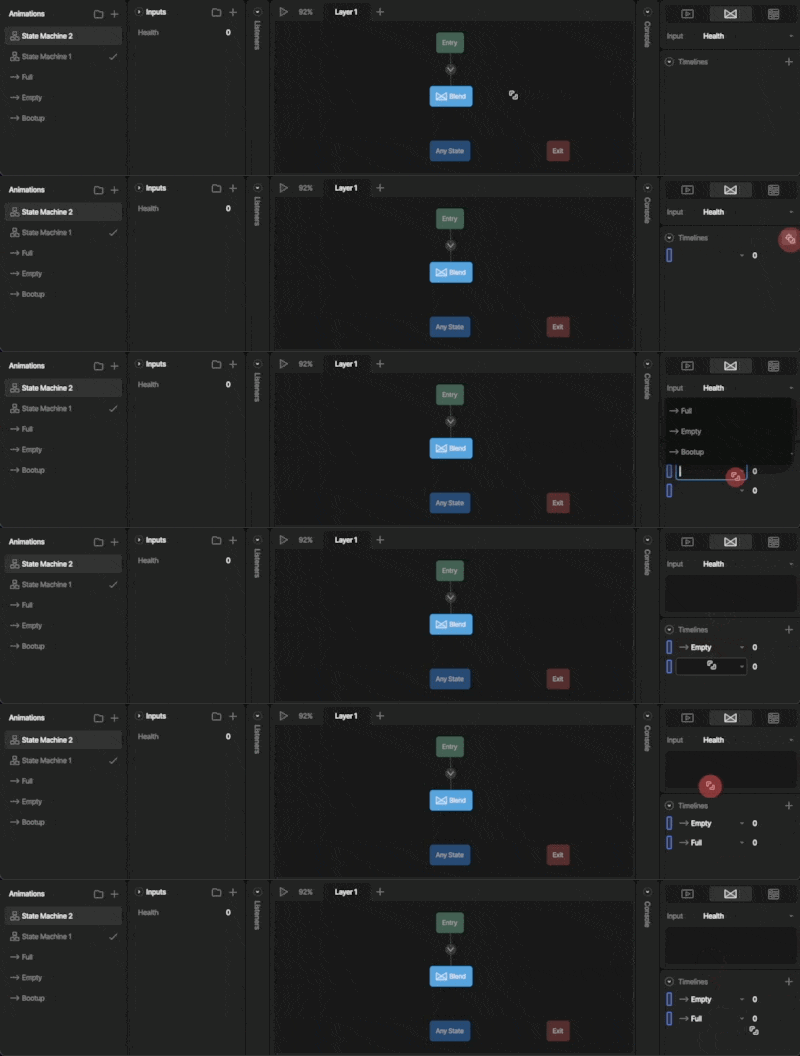
The plus button that appears below the number property allows you to add timelines to your blend state. Use the dropdown to assign a specific timeline. Note that you can add as many timelines as you’d like.
Next, you need to define a numerical range that your blend state will work between. This particular blend works between 0 and 100.
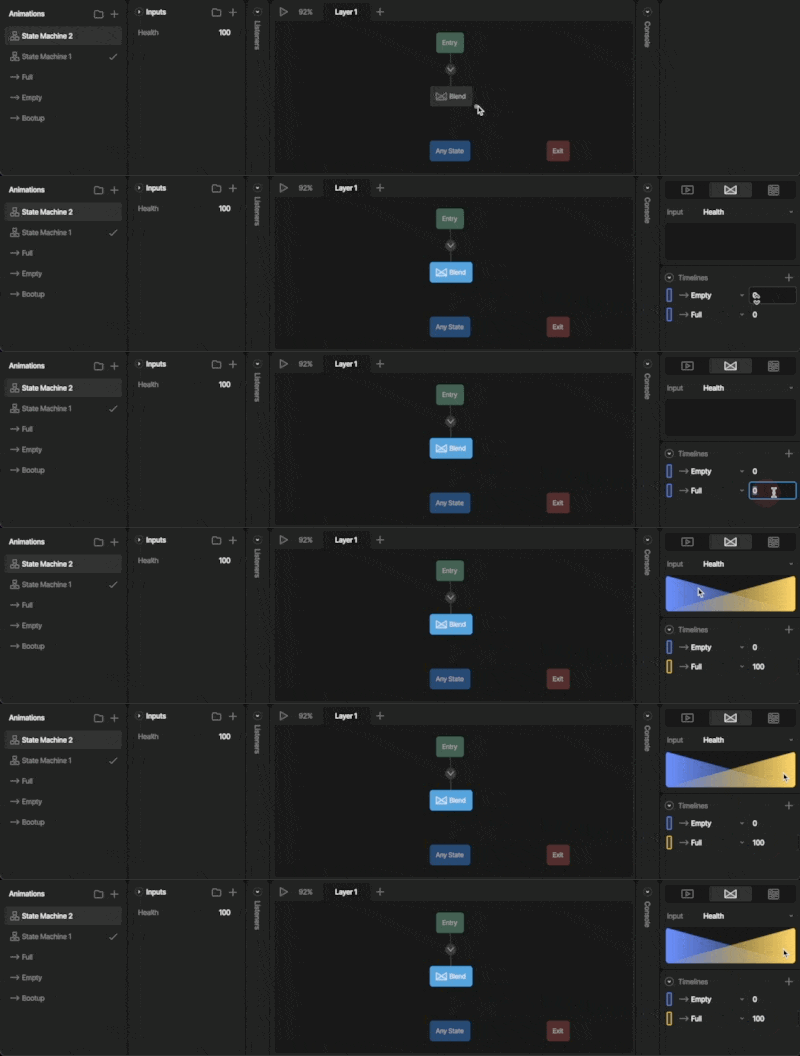
Notice that once you define the range, a graphic appears above the property dropdown, visually representing how your animations will mix. When the state machine is active, as you increase or decrease your property within the defined range, you’ll see a visual representation move across that graph, showing you the mix of your timelines.
#### Additive Blend state:
An Additive Blend state allows you to blend together multiple timelines using multiple number properties. This allows us to create unique poses and facial positions by mixing multiple animations together. While working with an Additive Blend, you’ll either be mixing an animation by value or property. Read more below.
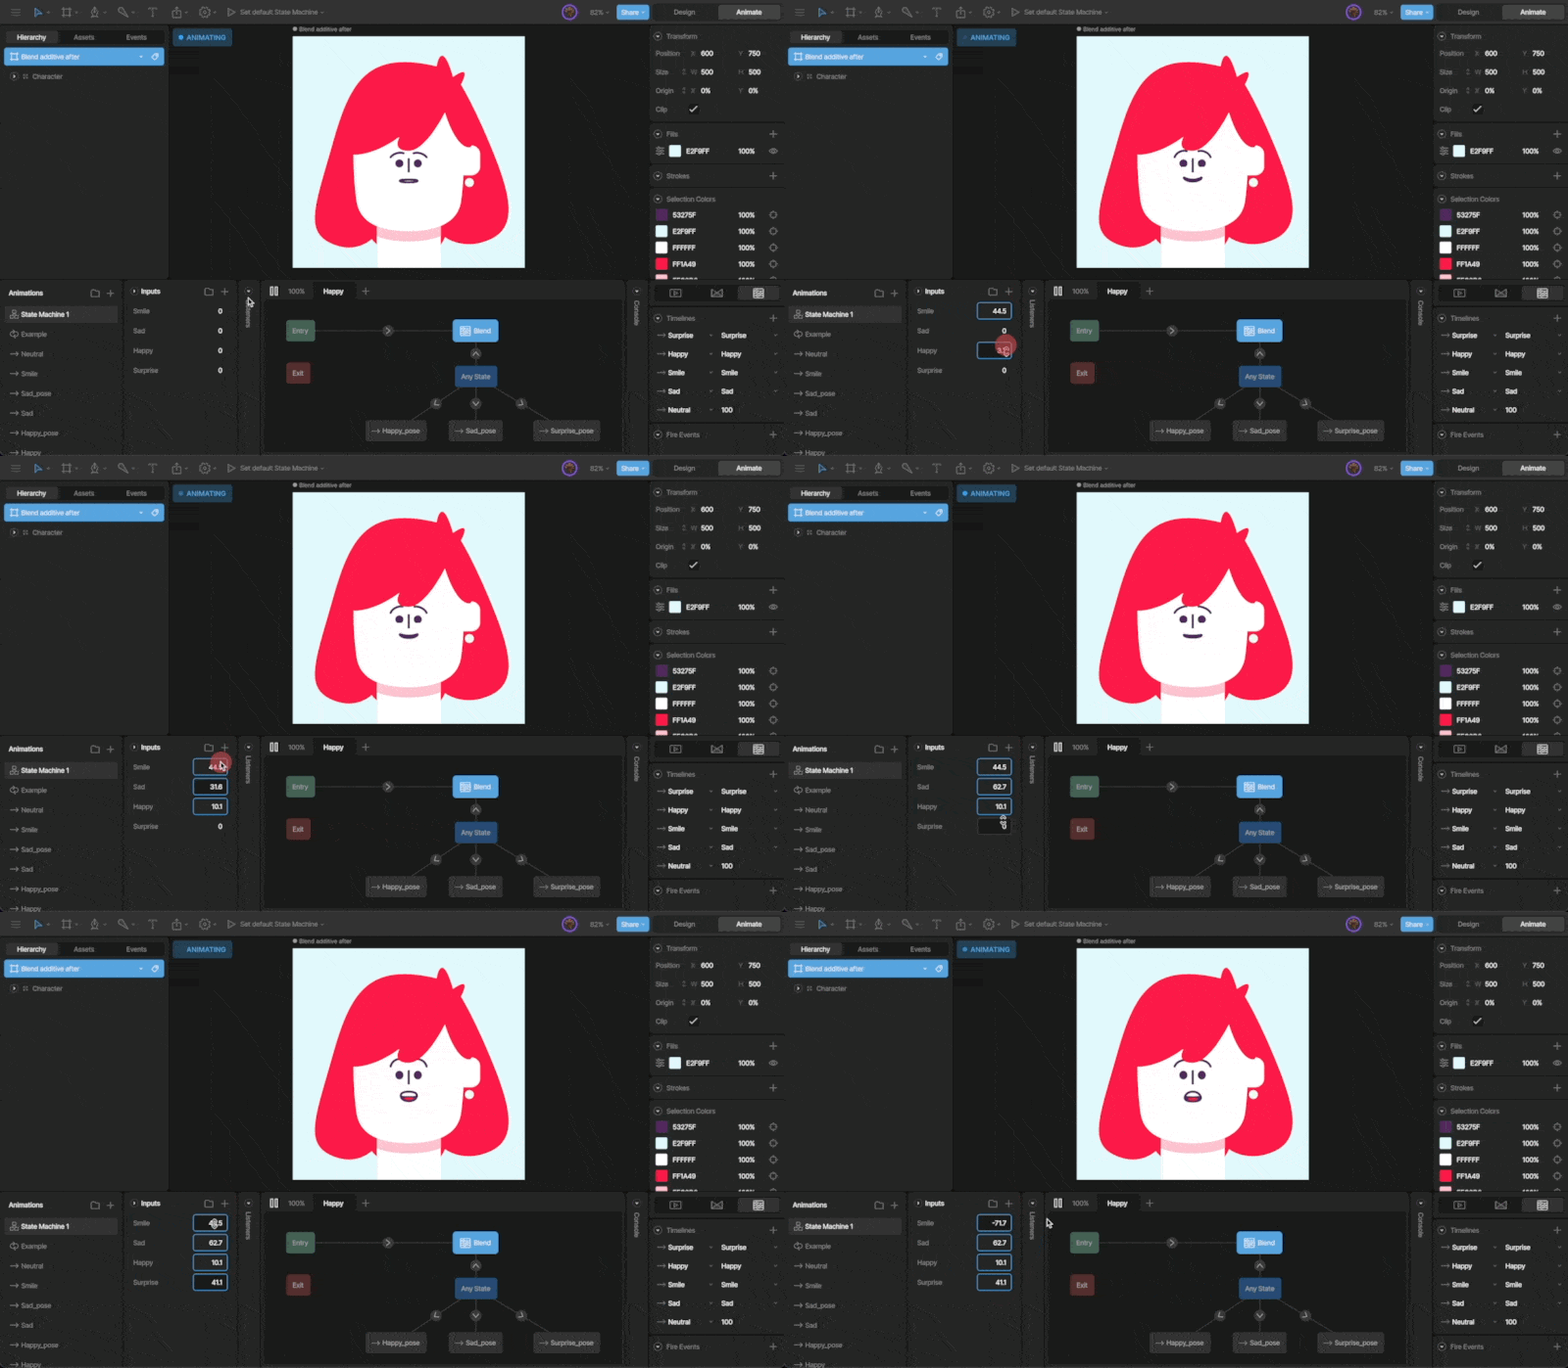
**Value vs Property blend**
When adding animations to an Additive blend state, you’ll be prompted to either add a Blend by Value animation or a Blend by Property animation.
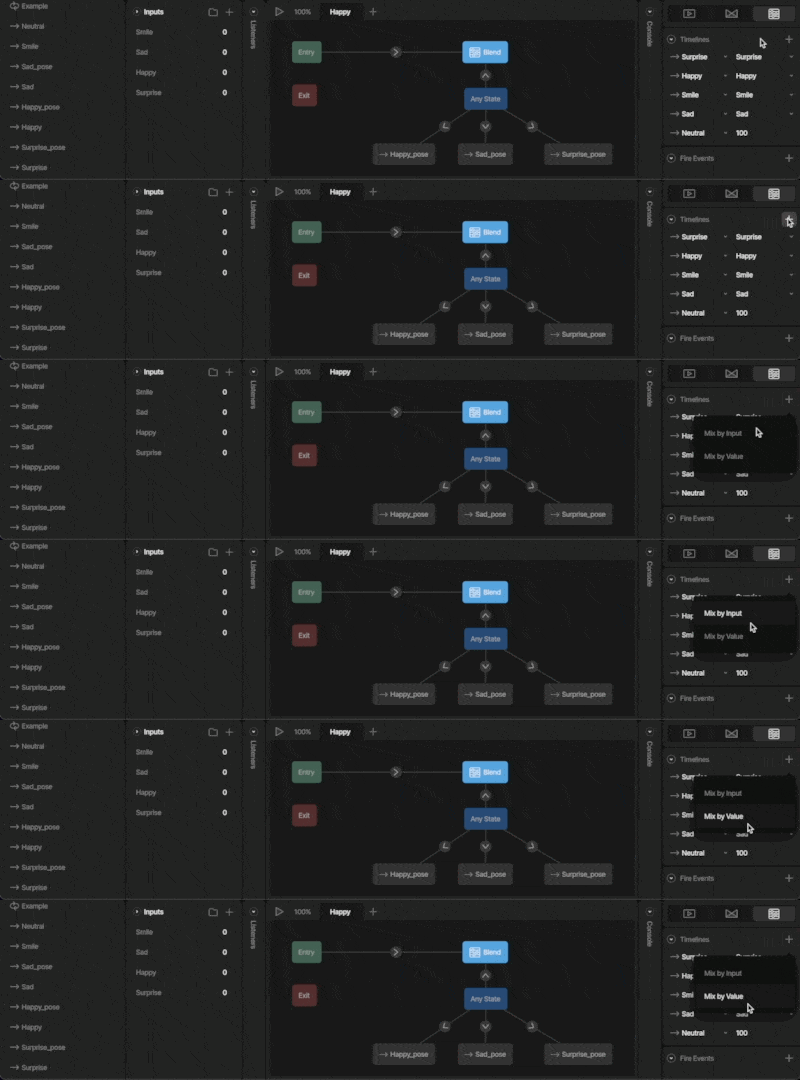
A Blend by Value timeline can be thought of as the baseline animation, or default pose. This value is not tied to a property, so it can’t be used to control the state machine. Instead, this value describes its mix weighting.
A view model property blend is an animation that is mixed with the default pose or motion via a number property. Each of your different property blends should have their own number property.
## State Options
When you select a state in the State Machine Graph, you can change its options in the Inspector, including:
* **Name** - The name of the state.
* [Caption](#caption) - Notes for collaborators or your future self.
* **Type** - The type of state, such as a single animation, 1D blend, or additive blend.
* [Timeline](#timeline) - The animation assigned to the state.
* [Speed](#speed) - The speed at which the timeline plays.
* [Transitions](#transitions) - A list of transitions to and from the state.
### Caption
You can add a caption to a state to leave notes for collaborators or your future self.
When a state has a caption, an info icon appears on the state in the State Machine Graph. Hover over the icon to view the caption.
Captions are useful for explaining why a state exists and documenting complex logic.
Captions are only visible in the editor. They are not exported for runtime.
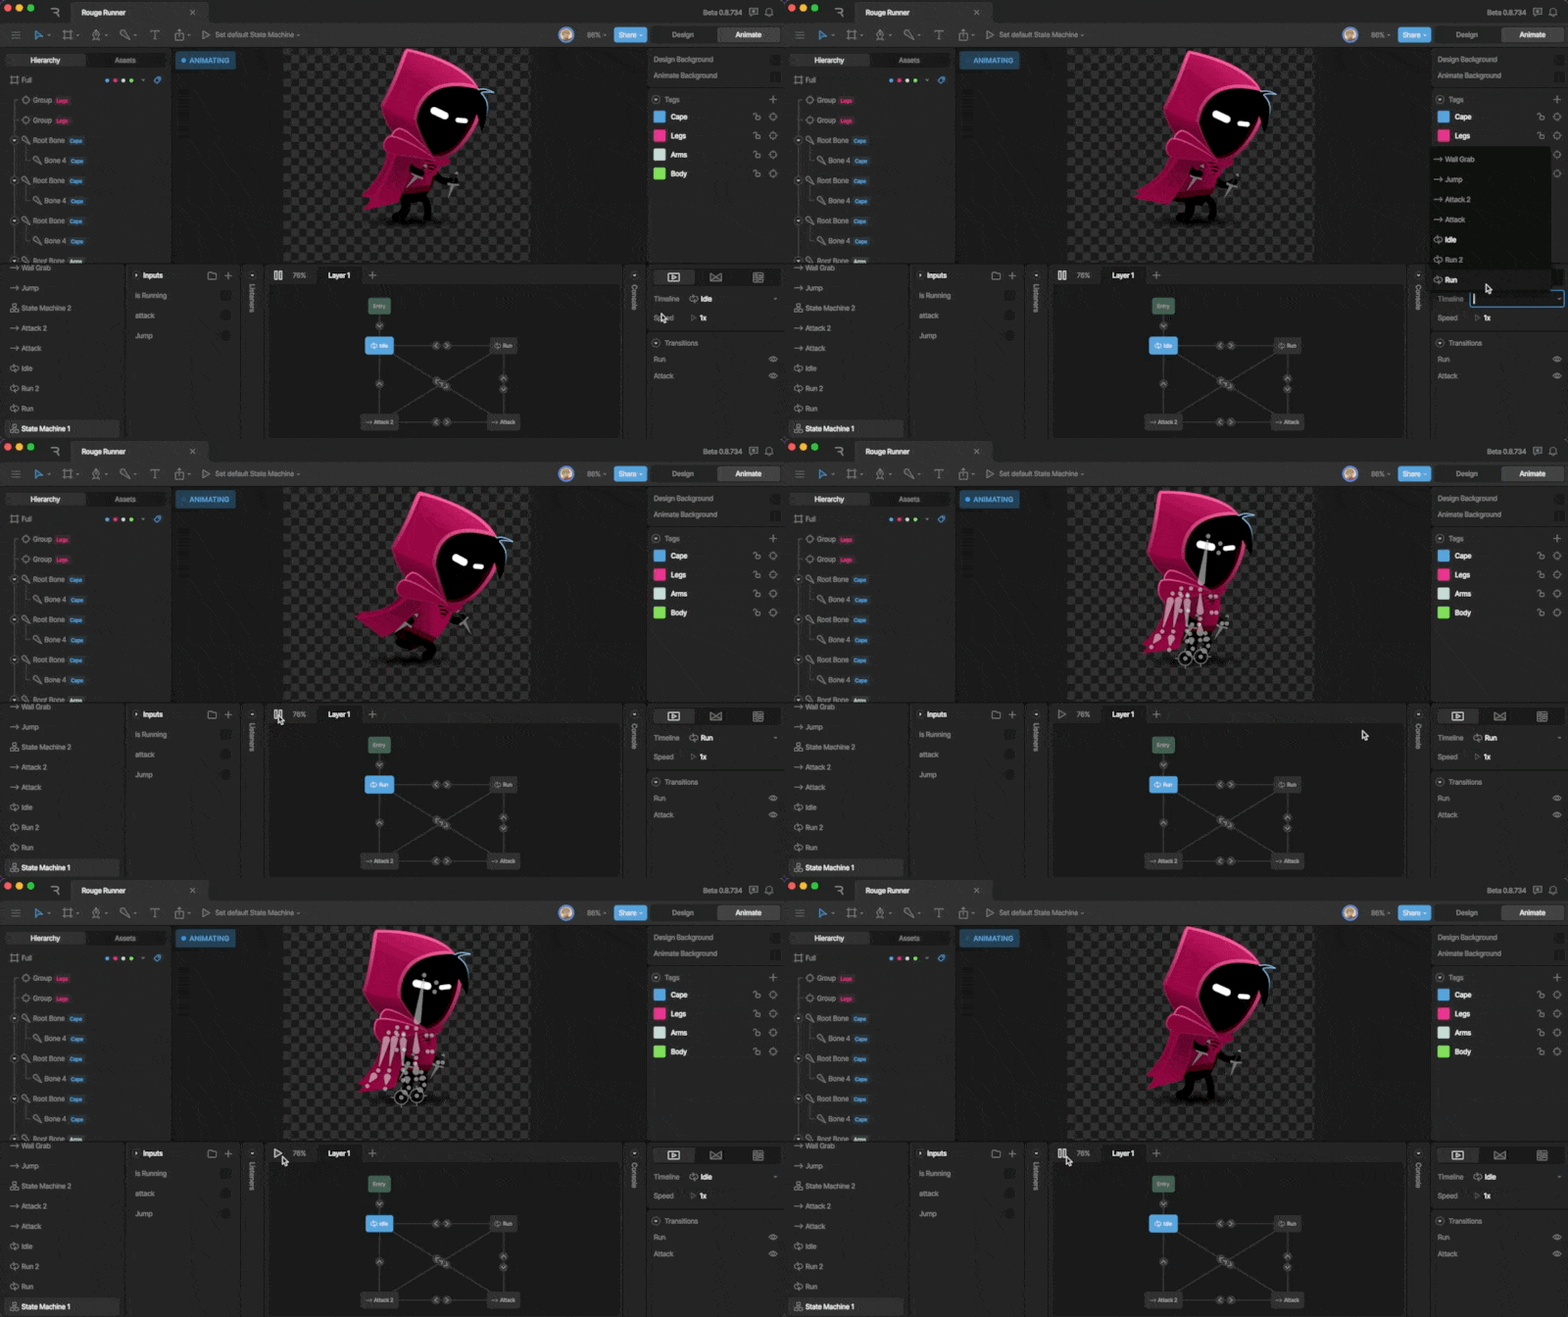
### Timeline
Use the dropdown to change which animation is assigned to the current state.
### Speed
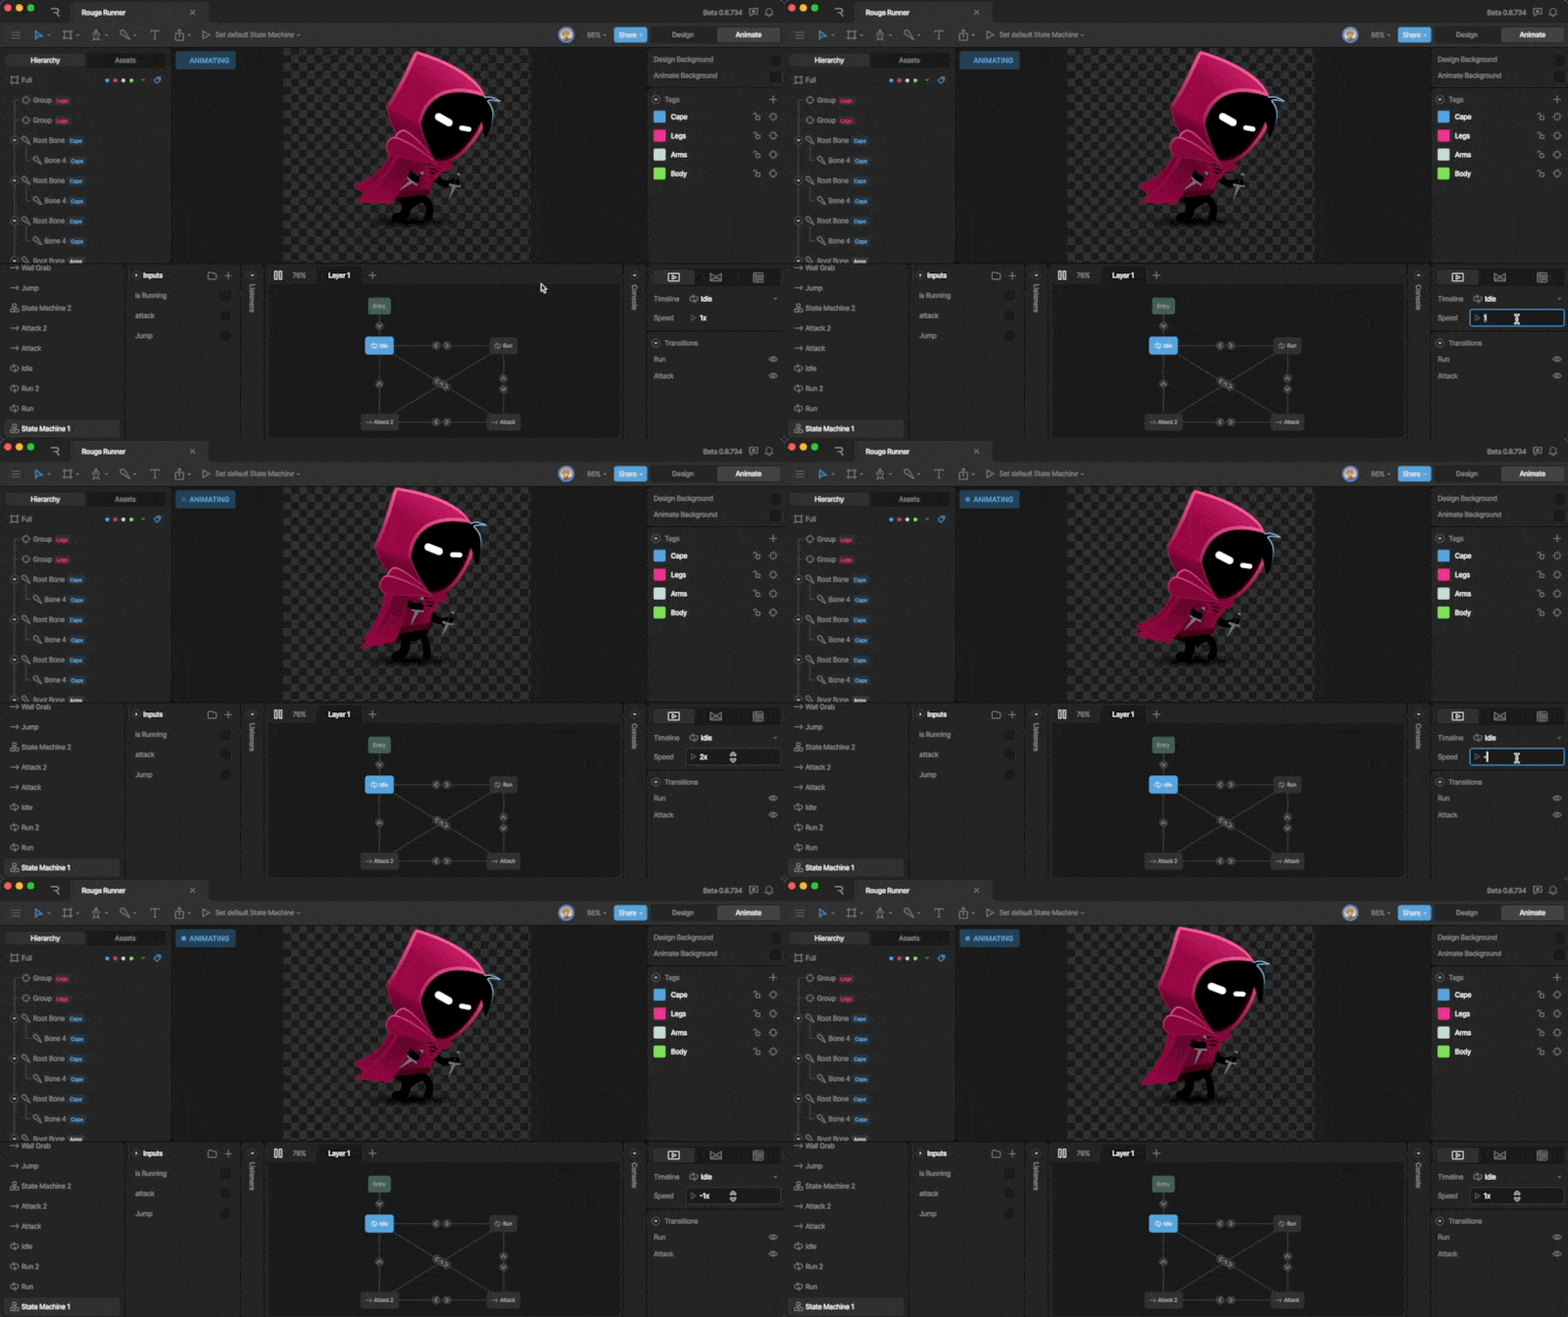
Use **Speed** to change how fast the state’s animation plays. Positive values play the animation forward, and negative values play it backward.
### Transitions
The **Transitions** section lists the [transitions](/editor/state-machine/transitions) connected to the selected state. Use the eye icon to disable a transition, or the **-** button to remove it.
## Actions
You can perform actions when the state starts or ends.
Actions can be used to:
* Set property values
* Report events
* Align targets
* Control focus
* Fire a scripted action
Actions can also be fired at the start or end of a transition.
See [Transition Actions](/editor/state-machine/transitions#actions).
### Action Timing
Each action can run at either:
* **Start** — Runs when the state begins
* **End** — Runs after the state completes
### Creating an Action
### Entry State
The Entry State is the state that your State Machine will start from. You’ll notice that by default, your state machine will already have an animation attached to the Entry State, but you can change this animation at any time. Note that you can connect multiple animations to the Entry State if you need I.E. you want to build a switch that can start in either the on or off state.

### Exit State
The Exit State tells the State Machine layer to stop playing. This niche state has uses when multiple layers are being used.
### Any State
Unlike normal states, states connected to the Any State can be played at any time, regardless of which state your state machine is in. Any States are great to use when you want to create an array of states that can be activated at any time, such as changing the skin of a character.

## Animation States
Animation states include all states other than the default states added to a State Machine. These states will control the look and motion of your interactive content. There are three types of animation states; Single Animation, 1D blend, and Direct blend states.
To add a State to the Graph, you can drag and drop an animation from the Animations List directly onto the Graph. Notice that this will create a Single Animation state. You can change the state type using the inspector.

Additionally, you can right-click on the graph and create a blank state of any type with no associated timelines.

Right-click to add State
To assign a timeline to a state, use the timeline dropdown in the inspector.
### Single animation state
Any timeline that we create can be used as a single animation state. Depending on the type of animation we are using, the single animation state could be a one-shot, looping, or ping-pong state. In most cases, you’ll be using single animation states to create most of your state machines.
### Blend states
A Blend State is any state that blends together two or more timeline animations. We use these states for content like loading bars, health systems, scrolling interactions, and dynamic face rigs.
There are two types of blend states; 1D and Direct Blend states.
#### 1D Blend state:
A 1D Blend State allows us to mix multiple timelines together with a single numerical view model property. This state works by ramping up one animation and ramping down the other while you increase or decrease a number value. Note that this mixing is not linear, but is additive and could give you unexpected results.

**Configuring a 1D Blend State:**
You'll want to start by creating a few timelines for your Blend state. Keep in mind that it's often best to use timelines with only a few properties keyed. In this health bar example, only the X scale is keyed.

Timelines for health bar
After adding a 1D Blend State to the graph, use the Inspector to configure the state.

First, add the number property you want to drive the blend using the dropdown. If you haven’t created one yet, you’ll notice that nothing appears here.

The plus button that appears below the number property allows you to add timelines to your blend state. Use the dropdown to assign a specific timeline. Note that you can add as many timelines as you’d like.

Next, you need to define a numerical range that your blend state will work between. This particular blend works between 0 and 100.

Notice that once you define the range, a graphic appears above the property dropdown, visually representing how your animations will mix. When the state machine is active, as you increase or decrease your property within the defined range, you’ll see a visual representation move across that graph, showing you the mix of your timelines.

#### Additive Blend state:
An Additive Blend state allows you to blend together multiple timelines using multiple number properties. This allows us to create unique poses and facial positions by mixing multiple animations together. While working with an Additive Blend, you’ll either be mixing an animation by value or property. Read more below.

**Value vs Property blend**
When adding animations to an Additive blend state, you’ll be prompted to either add a Blend by Value animation or a Blend by Property animation.

A Blend by Value timeline can be thought of as the baseline animation, or default pose. This value is not tied to a property, so it can’t be used to control the state machine. Instead, this value describes its mix weighting.
A view model property blend is an animation that is mixed with the default pose or motion via a number property. Each of your different property blends should have their own number property.
## State Options
When you select a state in the State Machine Graph, you can change its options in the Inspector, including:
* **Name** - The name of the state.
* [Caption](#caption) - Notes for collaborators or your future self.
* **Type** - The type of state, such as a single animation, 1D blend, or additive blend.
* [Timeline](#timeline) - The animation assigned to the state.
* [Speed](#speed) - The speed at which the timeline plays.
* [Transitions](#transitions) - A list of transitions to and from the state.
### Caption
You can add a caption to a state to leave notes for collaborators or your future self.
When a state has a caption, an info icon appears on the state in the State Machine Graph. Hover over the icon to view the caption.
Captions are useful for explaining why a state exists and documenting complex logic.
Captions are only visible in the editor. They are not exported for runtime.
### Timeline
Use the dropdown to change which animation is assigned to the current state.

### Speed
Use **Speed** to change how fast the state’s animation plays. Positive values play the animation forward, and negative values play it backward.

### Transitions
The **Transitions** section lists the [transitions](/editor/state-machine/transitions) connected to the selected state. Use the eye icon to disable a transition, or the **-** button to remove it.
## Actions
You can perform actions when the state starts or ends.
Actions can be used to:
* Set property values
* Report events
* Align targets
* Control focus
* Fire a scripted action
Actions can also be fired at the start or end of a transition.
See [Transition Actions](/editor/state-machine/transitions#actions).
### Action Timing
Each action can run at either:
* **Start** — Runs when the state begins
* **End** — Runs after the state completes
### Creating an Action
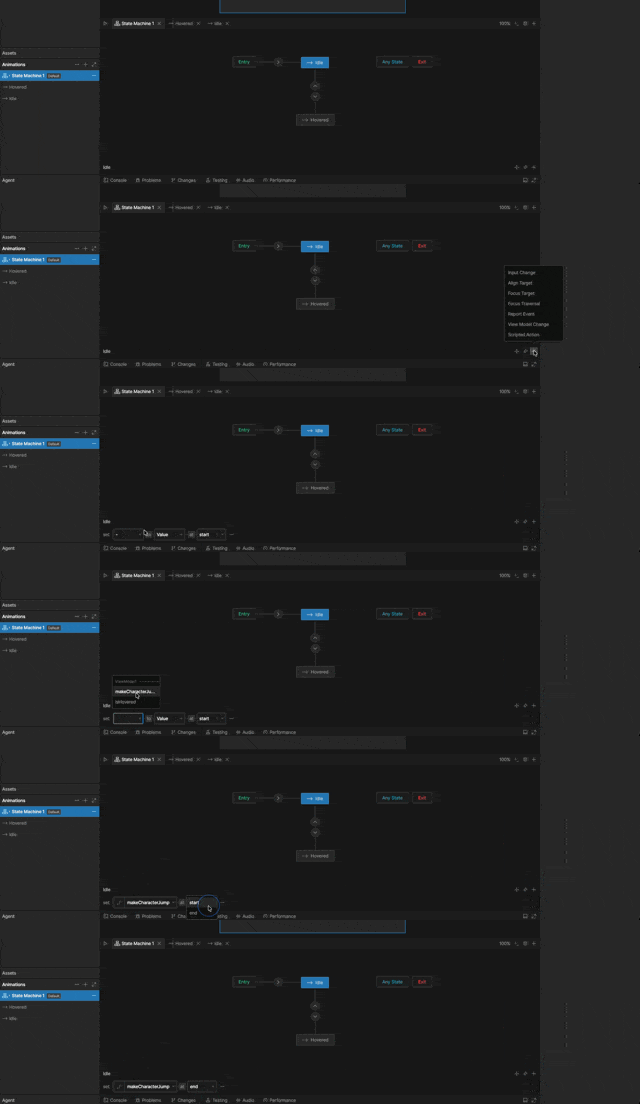 With a state selected, click the `+` button to the right of the state name, and select an action type.
Configure the action based on the action type.
## Common Issues
## Use case: Build a simple button
In this exercise, we will use our state machine knowledge to create a simple button with two layers of interactivity. Hover and click.
With a state selected, click the `+` button to the right of the state name, and select an action type.
Configure the action based on the action type.
## Common Issues
## Use case: Build a simple button
In this exercise, we will use our state machine knowledge to create a simple button with two layers of interactivity. Hover and click.